Author:
Morris Wright
Date Of Creation:
28 April 2021
Update Date:
1 July 2024

Content
- To step
- Part 1 of 4: Opening the registry editor
- Part 2 of 4: Backing up the registry
- Part 3 of 4: Finding your way around the registry editor
- Part 4 of 4: Create and delete registry entries
- Tips
- Warnings
This wikiHow teaches you how to open and use the Windows Registry Editor, also known as "regedit". The registry editor allows you to make changes to system files and programs that you otherwise wouldn't be able to access. Changing the registry incorrectly can cause permanent damage to your operating system, so it is best to leave the registry alone if you are unsure of what to do with it.
To step
Part 1 of 4: Opening the registry editor
 Open Start
 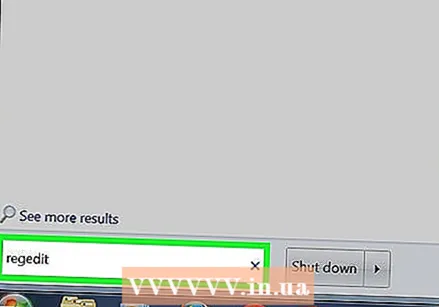 Type regedit in Start. This is the command that opens the registry editor.
 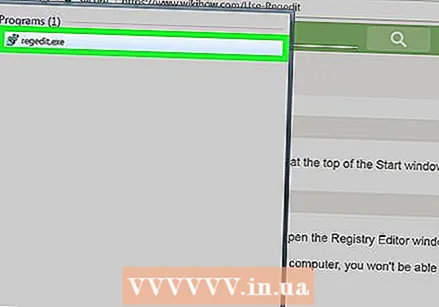 click on regedit. This is a series of blue blocks at the top of the Start window.
 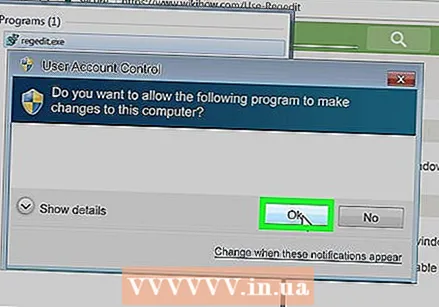 click on Yes when prompted. The registry editor window opens.
 - If you are not an administrator on your current computer, you cannot open the registry editor.
Part 2 of 4: Backing up the registry
 click on Computer. This is the monitor icon at the top of the sidebar (left of the window) of the registry. This will select this.
 - You may have to scroll up the sidebar to see this icon.
- With this step, you can back up the entire registry, but you can also do this with a specific folder or set of folders in the registry.
 click on File. This tab can be found in the top left of the register window. A drop-down menu will appear.
  click on Export…. This option can be found at the top of the drop-down menu. The window for exporting the registry file opens.
  Enter a name for the backup file. Type the name of the backup. It's a good idea to use the current date or something similar to indicate the file, in case you need to restore the backup.
 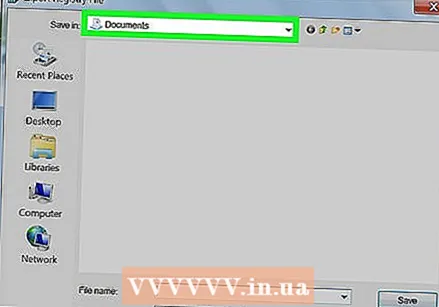 Select a storage location. Click a folder on the left side of the registry export window to designate it as where the backup will be saved, or click a folder in the center of the window to create a folder. in your current location.
  click on Save. This button is at the bottom of the window. This will make a copy of the current settings, values, and other information in the registry. If something goes wrong with the registry while you are working with it, you can restore this backup to fix minor to moderate errors.
 - To restore a backup of the registry, click the tab File, on Import… from the drop-down menu, and select the registry backup file.
- You should always make a new backup of the entire registry before editing it.
Part 3 of 4: Finding your way around the registry editor
 click on > next Computer. This icon is located to the left of the Computericon you selected while backing up. The map Computer will be expanded, showing the folders contained in it, below the icon Computer.
 - If Computer already shows several folders below it, it is already expanded.
 View the default folders of the registry. There are usually five folders in the folder Computer:
 - HKEY_CLASSES_ROOT
- HKEY_CURRENT_USER
- HKEY_LOCAL_MACHINE
- HKEY_USERS
- HKEY_CURRENT_CONFIG
 Click on a folder of the registry. Clicking on a folder in the registry editor will display its contents in the right pane of the registry editor.
 - For example, if you click on the folder HKEY_CURRENT_USER, you will see at least one icon on the right side of the window, named (Default).
 Expand a folder of the registry. Click on the > on the left side of the folder to expand it and view its contents. This applies to every folder in the registry, regardless of which of the folders.
 - You can also double-click on folders to expand them.
- Some folders (such as HKEY_CLASSES_ROOT) contain hundreds of sub-folders, which means that expanding them results in an overview of sub-folders in the left sidebar. The registry isn't always easy to navigate when this happens, but all directories are in alphabetical order.
 View the menu items. This can be found at the top left of the register window, and contains the following items:
 - File - Import or export a register file, or print a selected item.
- edit - Change aspects of a selected registry item, or create a new one.
- Display - Enable or disable the registry address bar (not every version of Windows 10 has this feature). You can also view the binary data of a selected register item.
- Favorites - Add a selected registry item to your favorites folder.
- Help - View Microsoft's help pages for the registry.
 Double-click an item of a registry folder. You will see an icon with ab in red and name (Default) in most registry folders. By double clicking on it you can view its contents.
  click on Cancel. This will close the registry entry.
Part 4 of 4: Create and delete registry entries
 Go to the folder where you want to create the item. You can do this by expanding the folder, going to a child folder, expanding it, and repeating this until you reach the folder you are looking for.
  Select the folder. Click on the folder where you want to create the item. A folder is selected, so whatever you create ends up in that folder.
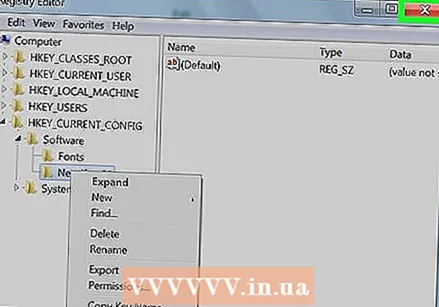
  Click on the tab edit. You can find this in the top left corner of the window. A drop-down menu will appear.
  Select New. This option is located at the top of the drop-down menu. A slide-out menu will appear next to the drop-down menu.
  Select the item you want to create. Click on one of the following items:
 - String Value (string value) - These are the things that control system functions (such as the keyboard speed or the size of icons).
- DWORD Value - DWORD values work with string values to determine how certain system processes work.
- Key - A registry key is just a folder.
- There are several variations of DWORD values and string values, which you can select depending on the instructions you have been given.
 Enter the name of the item. Type in a name for your DWORD, string value, or key, and press ↵ Enter. The item will be created in the location you specify under the name you just entered.
 - If you want to edit the item, you have to double-click on it to open and change its contents as desired.
 Delete your registry entry. Keep in mind that doing this for an item other than the one you just created can permanently damage your system. To delete a registry entry, do the following:
 - Click on the registry entry.
- click on edit
- click on To clear
- click on OK when prompted.
 Close the registry editor. Click on the X in the top right corner of the registry editor window. The registry editor will close.
Tips
- There are several applications available to make changes to the registry without having to deal with Regedit's intimidating interface.
Warnings
- Changing the registry incorrectly will most likely damage your system, and in some cases make it impossible for you to work with it. Test your changes in a virtual machine before applying them to your computer, and do not make changes that were not made by a technician.


