Author:
John Pratt
Date Of Creation:
12 April 2021
Update Date:
1 July 2024

Content
- To step
- Method 1 of 3: Search for the file in the Recycle Bin
- Method 2 of 3: Look in the Time Machine
- Method 3 of 3: Using data recovery software
We are all familiar with the nauseating feeling as soon as we realize that we have accidentally deleted an important file. It may seem like it is gone forever, but there are actually several ways you can try to recover the file. If you haven't emptied the Recycle Bin yet, that's the first place to look. If you have made backups with Time Machine, you can restore the file that way. If nothing worked, you can try to recover the file with recovery software, which is sometimes offered for free and allows you to search the hard drive for the deleted file.
To step
Method 1 of 3: Search for the file in the Recycle Bin
 Open the Recycle Bin. Items you have deleted are usually sent to the Recycle Bin. The Recycle Bin will keep the files until you permanently delete them. You can open the Recycle Bin from the desktop.
  Find the item you want to restore. You can scroll through the Recycle Bin to find the file or files that you accidentally deleted. If the item is no longer in the Recycle Bin, you may need to try one of the following methods.
  Right click on the item and select Put it back. If this option is not available, the original location is no longer present. You will instead have to drag the file out of the Trash and place it on your desktop. You can then move the file wherever you want.
Method 2 of 3: Look in the Time Machine
 Open the window with the item you want to restore. If you used the Time Machine feature to back up your files, you may be able to restore an older version of the deleted file. Open the folder where the file was originally located. For example, if you deleted something from the Documents folder, open that folder.
  Connect your external storage medium with Time Machine on it to the computer. If your Time Machine backups are on an external drive or on a network drive, make sure that drive is connected before continuing.
 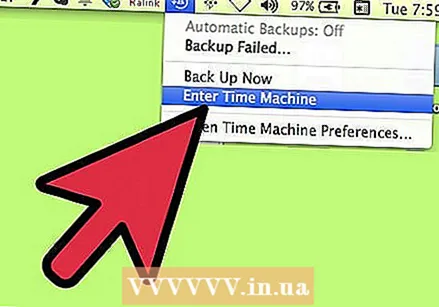 Click the Time Machine menu. You can find this in the menu bar. Choose Activate Time Machine. Your computer may take a few moments to connect the Time Machine drive.
  Find the backup of the file. Use the arrows to move back and forth between the snapshots of that folder, or use the timeline on the right side of the screen to go directly to a particular backup. If the entry on the timeline is gray, it means that the backup disk with the snapshot is not connected.
 - You can use the search bar to find specific files in the snapshot.
 View the old file. Double-click the file to open it. This allows you to see which version of the file is included in the snapshot. Use the preview to find the version of the file that is closest to the version of the file you are looking for.
  Recover the file. Once you have found the file you were looking for, select it and click Restore. The item will be returned to its original location. You can select multiple items to restore them all at the same time.
 - If the item was in multiple folders that have since been deleted, you may be asked if you want to recreate those folders so that the file can be recovered.
Method 3 of 3: Using data recovery software
 Immediately stop using the disc. The key to recovering files using data recovery software is to stop using that drive right away. When a file is deleted, it can be overwritten. If you stop using the disk immediately, you increase the chances that the file has not been overwritten yet.
 - Do not open any program or save, create or delete any file, and shut down your computer if the deleted file is on your startup disk.
 Download a file recovery program. Make sure to download the program on another computer or disk so that you don't accidentally overwrite the file you want to recover. Some popular programs are:
 - PhotoRec (Free)
- Disk Drill (Free)
- Data Rescue
- FileSalvage
 Install the program on a USB drive (if possible). If successful, install the file recovery program on an external drive or USB stick. This allows you to run the program from that external storage medium, preventing anything on the hard drive from being overwritten.
  Scan your disk. The process varies depending on the program you choose, but generally you will be able to select a drive to scan. Select the drive that contained the file that was accidentally deleted. You may be asked to indicate the type of files to search for. By refining the search you can increase the speed of scanning.
 - You may be able to choose from Quick or Full / Deep scan. Try Quick scan first to see if your file can be recovered as Full scan can take a long time. If Quick scan fails to recover the file, try a full scan.
- Some data recovery programs come in the form of a bootable image. In principle, this makes it possible to recover more files than with a scan from OS X.
- If you are using PhotoRec, you will need to specify the file system of the drive you are using. You can select "Other" if the disk is not formatted according to the EXT2 / EXT3 file system.
 Select the files you want to recover. After scanning your drive, you will be presented with a list of files that can be recovered. Filenames are often destroyed, so you will probably have to look at each file to find what you are looking for.
 - Not all files can be recovered. You may have to search multiple files to find what you are looking for, because the file names will no longer be recognizable.
 Save your files. After selecting the files you want to recover you will be asked where you want to save the files. If you have more files to search, do not keep the recovered files on the drive you erased them from. Save them to an external drive or another connected drive.
 - If you are trying to recover a large number of files, do it with the main ones first. Even the recovery process can overwrite and damage deleted files, so make sure to bring the most important ones with you first.


