Author:
John Pratt
Date Of Creation:
11 April 2021
Update Date:
1 July 2024

Content
- Ingredients
- Basic recipe London Broil
- Balsamic marinade
- Asian marinade
- Tequila Jalapeño Marinade
- To step
- Part 1 of 3: Preparing the meat
- Part 2 of 3: Grilling the meat
- Part 3 of 3: Serving the meat
- Tips
- Warnings
What exactly is a London Broil? The answer to this question is actually a bit vague - for some, "London Broil" is a cooking method; for others, the term refers to a specific piece of meat. Culinary experts agree that the dish doesn't even originate from London! However, the following is certain: London Broil is a flank steak that, when cooked properly, is filling, flavorful and nutritious. While the London Broil can be prepared in a number of ways, marinating and slow grilling are an easy way to give the meat delicious texture and flavor.
Ingredients
Basic recipe London Broil
- 1-1.2 kilos of bavette (for about six people)
- Salt and pepper to taste
- Olive oil or canola oil
Balsamic marinade
- 4 tablespoons of balsamic vinegar
- 4 cloves of garlic, finely chopped
- 3 tablespoons of lemon juice
- 160 ml olive oil
- 3 tablespoons of mustard
- Red pepper flakes to taste
- 1 tablespoon of soy sauce
Asian marinade
- 180 ml soy sauce
- 5 cloves of garlic, finely chopped
- 3/4 cup cilantro, cut into pieces
- 1 tablespoon of brown sugar
- 2 tablespoons of sesame oil
Tequila Jalapeño Marinade
- 240 ml tequila
- 1 jalapeño pepper, seeded and cut into pieces
- 240 ml teriyaki sauce
- 1 clove of garlic
- 1/4 sesame oil
- 60 ml Worcestershire sauce
- Salt and pepper to taste
To step
Part 1 of 3: Preparing the meat
 Buy good quality bavette. There's no getting around it: if you use high-quality meat, it is much easier to get a great tasting result than if you use mediocre meat. While good chefs can make a tasty London Broil from a cheap cut of meat, it remains challenging, so opt for a high-quality cut of beef whenever you can. If you're unsure which cuts of bavette are best, ask your local butcher.
 - In the US, the US Department of Agriculture ranks beef as "Select", "Choice" or "Prime" (in order of quality improvement). "Prime" cuts are generally the most flavorful and well-marbled meat, so choose this one when available.
- Some butchers may call a portion of the meat called "top round steak" London Broil, instead of bavette.
 Make your meat more tender. Bavette has a somewhat unfair reputation as a tough, tasteless piece of meat. However, this is only true if the meat is poorly prepared. There are a number of ways to tenderize flank steak before you even start cooking it. The easiest? Work it with a meat mallet on a clean cutting board. This breaks the meat's hard muscle fibers, giving it a softer texture.
 - Do not use powders to tenderize meat with papaya or pineapple extracts. These are tricky to use and can sometimes tenderize the meat unevenly, giving it a mushy outside and chewy inside.
 Marinate your meat. Working your bavette with a hammer isn't the only way to make the meat more tender. Bavette can also be improved by marinating the meat for a while before cooking - this not only gives the meat a chance to absorb some of the flavor of the marinade, but also makes it a bit more tender (although this is not is always the case).
 - We've included a few sample marinade recipes here. To marinate your meat, combine the ingredients from one of the recipes above (or your own), place the meat in an airtight plastic bag, pour the liquid ingredients over and seal the bag. Finally, let it sit in the refrigerator for at least several hours. Usually half a day of marinating is enough for the meat to absorb as much flavor as possible.
- To help the steak absorb the marinade, score the meat before marinating. Use a sharp knife to make a few X-shaped cuts on the surface of the meat, about half an inch or so deep, before placing it in the marinade.
 Heat the grill. When the meat has marinated long enough, remove it from the refrigerator and let it come to room temperature. While you wait, turn on the grill. Allow the grill to reach medium heat before cooking the meat - the grill should be hot enough to "sear" the meat for a while, but not so hot that the meat dries out during cooking.
 - For optimal tenderness, let the meat cook slowly after the first searing. This is easy on a gas grill - just set one burner on medium and another on low. On a charcoal grill, this is a bit trickier - make a large pile of charcoal on one side of the grill and a small one on the other.
- With a charcoal grill, remember that the charcoal is not ready to cook the meat once it has caught fire, but only when it has been overturned and emits an orange glow.
Part 2 of 3: Grilling the meat
 Place the meat directly on the grill. Remove the meat (which is now about room temperature) from the marinade and pat it dry with a paper towel. Lightly brush the edges of the grill with a little olive or canola oil, then gently place the meat on top. You should immediately hear a hissing noise - if you don't, your grill probably isn't hot enough. Let your meat cook without a lid on the grill.
 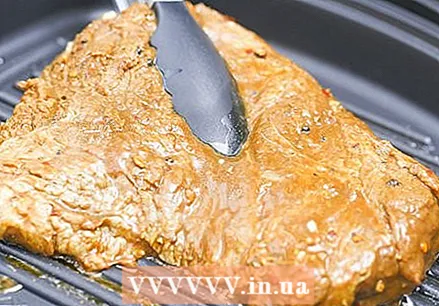 Turn the meat once during cooking. Resist the urge to turn the meat regularly - otherwise the meat may dry out. The exact time it takes for each side of the meat to cook can vary greatly depending on both the doneness you want and the thickness of the meat. In general, thicker pieces will take a few minutes longer per side, as will (of course) more well-done dishes. Below are some general guidelines for how long the meat will last per side " must yarn:
 - Rare: 2 minutes for a 1/2 inch steak, 2-3 minutes for a 1/2 inch steak, and 3-4 minutes for a 1/2 inch steak.
- Medium: 3-4 minutes for a 1/2 inch steak, 4-5 minutes for a 1/2 inch steak, and 5-6 minutes for a 1/2 inch steak.
- Welldone: 5-6 minutes for a 1/2 inch steak, 6-7 minutes for a 1/2 inch steak, and 8-9 minutes for a 1/2 inch steak.
 Move the meat to less heat. If you have divided your barbecue into a hot and a cooler section (as described above), once your meat starts to cook, you can transfer it to the cooler section. Leave it there for a few more minutes with the lid closed. Cooking the meat for longer on a lower heat helps to make it as tender as possible - this is why exceptionally tough cuts of beef like brisket are sometimes cooked over low heat for an entire day.
  If you haven't marinated the meat, brush it with your favorite sauce. If you didn't have time to apply a marinade before cooking, you can still add some extra flavor to your meat during the cooking process. Using a grill brush and a small bowl of your favorite sauce, brush the top of the meat generously with sauce, repeating after turning it over. Brush each side again with the sauce about thirty seconds before removing the meat from the grill. While the complex flavor combinations possible with marinades aren't possible with this trick, a cut of meat generously slathered with barbecue sauce, sriracha, or any other delicious sauce can be excellent on its own.
  Remove the meat when it is well cooked. The meat is ready when it has a pleasant brown color (with black spots) and a fork inserted into the thickest part of the meat does not meet tough, uncooked pieces. If you're not sure if the meat is cooked, cut into it to check for deep red uncooked parts.
 - Another way to check your meat for doneness is with a meat thermometer. Stick this into the thickest part of the meat with the thermometer showing about 57C for medium-rare; and ten degrees more for medium to well-done. If the meat is hotter than this on the inside, it can dry out, so take it off the heat immediately!
Part 3 of 3: Serving the meat
 Let the meat "rest" before carving it. As with most other cuts of meat, the bavette is most tender and flavorful if it has been allowed to rest and cool for a while after the meat has come off the grill. If the meat is cut right after removing it from the grill, you will notice the meat juices running out onto the plate. These juices are responsible for the flavor and texture of the meat, so this will make the meat less tender and tasty. If you give the meat a short rest before carving it, it will have a chance to re-absorb these juices, allowing the meat to retain much of its juiciness and aroma.
 - To "rest" your meat, place it on a clean plate or dish under an aluminum foil tent, and let it rest for 10-15 minutes. The foil helps the meat retain its heat while it rests.
 Cut against the direction of the fibers. Bavette is made up of long, thin muscle fibers - you can think of them as tiny, faint lines running the length of the meat. If left intact, these fibers can be difficult to chew. However, cutting the meat diagonally, perpendicular to the grain of the meat, cuts the fibers, making the slices of meat much more tender. That is why the London Broils are traditionally served as narrow, diagonal slices against the fibers of the meat.
  Season the meat as desired. Divide your London Broil into portions of a few slices of each. You can season the portions individually if you wish. A little salt and freshly ground black pepper can almost always be combined with London Broil, but other spices can also be tasty. The following are just a few herbal ideas:
 - Spice mixes
- Rosemary, thyme and roasted garlic
- Chili powder
- Paprika
- Grilled / fried onions
 Enjoy it! Congratulations! Your delicious London Broil is ready to eat. Try this classic dish with roasted vegetables or as a topping on a sandwich for classic flavor combinations.
Tips
- You can also add oregano or other spices to the meat when it's done to give it more flavor.
- If you're not sure how "cooked" you want the meat to be, choose rare or "medium rare" first. You can always let the meat cook longer if you don't like it, but you cannot "undercook" meat that is "well done"!
Warnings
- Don't pierce your meat with a fork to turn it. Instead, turn the meat over with a long meat tong. Piercing meat can cause the meat juices to be released, making the end result drier.


