Author:
Judy Howell
Date Of Creation:
1 July 2021
Update Date:
1 July 2024
Content
- To step
- Method 1 of 3: Permanently delete an account
- Method 2 of 3: Safeguard a dormant account
- Method 3 of 3: Turn off iMessage
- Warnings
There is no official way to delete an Apple ID, but you can have it done by customer service if you ask for the correct way. If you don't want to delete your ID completely, you can delete your personal information and stop using your ID. If you've recently switched from an iPhone to a different kind of smartphone, you can turn off iMessage so that you can receive text messages normally.
To step
Method 1 of 3: Permanently delete an account
 Make sure you want to permanently delete your Apple ID. When you delete your Apple ID, you will no longer be able to access all services and purchases associated with it. For example, you will no longer be able to access iCloud Mail and iCloud Drive. You will lose all purchases made with the account, including iTunes, the App Store or other Apple web shops. You will also no longer be able to access iMessage.
 - You may not need to delete your account completely if you want to keep access to your account and purchases. You can change your account details so that all your payment details and personal details are deleted. This way you can let the account exist without having to worry that someone can access your data. Go to the next method for detailed instructions.
- If you have recently switched from an iPhone to another smartphone type and you are no longer receiving text messages, please go to the "Turn off iMessage" section.
 Delete all email addresses associated with the account. When you permanently delete an Apple ID, you cannot create a new ID with the same email address. Many people don't realize that you can't use the other email addresses associated with the account. Make sure to also delete these other email addresses from your account before deleting the account itself. This way you can later create a new account with one of these email addresses.
 - Go to appleid.apple.com and log in with your Apple ID.
- Click on "Edit" next to "Account".
- Click the "X" next to the email addresses you want to remove from the account. This way you can use them again later if you decide to create an account again.
 Generate a Support pin. You need this Support Pin when you call customer service to have your account deleted. You can create a pin code by pressing appleid.apple.com go to the "Security" section and select "Generate PIN".
  Back up any files and email messages you want to keep. You will no longer be able to access your iCloud Mail and your iCloud Drive, so make sure to back up all important messages and files before deleting the account.
 - You can back up your messages in your iCloud Mail by moving messages from your iCloud inbox to an inbox on your computer. You cannot back up emails with an iOS device.
- Make copies of any documents you have stored on your iCloud Drive. It is easiest to open these documents on a Mac computer with Yosemite or higher as you can easily find the files by clicking "iCloud" in the Finder. If you are using an iOS device, you will have to open the documents in the corresponding apps and then share the copies with your computer.
- Back up your photos. All images stored in iCloud will be lost when you delete your account. Make sure you have saved all important images on your computer before deleting your account.
 Call Apple Support. On this page, click on "Get support now" under the heading "Netherlands". Go through the step-by-step plan and leave your details, so that Apple Support will call you back or you can call Apple Support yourself at a later time.
  Call Apple Support at the correct phone number and explain that you want to remove your Apple ID. You will have to prove who you are, and that is what the Support pin you created earlier is for. Removing an Apple ID is not a standard procedure, so the person calling you may be difficult or refuse. Apple does not want you to delete your Apple ID, because then they lose a customer. If the customer service representative cannot help you, politely ask if you can talk to a supervisor and explain your situation again.
 - You will likely be told several times that you will lose access to all of your purchases. You will need to confirm that you understand that you are losing access to your purchases and data.
- All email addresses associated with your account can no longer be used to create a new Apple ID later.
Method 2 of 3: Safeguard a dormant account
 Remove your Apple ID on your computer from iTunes. Before securing your ID, make sure you have completely removed your ID from iTunes.
 - Click in iTunes on the "Store" menu and choose "Show my Apple ID".
- Click on the "Revoke all permissions" button. This will remove your Apple ID from any device you are signed in to with it.
- Click the "Manage Devices" button and delete all your devices. This will stop automatic downloads.
- Turn off auto-renew for all your subscriptions, such as iTunes Radio.
 Remove your Apple ID from your iOS device. Remove your Apple ID from your iOS devices before changing any data. This way you will be able to log in with a new Apple ID.
 - Open the Settings app and tap "iTunes and App Stores".
- Tap your Apple ID at the top of the screen, then tap "Sign Out".
 Log in with your Apple ID appleid.apple.com. If you don't want to delete your account completely, you can delete all your personal information from your account and just let your account exist without doing anything with it. This way you will continue to have access to your old purchases and your iCloud data. Log in to the account management page with your Apple ID and password.
  Change your personal information. Always click on the "Edit" button to change your name, address and date of birth. You can fill in fake data instead of your own data. This way you can remove all your personal information from your Apple ID.
 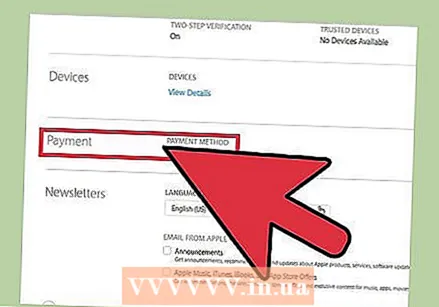 Delete your payment information. On the account management page, find the "Payment Information" section and delete your payment information. You will not be able to delete your payment information if there is an unpaid amount or if you have recently changed the country.
 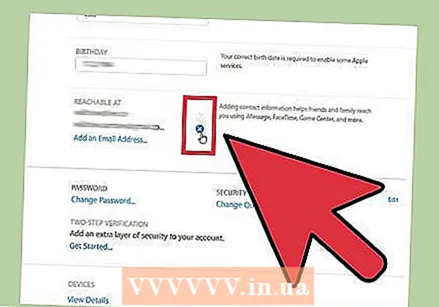 Change your Apple ID email address. If you later want to be able to use your Apple ID email address to create a new Apple ID, you will need to change the email address associated with your account to something else. You can create a new email address for free at Yahoo !, Gmail or another email service and use this new address for your Apple ID. This way you can use your old email address to create a new Apple ID later.
 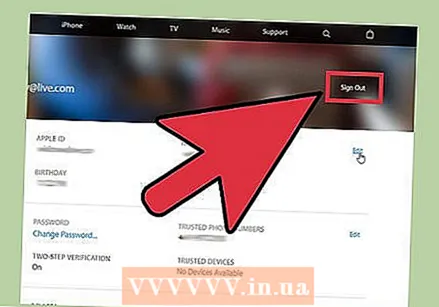 Log out of your account. Your Apple ID no longer contains your personal and payment information, and you can safely leave the account alone. You will still be able to use the account if you want to access your old purchases, but you will not be able to make new purchases unless you re-enter your real data.
Method 3 of 3: Turn off iMessage
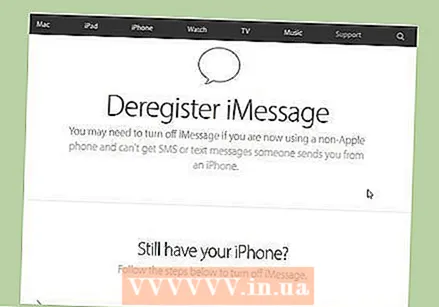 Go to the "Unregister iMessage" page. If you've switched from an iPhone to an Android device or another smartphone, you may not receive the text messages that are still sent to your Apple ID. You can unregister iMessage by going to selfsolve.apple.com/deregister-imessage/en/en to go.
  Enter your phone number. Enter the phone number on which you are not receiving your messages correctly. You will then receive a text message from Apple containing a confirmation code.
  Enter the confirmation code you received. By entering this code you confirm that you are the owner of the phone number. Your iMessage account will now be disabled. You should now receive all of your text messages in the normal way.
Warnings
- It is not possible to merge multiple Apple IDs. If you have created a new account, you will not have access to the data of your old account. You will have to log in with your old ID.


