
Content
- To step
- Method 1 of 7: Fix the underlying problem causing the headache
- Method 2 of 7: Massaging the aconite muscles
- Method 3 of 7: Stretch the back neck muscles
- Method 4 of 7: Manipulating the temporal leg muscle
- Method 5 of 7: Use pressure on the muscles of the face and scalp
- Method 6 of 7: Activate different jaw muscles
- Method 7 of 7: Relieve headaches with heat and cold
- Tips
- Warnings
You may think that only about 100 people get a headache every day, but the reality is that millions of people suffer from all kinds of headaches on a regular basis, and the most common excuse for headaches is absence. Most headaches fall into one of these three categories — tension headaches, migraines, or cluster headaches. Tension headaches are usually caused by muscle and postural problems, and can get worse when you are stressed, anxious, tired, depressed, or when there is a lot of noise or light. Migraine headaches aren't necessarily worse than tension headaches in the sense of pain, but instead they tend to focus on just one side of your head and can worsen when you move, talk, or cough. Cluster headaches are defined as pain that (usually) starts after you fall asleep, first at a lower intensity and increasing to a peak that can last for several hours. Regardless of the specific type of headache you are suffering from, there are multiple pressure points on your head, neck, eyes and upper back that, when massaged, can provide relief from your existing headache.
To step
Method 1 of 7: Fix the underlying problem causing the headache
 Start a headache diary. To help you identify the underlying causes of your headaches, you can keep a headache diary. You should write in your journal every time you have a headache and keep a record of the following:
 - When the headache took place.
- Where the pain was in your head, face and / or neck.
- The intensity of the headache. You can use a personal rating scale from one to ten on which you have defined each level based on your personal experience.
- What activities you were doing when the headache started, including where you were.
- A note about how well you slept the night before experiencing the headache.
- A note about what you ate, drank, heard, or smelled in the 24 hours prior to the headache.
- A note on how you felt before the headache started.
- Any other points you find useful.
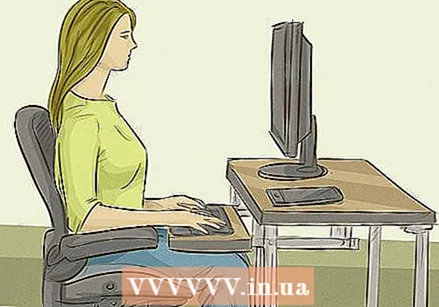 Set up your workplace correctly ergonomically. Uncomfortable and improper furniture (such as your desk, chair, keyboard, monitor, mouse, etc.) can cause your body to be in poor posture for long periods of time. This bad posture can cause all kinds of long-term muscle problems, which in turn cause headaches. You can either customize all of your office furniture on your own or hire a specialist company to do it for you.
 - You should never have to turn your head, or look up or down, to look at your computer screen. It should be straight in front of you, a little below eye level. If your display stand cannot be adjusted to the correct height, use books, boxes, a short shelf, or whatever you have that can support the display.
- You shouldn't have to reach very far for your keyboard and mouse. You should be able to comfortably rest your arms on the armrests of your chair with your hands touching both the keyboard and the mouse.
- When you sit on your office chair, you shouldn't have to reach with any part of your body to sit in a relaxed position. Your legs should be at 90 degree angles and your feet should be flat on the floor. Your arms should be at a 90 degree angle where your arms or wrists can lean on the armrests or desk. You should be able to lean back comfortably with enough support for your spine. You should never sit forward in your chair with your feet on the wheels! In fact, it is best if your chair cannot move on wheels.
- You should never hold a phone between your shoulder and your ear. Use the speaker, headset, or a bluetooth device to talk on the phone if you want your hands free.
 Use pillows and mattresses that support your body well. Your pillow should keep your spine straight whether you are lying on your back or on your side. Don't sleep on your stomach. Your mattress should be firm, especially if you have a sleeping partner. If your sleeping partner is heavier than you, make sure your mattress doesn't dent so much that you roll into him or her. When this happens, you probably subconsciously hold yourself back to keep from rolling.
 - If you're not sure if your mattress is firm enough, try sleeping on the floor or on a camping mattress for a few days. If you notice that you sleep better on the floor, your mattress is not nearly firm enough.
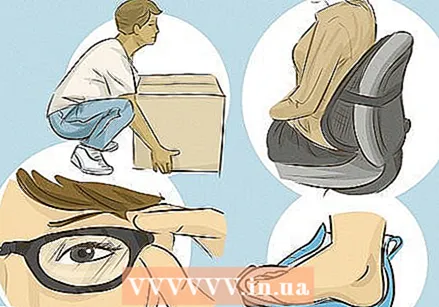 Treat your muscles with respect. Lift with your legs and not with your back! Take frequent breaks if you are in the same position for a long time. Consciously relax your muscles and take a few deep breaths every now and then. Don't clench your jaw. Do not carry your shoulder bag or backpack over one shoulder, carry it diagonally (for shoulder bags) or over both shoulders (for backpacks). Only wear properly fitting shoes with arch support. Wear high heels as little as possible. Use spinal support on any chair or seat that you will be sitting in for longer (such as your car, work, dining chair, etc.). Make sure that your prescription is still up to date and that you don't have to make an effort to see your book or screen.
  Take a multivitamin. The food we eat every day does contain some necessary vitamins and minerals, but it is unlikely that you will get all the necessary vitamins and minerals in the correct amounts every day. A good multivitamin or a combination of more than one individual vitamin will ensure that you get what you need. Doctors recommend making sure you get enough vitamins C, B1, B6, B12, folic acid, calcium, magnesium, iron and potassium.
 - If you are also taking other medications, consult your doctor before choosing a multivitamin.
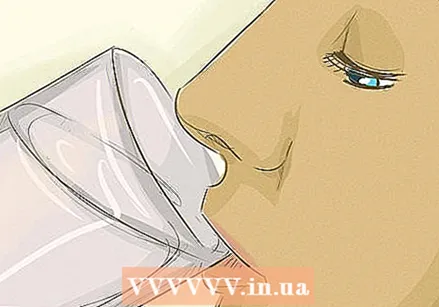 Make sure you stay well hydrated. If you have ever spoken to a doctor, nurse, nutritionist, masseur or other therapist you have probably been told to drink more water! In general, an adult should drink eight glasses or 2 liters of water per day. And that amount should increase when you exercise or when it is very hot and you sweat.
 - It can be very difficult to drink the recommended amount of water, especially if you are busy and always on the go. If you struggle with it, force yourself to take a reusable bottle of water with you everywhere you go and refill it at every opportunity. Always keep it handy and always give in to the temptation to take a sip!
 Adjust your caffeine intake. Most people don't like it when they are told to limit the amount of caffeine they consume! And ironically, many headache medications contain caffeine as an ingredient. This is because caffeine can help a headache at first, but if you consume too much on a daily basis, the caffeine causes more muscle tension and other internal problems.Try to stick to the equivalent of two cups of coffee a day. This includes anything you consume with caffeine in it, including coffee, tea, soda, medications, and some chocolate.
  See your doctor to discuss specific emotional or physical issues that can be causing headaches. This could include emotional problems such as depression or anxiety, and physical problems such as sleeping problems, infections, hormone imbalance, thyroid function, blood sugar levels, and more. Your doctor can determine and, if necessary, perform lab tests to determine if you have any of these underlying problems, and then develop a treatment plan specifically for you.
Method 2 of 7: Massaging the aconite muscles
 Find your aconite muscles. You have two aconite muscles, one on either side of your spine, in the shape of a triangle from the top of your neck to your shoulder to the center of your back. The three parts of the aconite muscle are called the top, middle, and bottom aconite muscles.
 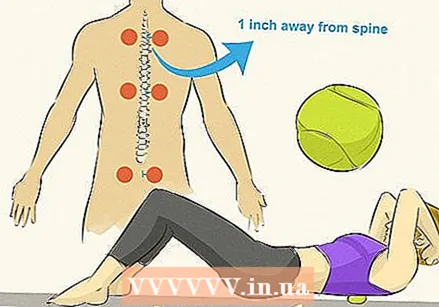 Let the aconite muscle work while you are lying down. To do this, lie on your back with your knees bent. Place a tennis ball under your back about an inch from your spine. Start at the top of your back and work your way down. Lie on the tennis ball for 8 to 60 seconds and then move it lower. Go down to the top of your pelvis and remember to work on both sides of your back.
  Squeeze the aconite muscle. This sounds worse than it feels! Rest your elbow and forearm on a counter or table so they are supported. Use the opposite arm to squeeze the top aconite muscle between your neck and shoulder. Hold for 8 to 60 seconds and then do the other side. Don't push your fingers into your shoulder, just grab the muscle itself.
 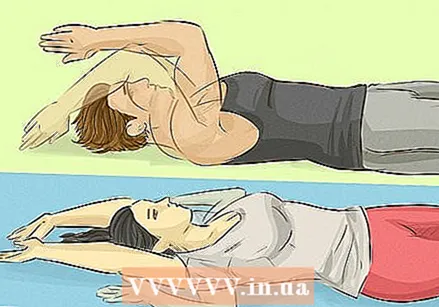 Stretch the aconite muscle. Lie on your back. Start with your arms at your sides. Move your arms so that your upper arms are at a 90-degree angle to the ground and your forearms are at a 90-degree angle with your upper arms. Then put your hands down to touch the ground behind your head. Extend your arms straight overhead with palms facing the ceiling. Then move your hands down until your upper arms form a 90 degree angle with your body. Repeat three to five times.
  Stretch your chest muscles. While your chest muscles are not the aconite muscles, stretching them also helps your aconite muscles. To stretch, you have to stand in an open doorway, next to a corner in a wall. Lift the arm next to the doorway or wall so that the part of your hand up to your elbow is against the doorway or wall. Your palm should be against the doorway or wall. Take the leg one step forward on the same side of your body. Turn your body away from the doorway or wall until you can feel the stretch just below your collarbone. You can raise and lower your arm to target different parts of the same muscle.
Method 3 of 7: Stretch the back neck muscles
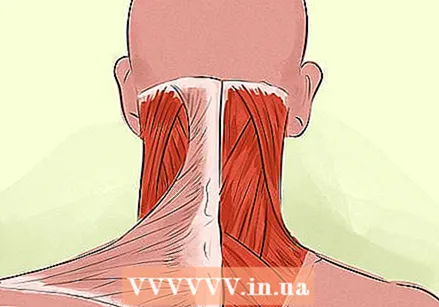 Find your back neck muscles. There are at least half a dozen specific muscles in this area at the back of your back, from the base of the skull to your shoulder blades. Tension in this particular area of your body is probably responsible for the vast majority of headaches.
 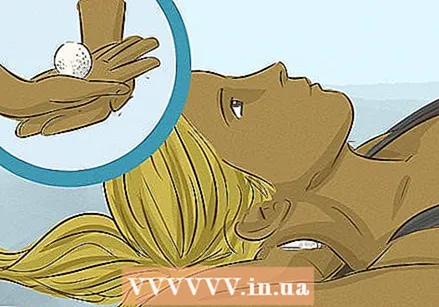 Target the muscles at the base of the skull. Lie on your back with both hands behind your head. One hand must hold the other hand. Hold a golf ball in the palm of the top hand. Place your hands and the golf ball so that they are next to your spine and not on it, then rotate your head to the side to move the golf ball. The only time you need to move your hands is to place the golf ball lower in your neck. Once you've massaged one side of your spine, put the golf ball on the other side and repeat.
 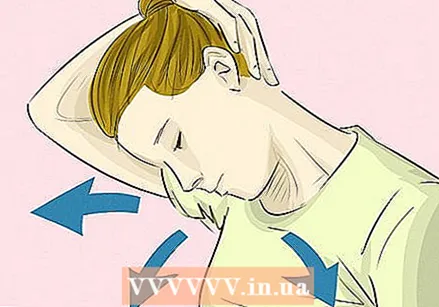 Stretch the back of your neck. You can do these stretches while sitting or even in the shower. Sit up straight and put your hands behind your head. Use your hands to gently pull your head forward until you feel the muscles stretch. You can also use your hands to pull your head forward and about 45 degrees to each side. Then put one hand on top of your head and pull your head towards that side of your body until you feel the stretch. Repeat with the other hand on the other side.
  Stretch your neck muscles when lying down. Lie on the floor on your back. Bend your knees up and put your left hand, palm down, under the bottom of your spine. Place your right hand on top of your head until you feel a stretch while looking at the ceiling. Then use your hand to pull your head back to the right, but this time turn your head about 45 degrees so that you are facing the wall to your right. Finally, turn your head 45 degrees to the left so that you are facing the wall to your left, but use your hand to pull your head back to the right. Repeat the entire process on the left side of your body, with your left hand on your head.
Method 4 of 7: Manipulating the temporal leg muscle
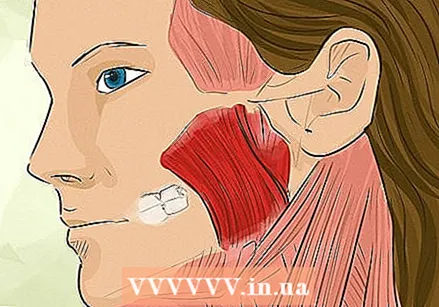
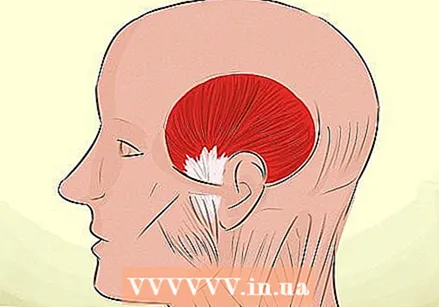 Find your temporal leg muscle. Headaches caused by the temporal leg muscle are very common. The temporal leg muscles are on the sides of your head, from your upper jaw, along the top of your ear, and then back behind your ear. Temporal muscle problems can also be linked to temporomandibular joint problems.
  Apply pressure to the temporal leg muscles. While you are either sitting or standing, press the fingertips of your index and middle fingers on the areas above your temple. While pressing, open and close your jaw a few times. Move your fingers in that area to any area where you feel discomfort and open and close your jaw a few times at each area.
 - As an alternative, you can just yawn and stretch the temporal leg muscle all the time without using your hands to apply pressure.
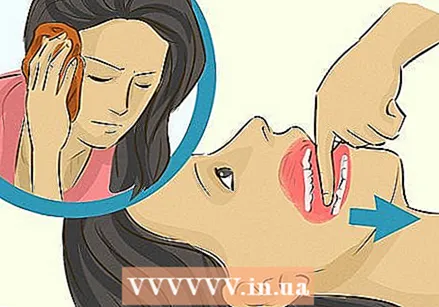 Stretch the temporal leg muscles. Before doing this stretch, warm up both temporal leg muscles by applying warm compresses, a heating mat at a low temperature, or a warm wet cloth on both sides above your ears. Once the muscles have warmed up, lie on your back and look at the ceiling. Place the index fingers of both hands in your mouth and pull your jaw down by applying pressure to the area just behind your lower teeth.
  Tighten the temporal leg muscle. Lie on your back and look at the ceiling. Place your right index and middle fingers on your right cheek, just above your teeth. Place your left index and middle fingers on your lower jaw. Use your left hand to push your jaw to the left. You can repeat the same process on the right by switching the positions of your hands.
 - To do this as a stretch, your jaw must be relaxed and not resist the movement of your jaw to the left and right. If you've been working on the area for a while and want to try to strengthen the muscle rather than just stretch, you can add some resistance to the movement of your lower jaw.
Method 5 of 7: Use pressure on the muscles of the face and scalp
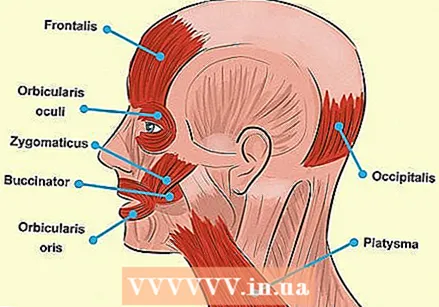 Find the muscles of your face and scalp. There are at least half a dozen specific muscles in your face and scalp that you can work on to relieve your headaches. The areas you can work on include: above each eye, on the edge of your eye socket, just below your eyebrow (eye sphincter); just above the ends of your mouth (big yoke muscle); the area to the left and right of the end of your mouth, when pretending to extend your mouth by 1.5 cm (cheek muscle); directly above your eyes and eyebrows, just to the inside of your face (frontalis); the spots on the back of your head, or at the same level as the top or middle part of your ears (occipital muscle); the spots under your jaw, on both sides if you follow the curve and direction of your earlobe down a few centimeters (platysma).
  Apply pressure to the eye circle muscles. There are two ways to put pressure on these muscles. One method is to just use your index finger and press on the area above your eye and below your eyebrow, on the bone of your eye socket. You know you've found the right place because it probably feels uncomfortable. Another method is to take and pinch this area between your fingers.
  Apply pressure to the cheek muscle and large yoke muscle. You can tackle both places with the same technique. Put your right thumb in your mouth on the left side, with your right index finger on the outside of your mouth in the same area. Pinch the skin between your thumb and your index finger. You need to move your fingers from your cheek to the bottom of your jaw - where you will also find an area that feels uncomfortable. Repeat on the right side of your face with your left hand.
  Apply pressure to the frontalis muscles. This one is very simple - just use your index and middle fingers to apply pressure to the area above your eyebrow, on your forehead. Move your fingers to any areas where you feel discomfort.
 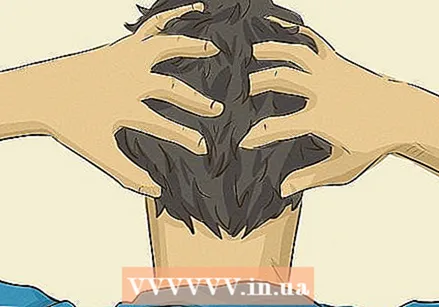 Apply pressure to the occipital muscles. You can tackle the area in one of two ways. The easy way is to just use your index and middle fingers to apply pressure to the areas at the back of your head where you feel discomfort. You can also lie on the floor looking at the ceiling and use a tennis ball to apply pressure to those areas.
Method 6 of 7: Activate different jaw muscles
 Find your jaw muscles. There are many muscles attached to or close to your jaw that help you with important things like chewing. These muscles include: the chewing muscle, which is also in front of you, along your teeth; the lateral pterygoid, which attaches to your temporomandibular joint and up to your cheek; the medial pterygoid, which sits behind your jaw bone; the digastric, which sits under your chin.
 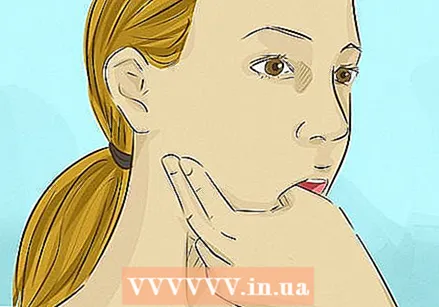 Apply pressure to your chewing muscle. To do so, put your right thumb in on the left side of your mouth, with your right index finger on the outside of the left side of your mouth. Since the masseter muscles are further back towards your ears, you may need to push your thumb slightly towards the back of your jaw, behind your cheek. Then use your index finger (and middle finger if needed), along with your thumb, to squeeze the chewing muscle. You can work your fingers from the top of the muscle (higher on your face) to the bottom of the muscle (closer to your jaw). Once you've done the left side of your face, use your left hand to do the same with the masseter on the right side of your face.
  Stretch your mouth and chewing muscles. Place your right hand on your forehead. Place your left index finger in your mouth, just behind your lower teeth. Place your left thumb under your chin / jaw. Use your left hand to pull your jaw down while using your right hand to keep your head still. Hold for eight seconds. You can do this five to six times to stretch and exercise the muscles of your mouth.
 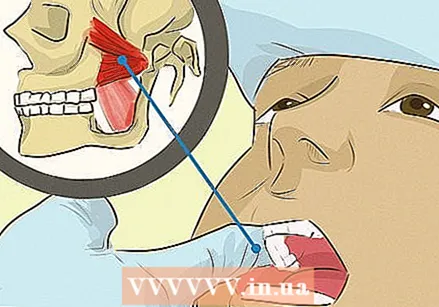 Apply pressure to the lateral pterygoid. These muscles are behind many other things in your face and are not the easiest to achieve on your own. The best way to put pressure on these muscles is to put your left index finger in the right side of your mouth - all the way in the back after your last molar in your upper jaw. If you push your finger up in this area, slightly towards your nose, you should be able to put pressure on the lateral pterygoid. Once you've done the muscle on the right side of your face, switch hands and do the muscle on the left side of your face.
 - Since this is a difficult muscle to reach on your own, don't worry if you can't find it. You may need to enlist the help of a professional to reach this muscle if it is the cause of some of your headaches.
 Apply pressure to the medial pterygoid. As with the lateral pterygoid, the muscles of the medial pterygoid are located behind many things in your face and are not easy to reach. One method is to put your left index finger in the right side of your mouth. Push your finger back down your cheek until you are past the last molar in your upper jaw. Then push your finger against the area near your temporomandibular joint. You can move your finger up and down in this area until you find areas that feel uncomfortable and then hold pressure on those areas for 8 to 60 seconds. Repeat the entire process with your right hand for the left side of your face.
 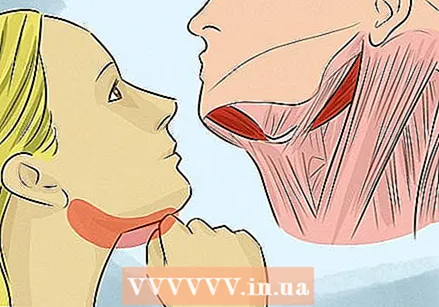 Apply pressure to your digastric. Start by pushing the knuckle of your right index finger into the soft area under your chin, just behind your lower jawbone. Start this process at the front of your chin and move your knuckle back along your jawbone until you are behind your temporomandibular joint by your ear. Press and hold for 8 to 60 seconds in any area where you feel discomfort. Switch to your left side once your right side is done.
Method 7 of 7: Relieve headaches with heat and cold
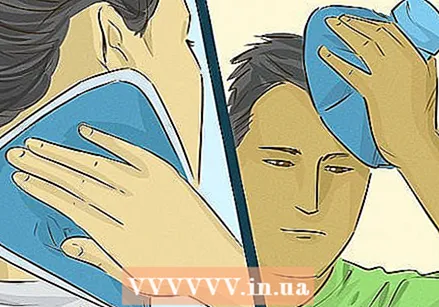 Apply heat or cold to your head or neck. Put an ice pack or ice in a towel and place the towel on the area of your head that hurts. Don't leave it on for more than 10-15 minutes.
 - Another way is to put an ice cube directly on the muscle that hurts and move it back and forth along the muscle for a while. Because you are using ice, you shouldn't keep the ice in one spot on your skin for too long or you could damage your skin or nerves.
- Applying an ice pack to the base of your skull and top of your neck can help with headaches that radiate to the front of your head and face.
 Moisten your face and neck. Moist heat, such as a wet towel or water directly on your body from a shower, is recommended over dry heat, such as a heating pad. You can apply the moist heat to any area of your face or neck that hurts for 10-15 minutes. Heat doesn't always work as well as cold because it can cause rather than reduce inflammation in some areas. If you find that heat is not working for you, you switch to cold.
  Use both hot and cold at the same time. Sometimes the best result comes from using hot and cold at the same time. One such method is to apply a cool compress to the bottom of your head or the top of your neck, plus a moist, warm towel on your upper back and bottom of your neck. To add even more variety, apply a cold compress to the right side of your face and a warm towel to the left side of your face - all at the same time. Switch the hot and cold things every 5 minutes. Do this for 20 minutes in total.
Tips
- If you have trouble visualizing where some of the muscles on your head and neck are, use pictures of the human musculature to narrow down the search and see the big picture.
- Tension headaches can also be caused by TMD (Temporomandibular Dysfunction) or temporomandibular joint complaints. Not only are people with the diagnosis more likely to have tension headaches, but those headaches are often worse and more common.
- Not everyone who has migraines gets what is called an "aura", which can affect their vision and be a precursor to the onset of migraines. Auras can also be non-visual and instead consist of dizziness, vertigo, weakness, tingling or numbness.
Warnings
- Even if you feel relief with massages or pressure point therapy, don't overdo it. To begin with, do self-therapy of pressure points only once a day. Only increase it to twice a day when comfortable.
- If you work on the pressure points, press the pressure point for at least 8, but no more than 69 seconds. The pressure you apply should cause discomfort. If you don't feel anything, don't press hard enough or that place isn't a pressure point for you. If you feel intense pain, release the pressure or stop. Don't hold your breath.
- If you are undergoing any form of therapy from a professional, do not do your own self-therapy on the same day.
- Stretch only after you did your own pressure point therapy, not before.


