Author:
Roger Morrison
Date Of Creation:
19 September 2021
Update Date:
1 July 2024
Content
- To step
- Method 1 of 4: Make a simple bow
- Method 2 of 4: Make a bow with loops
- Method 3 of 4: Make an elegant bow
- Method 4 of 4: Make a bow in the shape of a rose
- Tips
- Necessities
- Making a simple bow
- Make a bow with loops
- Make an elegant bow
- Make a bow in the shape of a rose
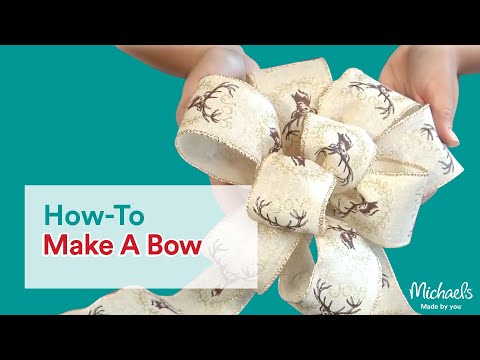
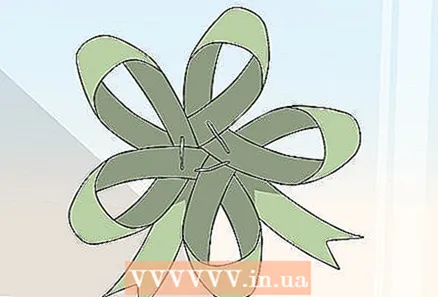
Wire reinforced ribbon can be difficult to work with because it behaves differently than regular ribbon. However, if you know how to work with reinforced ribbon, you can use it to make beautiful bows that are perfect for wreaths, garlands, flower arrangements and other decorations. You can even experiment by coming up with your own variations and making bows with longer ends or more loops.
To step
Method 1 of 4: Make a simple bow
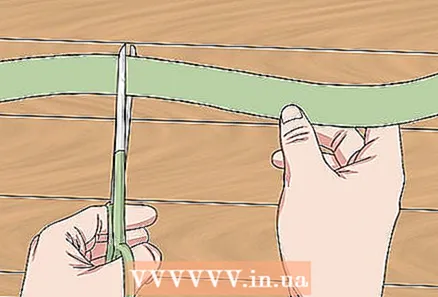 Cut a piece of ribbon. How long you make the ribbon depends on how big you want to make the bow. The wider the ribbon, the more you will have to cut. With this method you can make a bow that looks a bit like the simple bow that you make when tying your shoelaces.
 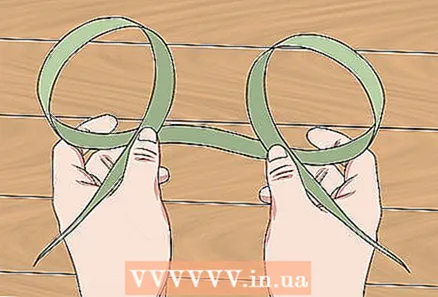 Make two loops in the ribbon. First find the center of the piece of ribbon, then make a loop on both sides of the center. Make sure both loops point upwards.
 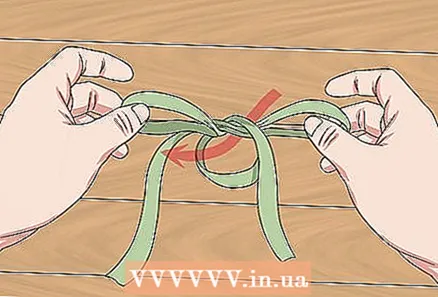 Get the loops over and under each other. Gently pull on the loops to tighten the knot. This is a bit like tying your shoelaces.
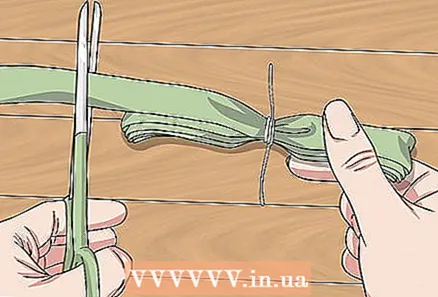
 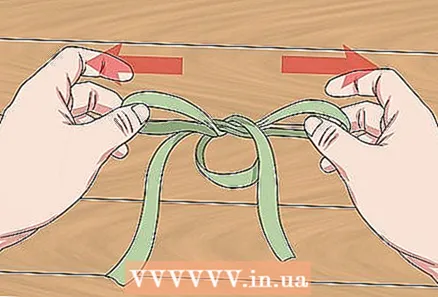 Adjust the length of the ends and the loops carefully. Pull the loops or ends one at a time until they are the desired length. When you find the loops long enough, stop and pull on both loops at the same time to tighten the knot. Don't worry if the ends of the bow are too long.
 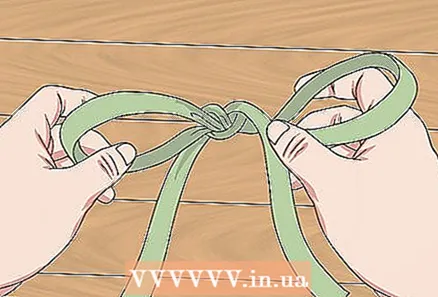 Straighten the knot if necessary. If the ribbon is very wide, the knot may have wrinkles in the center. Slide your index finger under the knot at the front of the ribbon on either side. Straighten the side edges of the knot.
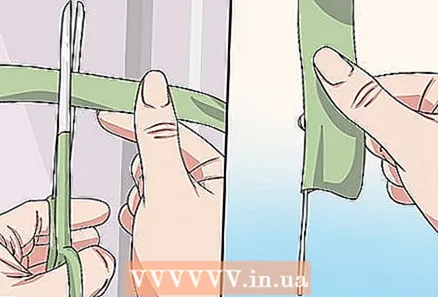
 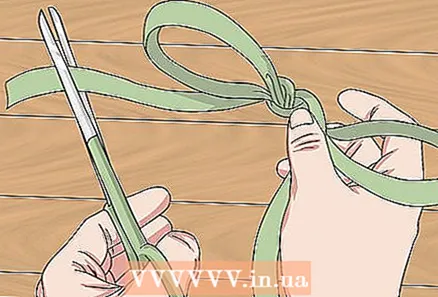 Adjust the ribbon and cut the ends. Use your fingers to make the loops fuller. The iron wire in the ribbon ensures that the loops keep their shape. If necessary, use scissors to cut the ends of the ribbon.
 - You can cut the ends of the bow diagonally or serrated.
Method 2 of 4: Make a bow with loops
 Roll up the end of the ribbon into a small loop. Flip the ribbon over so the wrong side is facing you. Roll up the end of the ribbon so that you get a loop. Hold the loop between your thumb and index finger. This will be the center loop of your bow.
 - Keep your thumb in the loop and your index finger behind the overlapping pieces of ribbon.
- With this method you make a bow that consists of several loops, like the bows used for flower arrangements and wreaths.
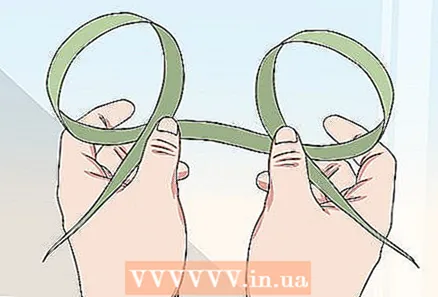 Twist the ribbon and make another loop. Turn the ribbon around briefly so that the right side is facing you. Pull the ribbon under the first loop to make a small loop. Hold the ribbon under your index finger to keep the loop in place.
 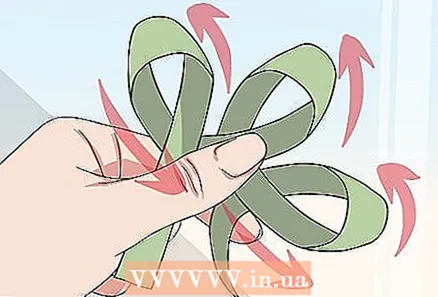 Turn the ribbon again to make another loop. Turn the ribbon again so that the right side is visible again. Make another loop on the other side of the loop in the middle. Make sure the loop is on the same side as the second loop.
 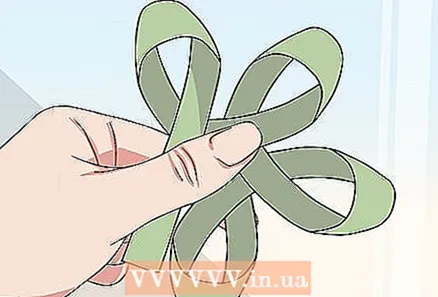 Keep working back and forth and making loops. Always turn the ribbon so that the right side is always visible. Make the loops slightly larger at each row. You can create as many rows and loops as you want.
 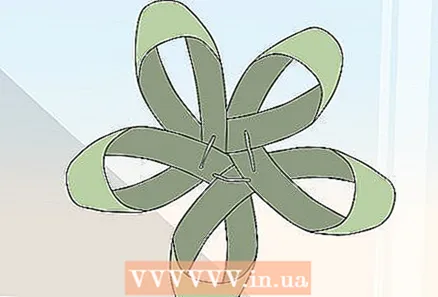 Wrap a piece of floral wire around the center of the bow. Thread a piece of thin floral wire through the first loop in the center. Wrap it under the bow and back through the first loop. Pull the thread to tighten it and wrap it around the center a few more times. Twist the ends of the floral wire around each other to secure it and trim the excess.
 - It is best to use the thin floral wire that florists also use for this. You can also use a pipe cleaner in the same color as the ribbon.
 Consider giving the bow long ends. A bow like this usually has no ends, but you can make them if you want. Cut a piece of ribbon twice as long as the ends should be. Fold the ribbon in half and secure it with a piece of floral wire at the back of the bow.
 - Make the ends of the bow even more beautiful by cutting them diagonally or serrated.
Method 3 of 4: Make an elegant bow
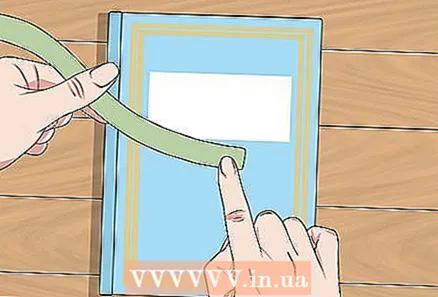 Place the end of a ribbon on the center of the cover of a book. Choose a book that is the same width as the bow you want to make. Place the end of a wide wire-reinforced piece of ribbon on the center of the book's cover. Slide the end of the ribbon one to three inches toward the spine of the book.
 - You can also use a CD or DVD case, or even a piece of loose cardboard.
 Wrap the ribbon around the book five to nine times. Keep the ribbon in the same place as you wrap it around the book. This will make your bow look neater. Don't wrap the ribbon too tightly around the book, or you will find it harder to slide the bundle off.
 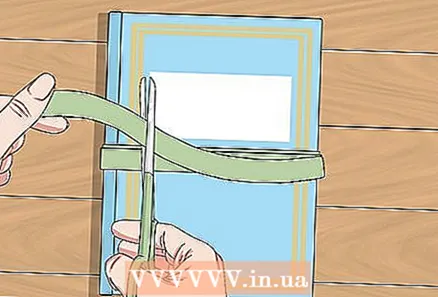 Cut the excess ribbon halfway down the cover of the book. Both ends of the ribbon should overlap one to three inches. This way the bow will not fall apart when you tie it.
 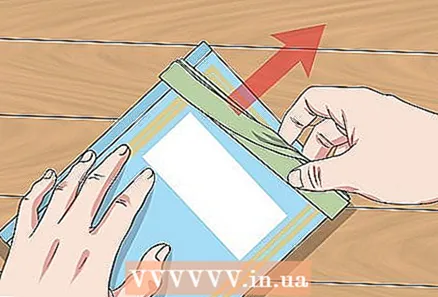 Slide the ribbon off the book. Try to keep the loops in place so that they look nice and neat. Do not lose the center of the bundle where the ends overlap.
 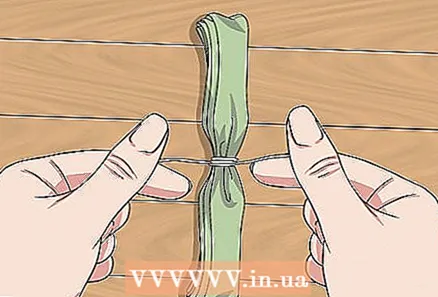 Wrap a piece of floral wire around the center of the bundle. Pinch the center of the bundle together with your fingers first, then wrap a thin piece of floral wire around the center.Wrap the wire tightly around the bundle so that there are folds in the ribbon and everything stays together. Do not cut off the excess floral wire just yet.
 - It is best to use the thin floral wire that florists also use for this. Closing strips for garbage bags are also suitable for this.
 Cut a piece of ribbon for the ends of the bow. The ribbon should be two and a half times as long as the ends should be. For example, if you want to make the ends 30 centimeters long, cut a 75 centimeter piece of ribbon.
 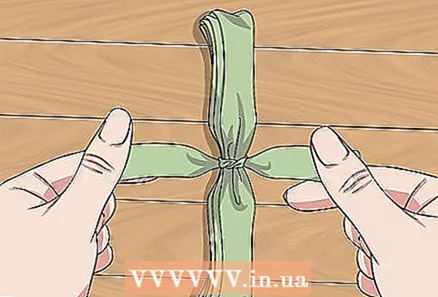 Tie a loose knot in the center of the ribbon for the ends. Make sure to tie a loose knot so that the ribbon does not wrinkle in the front. It is okay if the ribbon wrinkles at the back where the pieces of ribbon intersect.
 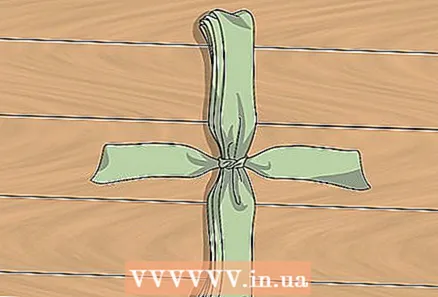 Wrap the ribbon around the center of the bow for the ends. Place the knot in the ribbon in the middle of the bow. Make sure the smooth part of the knot is facing you and not the back of the knot. Wrap the ends around the back of the bow.
 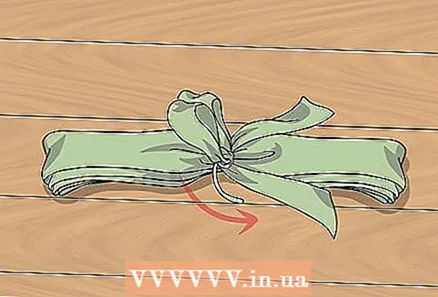 Use the rest of the floral wire to tie the ends of the bow. Keep the ends of the ribbon behind the bow. Pull them tight and wrap the rest of the floral wire around them to keep everything in place. Cut off the excess floral wire.
 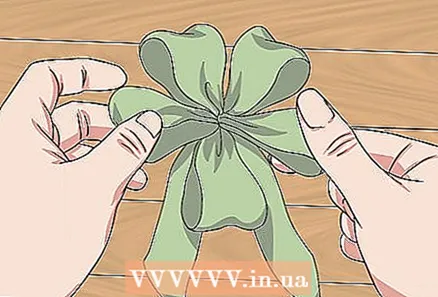 Shape the bow. Move the loops to make the bow look nicer. Use your fingers to make them fuller. If the ends of the bow are too long, you can cut them off with a pair of sharp scissors.
 - Make the ends of the bow even more beautiful by cutting them diagonally or serrated.
Method 4 of 4: Make a bow in the shape of a rose
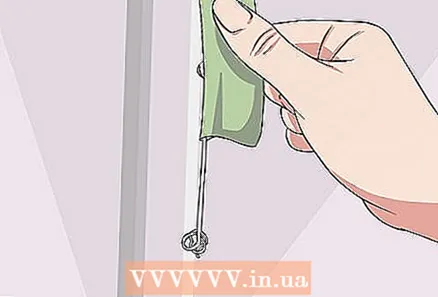
 Cut a piece of ribbon to the desired length and pull out one of the pieces of iron wire. Cut the ribbon first and then slide the end of the ribbon down over the wire until a piece of wire sticks out. Take the piece of iron wire and pull it out of the ribbon. Leave the other piece of wire in the ribbon.
 - Discard the piece of wire you pulled from the ribbon or save it for another project.
- Use a three-foot-long piece of ribbon if the ribbon is three to five inches wide. If the ribbon is thinner, you can use a shorter length of ribbon.
 Tie a knot in one end of the piece of wire remaining in the ribbon. Slide one end of the ribbon down until you see the wire. Gently pull on the wire, then tie it into a knot with a loop in it. This way the ribbon will not slide off the iron wire in the next step.
 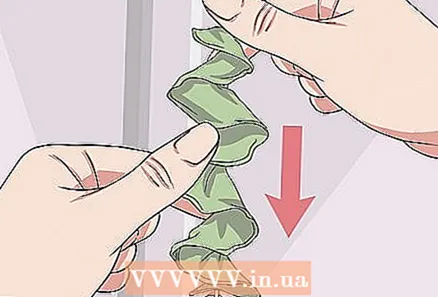 Push the ribbon together on the iron wire. Take the other end of the ribbon. Slide it down until you see the wire. Take the wire and push the ribbon down to the end with the knot in it. Keep pushing the ribbon until all of the fabric is just above the knot.
 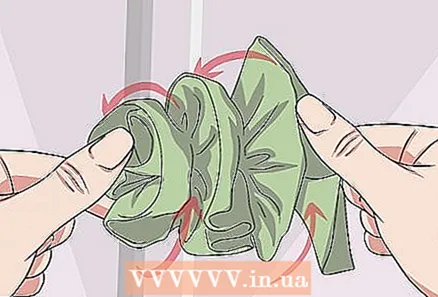 Twist the ribbon into a spiral. Start at the end with the long piece of wire and roll the ribbon into a cone-shaped spiral. The end with the knot in the iron wire forms the bottom / center of the flower. The petals are on the other end.
 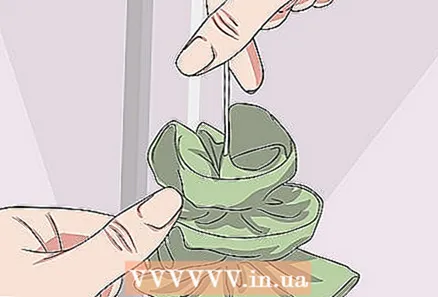 Pierce the iron wire through the center of the flower. Hold the flower in one hand so it doesn't come loose. Use your other hand to take the long piece of wire and push it through the center of the flower. This way the flower stays put together and becomes flatter.
 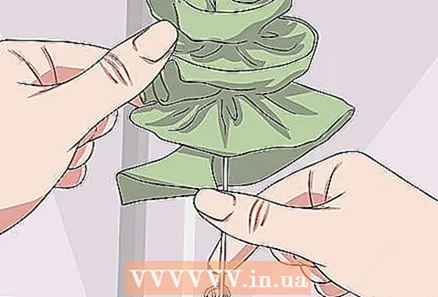 Pass the piece of iron wire through the bottom of the flower. Poke the wire through the bottom of the flower until it comes out the other side. Gently pull it and then run it through the flour again.
 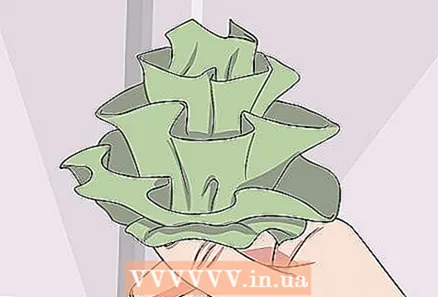 Tie a knot in the wire if necessary. If the flower is not already tied, tie the long length of wire to the knotted end of the wire. Cut the iron wire with sharp scissors or wire cutters.
Tips
- If you want to tie the bow on a wreath or garland, cut less of the wire. Leave a few inches of iron wire.
- You can stick small bows on gifts with double-sided adhesive tape. You can also leave some extra wire and stick it on the gift.
- Choose colors and patterns that match the season. Warm, earthy colors are great for fall. Brighter colors are more suitable for the summer.
- It is best to use a wider ribbon to make a larger bow. If you want to make a smaller bow, it is best to use a narrower ribbon.
- You can always cut the ribbon, pull out the pieces of wire, and then use the ribbon as if it were a regular ribbon.
- Use the iron wire in the ribbon to bend the bow into shape.
- If you made a long-ended bow, think about making spirals or circles in it.
- Thin-tipped pliers can come in handy for pulling the wire out of the ribbon.
Necessities
Making a simple bow
- Iron wire reinforced ribbon
- Scissors
Make a bow with loops
- Iron wire reinforced ribbon
- Thin floral wire
- Sharp scissors
- Wire cutter
Make an elegant bow
- Iron wire reinforced ribbon
- Thin floral wire
- Sharp scissors
- Wire cutter
- Book
Make a bow in the shape of a rose
- 1 meter of iron wire reinforced ribbon
- Scissors


