Author:
Roger Morrison
Date Of Creation:
1 September 2021
Update Date:
1 July 2024
Content
- To step
- Part 1 of 3: Installing an incubator
- Part 2 of 3: Place the eggs in the incubator
- Part 3 of 3: Keep an eye on the eggs
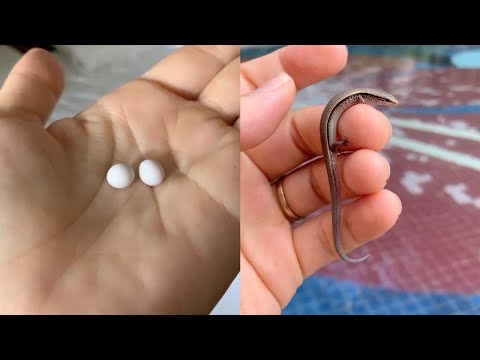
You may suddenly see a surprise in your lizard's home in the form of freshly laid eggs, or you may have intended to breed with your lizards. Either way, now that you have the eggs you need to know how to care for them to ensure they hatch. With a little attention and the right materials, lizard eggs are easy to care for. Install an incubator, put them on top of the appropriate substance, put them in a container, and leave them alone while you wait for them to hatch.
To step
Part 1 of 3: Installing an incubator
 Choose a holder. Which lizard has laid the eggs and how big the eggs are determines the size of the container you will use. Small eggs can be placed in plastic cups or plastic boxes. Medium eggs can be placed in lunch boxes and large eggs in larger plastic boxes.
 - Cover the container with a lid that you have punched holes in for ventilation.
- Measure the container so that you can choose an incubator that is large enough for the container.
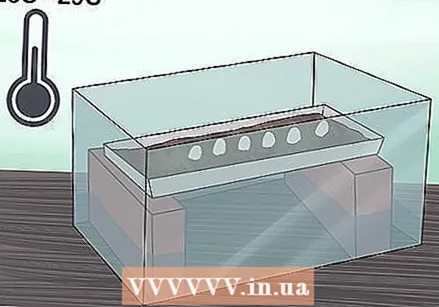
 Buy an incubator. Incubators are used to control the temperature while the eggs are preparing to hatch. They must be insulated to keep the temperature constant and have transparent walls so that you can keep an eye on the eggs. Incubators can be purchased at pet stores, agricultural stores and on the Internet.
 - Make sure the incubator you buy is big enough to hold the container your eggs are in. Make sure to measure the container before purchasing an incubator.
- Hovabator incubators are inexpensive and are often used by people who keep lizards. They are suitable for most lizard species.
- Buying an incubator is probably the best option, especially if you are new to hatching lizard eggs.
 Make sure the thermometer is accurate. Whether you have a commercial or home-made incubator, it is important that the thermometer is working properly. The incubator must be constantly kept at a specific temperature, so you must be sure that the thermometer is accurate.
 - The exact temperature you should maintain depends on the species. Research the specific species of lizard you have to make sure you're maintaining the right temperature. For example, most species from a temperate and tropical climate require 25-29 degrees Celsius.
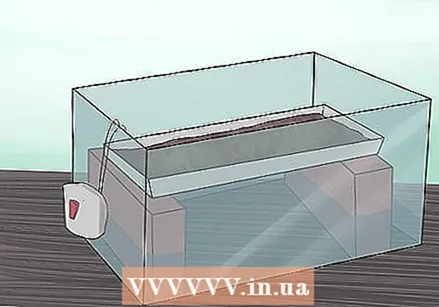 Make an incubator. If you don't have time to buy one or just don't want to buy one, you can make your own. To do this, take an aquarium, an aquarium heater, 2 bricks and cling film.
 - Place the stones in the aquarium and fill it to just below the top edge of the stones with water.
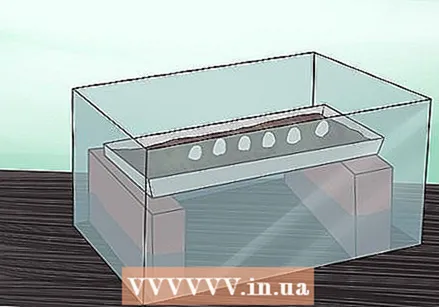
- Place the egg tray on top of the stones when you are ready to incubate.
- Put the aquarium heater in the water and set it to the correct temperature.
- Seal the top with cling film to keep in the heat and humidity.
- You can also use a Styrofoam cooler placed on top of a heating pad. Wait for the heating pad to heat up the cooler to the correct temperature and then place your egg container in it.
- Make sure to measure the container you will be using for the eggs before making the incubator. You need to make sure the container fits in the incubator.
- If you cannot use an incubator, keep the eggs warm and protected. If there is no way to buy or make an incubator, you can leave the eggs where they are in the vivarium. First, find out if the lizard you have is burying its eggs or leaving them out in the open.
- If the lizard buries them, cover the eggs with a thin layer of substrate. Insert a thermometer into the substrate next to the eggs.
- If your lizard is leaving eggs out in the open, make a hole in a plastic cup and place it over the eggs. Place a damp cloth under the cup to prevent the eggs from drying out.
- In either case, you should use heat lamps and heat pads to keep the temperature in the vivarium at the correct temperature for the lizard species.
Part 2 of 3: Place the eggs in the incubator
 Mark the eggs with a pen. Once you discover the eggs, don't turn them over. Lizards begin their development almost immediately in the egg and attach themselves to the side of the egg. Use a pen to carefully mark on the eggs which side was facing you when you found them. This will help you remember what the top is so you don't harm the lizards in the eggs.
 - Moving the eggs, or turning them over, can harm the embryo and kill the developing lizard.
 Separate the eggs. Some lizards lay their eggs in a pile, which causes them to stick together. If you find them early enough, you can separate the eggs carefully. Try not to damage the fragile shells. If they stick together, don't force them apart.
 - Separating the eggs helps to protect them. If one egg dies, its fungi could infect the healthy eggs.
 Choose an incubator that can hold water and that remains sterile. The agent, or substance, on which you put the eggs in the incubator is important. It must be able to hold water to help keep the incubator moist. It must be sterile, or nearly sterile, and must not stimulate the growth of fungi.
 - Perlite and vermiculite are widely used means that eggs can successfully incubate and hatch on. These resources are very similar, the choice is usually based on preference.
- You can find these substances at plant nurseries and DIY stores with a gardening department.
 Keep it moist. The incubator should be in the bottom of the container where you put the eggs. Put about 25-50 mm of it on the bottom of the container.It is important to keep the incubator moist while you wait for the eggs to hatch. Add water until the substance just sticks together. It should not be so wet that water drips out when you squeeze it.
 - Keep it at this moisture level until the eggs hatch.
 Make dents in the substance with your finger to lay the eggs. Before moving eggs, make a dent in the incubator with your finger where you will lay the eggs. This gives the eggs a safe place to prevent them from rolling over and damaging the embryos. You can also slightly bury the eggs thanks to this dent. The eggs should be about half covered with the substance.
 - Space the eggs about a finger's width apart. Line them up.
 Place the eggs very carefully in the container. When you are ready to move the eggs, be very careful. First, make sure your hands are clean. Do not flip or shake the eggs as you move them. Pay attention to the mark you made and make sure the top stays up. Place them in the substance in the container.
 - Don't let the eggs roll over when you move them.
- If the eggs are on a sprig, take the entire sprig and place it in the incubator. Do not try to remove the eggs from the sprig, they will break. Cut the sprig as small as possible without disturbing the eggs, and try to find a container that will fit the entire sprig.
 Place the holder in the incubator. Close the lid of the container containing the eggs. Then put the holder in the incubator. Write down when the eggs have been emptied and when they were placed in the incubator, calculate when they are likely to hatch and write it in your diary.
Part 3 of 3: Keep an eye on the eggs
 Keep an eye on the temperature. During the incubation process, the temperature must remain constant. Keeping the temperature constant is one of the most important things you can do to make sure the eggs don't die.
 - Check the thermometer to make sure the temperature in the incubator is not fluctuating.
- Make sure that the incubator remains moist as the temperature dries it out.
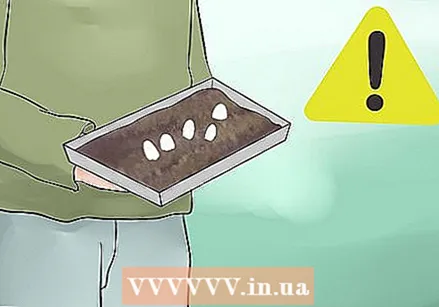
 Check the eggs regularly. It's important to keep an eye on the eggs while you wait for them to hatch. Eggs can die and rot at any point during the incubation process. They can get too hot, too cold, too wet, or too dry and go bad as a result.
 - Wet eggs can develop mold, while dry eggs can disintegrate.
- Remove bad eggs so they don't contaminate the healthy eggs.
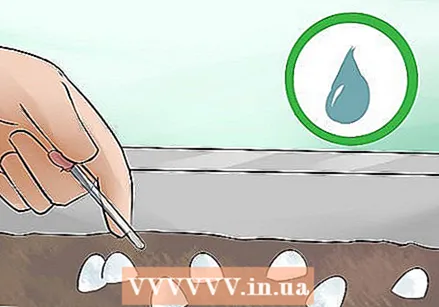 Adjust the conditions based on the moisture level. If the eggs or incubator are too wet, remove the lid from the container. Leave the container uncovered for several days, until the excess moisture has evaporated. When the eggs are dry, add water to the incubation medium. Do this slowly, so that everything does not suddenly get very wet.
 - Never pour water directly on the eggs. Drip the water around the eggs into the incubator. Try to use a pipette or damp cloth for this.
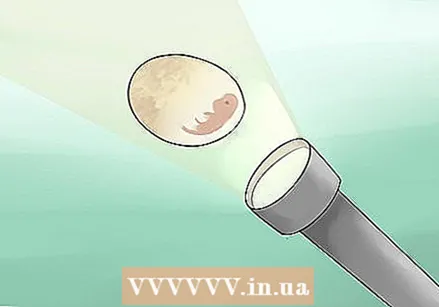 Use a candler to check the condition of the eggs. You can buy a fiber optic chimney or use a small white LED to check the eggs. Shine the light close to the egg, but be careful not to push it on or move the egg. The inside of the egg will light up. Healthy eggs should be pink and red inside, with a number of blood vessels.
 - If it glows yellow, the egg is sterile, dead, or too young to see development.
- Eggs that are sterile or dead will turn an off-white or yellowish color and eventually develop mold or collapse.
 Furnish the cages for the babies. While you wait for the eggs to hatch, you can create a habitat for the babies. Make sure you have everything you need, including food. Most lizards spend the first few weeks of their lives in a small cage lined with paper towels.
 - Make sure the cages have the right heat and humidity for the babies. Usually babies shed their first time within 24 hours and you should make sure that all skin comes off. The correct moisture level will ensure that there are no problems during shedding.
- Add a small bowl of water or use a spray bottle if the species only drinks drops of water.
- Some babies need less heat than adults. Research the specific heating needs of the babies of the lizard species you have.

 in Windows 7")

