Author:
Roger Morrison
Date Of Creation:
19 September 2021
Update Date:
1 July 2024

Content
- To step
- Part 1 of 3: Cutting hair
- Part 2 of 3: Putting the finishing touches on the hair
- Part 3 of 3: Gathering and preparing the right equipment
- Tips
A shaved hairstyle (also called a "hi-top fade" or "fade") is very short at the bottom and gradually lengthens towards the top of the head. Whether you want to save some money on haircuts, or are interested in cutting others' hair, you can easily learn to cut a shaved haircut or "fade" with the right tools and a little practice.
To step
Part 1 of 3: Cutting hair
 Dampen the hair. Before you start cutting, spray your hair with water so that you can shape and cut the hair easily. The hair should be slightly damp, but not soaking wet. Take a towel and pat hair again to dry it lightly. Then take a comb and part the hair.
 - Knowing where the hair's natural parting is is important as you may need to blend the shorter side a little more than the longer side, depending on the style.
 Select the correct conductor size for the fade line. A shorter guide means a shorter haircut. Choose a larger size to start with (e.g. a 3).
 - You can use a higher number to get an even shave around the sides and back of the head as the base length.
- To get the shaved effect, switch to shorter conductors as you go down. However, starting with the larger conductor makes it easy to get an even fade.
- You shave the entire side and back of the hair with your first guide and repeat with a shorter guide, moving a little further down, leaving the top the length you just cut.
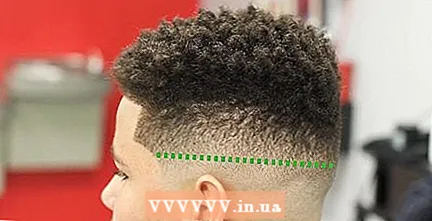 Decide where the fade line will be. The fade line will determine where the hair transitions from one length to another occur. It will wrap all the way around the head, actually from ear to ear.
 - Fade lines do not have to go straight behind. In fact, some fade lines sink a little down the back of the head, then return to the original line before reaching the other ear.
- You can have more than one fade line. Start with one on the first haircut - to gain confidence, try doing two.
- Where you place the fade line is a matter of personal taste. You can place it anywhere, from just above the ear to 5-8 cm above it.
 Divide the top part of the hair into pieces. Draw a rectangle around the skull with a comb. This will separate the longer hair on top of the head from the shorter sides. Use a hair clip or elastic to keep this hair out of the way.
 - If you are unsure of the size of the rectangle, use the eyebrows as a guide. The lines of the rectangle should line up with the outer tips of the eyebrows. Make sure that the entire crown falls inside the back of the head.
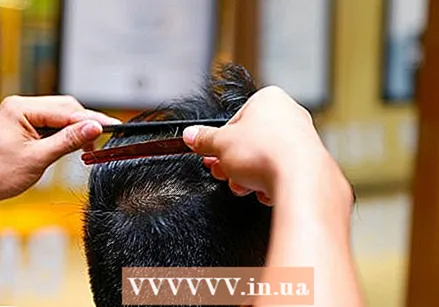
 Clean the fade line with the "trimmer over the comb" method. Just start to finish the fade with a regular comb. (Use a white comb for dark hair and a dark comb for light hair.) Hold the comb at a 45 degree angle to the fade line and comb towards the top of the head, keeping the comb just an inch. or two in the hair. Run the clippers up the comb from the fade line, cutting the hair above the teeth.
 - Repeat this process around the fade line (s), making sure to keep the distance between the combs the same.
- When done right, you should have a nice even fade with no visible fade lines. The hair should gradually shorten as it gets closer to the base of the skull.
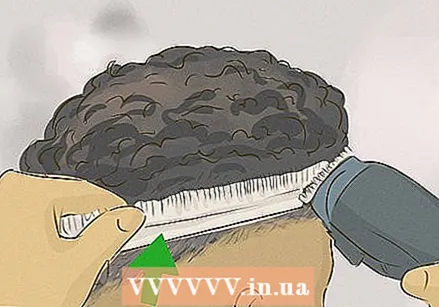
 Trim the top of the hair. Either use scissors if you want to keep the hair long, or a higher guide if you want a buzz look. For something like a grease top, pompadour, or messy top, use scissors, while for a caesar, or crew, a trimmer can be used.
 - To cut with scissors, use a comb or your finger and pull the hair upward, cutting or combing slightly above the fingers each time.
- Take into account the angle at which you cut. For a fade look with longer hair on top, you will need to cut the hair at an angle as you move towards the back of the head to blend it together.
- Check the edges while cutting. To do this, take out a strand of hair from the top of the hair and check the edges. The corners of it should be soft.
- If too much hair is falling back from the top, you can use thinning scissors or clippers to shorten the hair.
Part 2 of 3: Putting the finishing touches on the hair
 Shave the bottom of the hair with a beard trimmer or clippers without a guide. Now you need to make sure that the fade has a clear end point at the bottom of the head and the bottom of the sideburns. Use a trimmer or clippers and shave off the remaining hair.
 - You may not need to do this on the sideburns if the person whose hair you cut has facial hair that blends into the sideburns.
- Shave the base of the nape short and slightly over the last fade line to make sure the hair is cut evenly.
 Blur the remaining parts of the visible line with the clippers. Look for areas where the hair is now uneven and make sure to go over it again to clean it up.
 - You may need to angle your clippers slightly to get hold of stragglers and make the fade go evenly.
 Clean the base of the neck. Now that your bottom fade line has been established, cut the hair underneath. Make sure to include the sections at the bottom of the neck that have thinner longer hair.
 - Clean the edges with a razor blade or the trimmer to make sure the edges of the style are clean and remove any neck hairs.
- If you are using a razor, apply shaving cream to the area you will be cutting and dab it afterwards with a warm, damp towel.
- Brush off any loose hair and style the top with a pomade or gel for a finished look.
Part 3 of 3: Gathering and preparing the right equipment
 Make sure you have professional clippers. Clippers can be expensive, but to make sure you get a consistent fade, you need clippers that are powerful and reliable. Good clippers make a world of difference.
 - Some popular and proven hair clippers include:
- Oster Classic 76.
- Wahl Senior.
- Andis Master.
- Make sure the clippers have at least five different guide positions.
- It's also a good idea to get a professional clipper, which will be used to trim sideburns and neatly trim the areas around the ears, neck, and forehead. Ask your hairdresser where he buys his or look online.
- Some popular and proven hair clippers include:
 Keep your clippers clean. Even if you have new clippers, make sure they are clean before greasing them. Your clippers may come with a cleaning solution, but if you don't have a cleaning solution, you can always use nature.
 - Make sure your clippers are unplugged and remove the blades.
- If you have cleaning solution, spray it over your blades and let it soak in before wiping it off.
- If you are using natural vinegar, soak the blades in a vinegar solution for a few minutes.
- Do not wash your clippers with soap and water, as this can rust your blades.
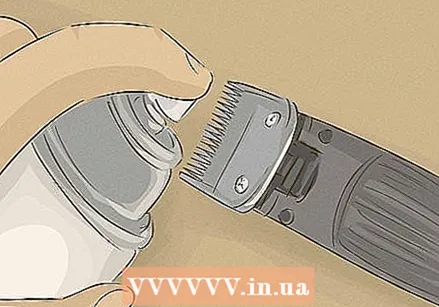
 Oil the blades before use. Read the instructions that come with your clippers to see if you need to remove the blades to put them in the oil, or if you can just point them at the bottom of a sink and drip oil on them. After applying oil to the blades, wipe off excess oil with a soft, dry cloth.
 - When you put the clippers in the oil, make sure that you have brushed off any excess hair that may be on the blades.
- Turn on the clippers and let the oil drip onto the blades so that the moving blades are well greased.
- Run the clippers for about 20 seconds.
- Wipe the clippers thoroughly and make sure the top of the clippers are dry so that the hair doesn't stick to it.
Tips
- You can easily shave it by using three different guides. The first guide is the longest (the higher the number, the longer the hair stays) - cut all hair with this guide. The second conductor is the shortest - choose the fade line, but go under it anyway. The third guide is medium in length - this is how you create transitions in the hair. Start a little lower than your fade line and go slightly over it. No more straight hard lines!
- If you have never done this haircut before, ask your stylist to explain to you what he will do the next time he cuts your hair and ask for tips. It's okay to say in advance that your friends are asking you to cut their hair, or that you want to keep your shaved hair that way until the next cut.
- If the result is a line or a "mushroom" - a style with extremely visible fade lines, go to a hairdresser to have it fixed.
- Don't worry if your first fade doesn't look perfect. It is a technique that requires experience and practice.


