Author:
Charles Brown
Date Of Creation:
7 February 2021
Update Date:
1 July 2024

Content
- To step
- Method 1 of 3: Plain herringbone braid
- Method 2 of 3: French herringbone braid
- Method 3 of 3: Side herringbone braid
- Tips
- Necessities
A herringbone braid looks complicated and will become a favorite hairstyle for mornings when you don't have much time, especially if you have long hair. The braid looks beautiful and is very suitable for a weekday. The braiding will get easier after you try it a few times. You could practice on a baby doll or a Barbie doll to get better.
To step
Method 1 of 3: Plain herringbone braid
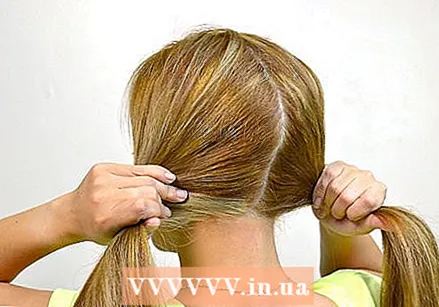 Divide your hair into two large sections, parted in the middle. For a tighter look, you can use a comb to part your hair evenly. If you prefer the tousled look of Katniss Everdeen from The Hunger Games, just use your hands to part your hair.
  Pull a thin strand of hair from the outside of the left section. Pull the lock over the left section and under the right section.
 - If you want a neat braid, get plucks of equal thickness from both sections. If you want to make your braid look a bit messier, get uneven strands. Whatever you choose, it will look good.
- Use thinner strands of hair for a more complex braid. It is a bit more work, but the result is beautiful.
- As a beginner, pulling it tighter will help you master the method.
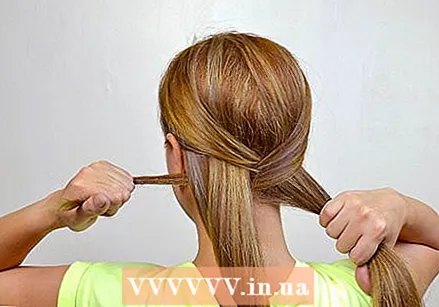 Repeat this on the right. Grab a lock of the right section and pull it over the right section to the left under the left section.
  Keep alternating both sides until you reach the bottom of the braid. Do this if you want a traditional herringbone braid. For a change, you can always secure the braid halfway with a rubber band.
 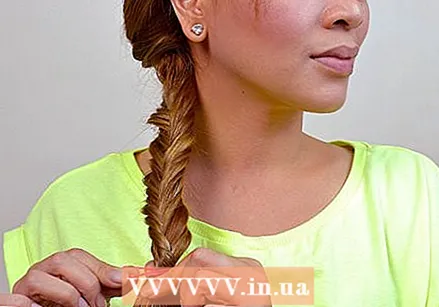 Tie the bottom with a hair tie. If you'd like, add a fun ribbon, hairpin, or other hair decoration to add a personal touch to your braid.
 - If you feel your braid is too tight, use your fingers to gently massage the strands of hair to loosen the braid a little.
- If you have very long hair, you can do even more with it now. You can put your hair up in a bun, wrap the braid around your head or across it, and so on. If you have shorter hair, make the braid as long as you want.
 Ready.
Method 2 of 3: French herringbone braid
 Grab an amount of hair on top of your head and divide it into halves. Start braiding as you would a normal French braid, with the part closest to the center. Hold one half in each hand.
 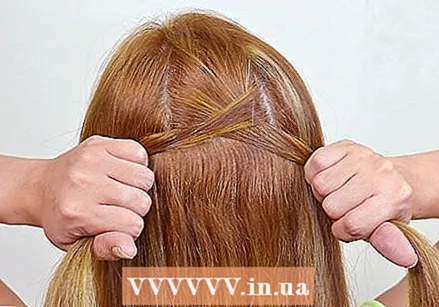 Pull up a section of hair on the left side of your hairline. To get a more even braid, start at the beginning of your hairline and work your way down the sides gradually.
 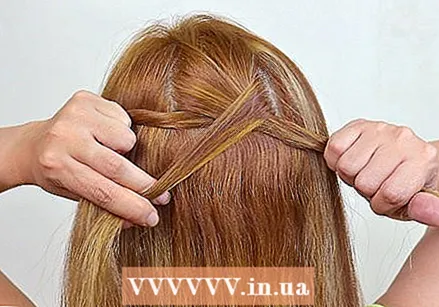 Braid the strand of hair over the left part of the herringbone and under the right part of the herringbone. Grab the lock with your right hand so that it becomes part of the right section.
  Pull up a section of hair on the right side of your hairline.
 Braid the strand of hair over the right part of the herringbone and under the left part of the herringbone, as you did with the first strand. Grab the lock with your left hand so that it becomes part of the left section.
 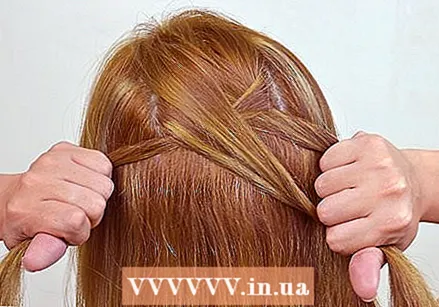 Keep pulling up and braiding more strands of hair until you've had it all.
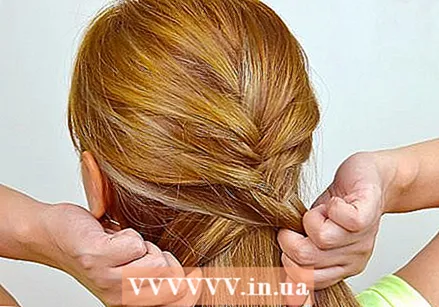 Braid the rest of the braid as usual.
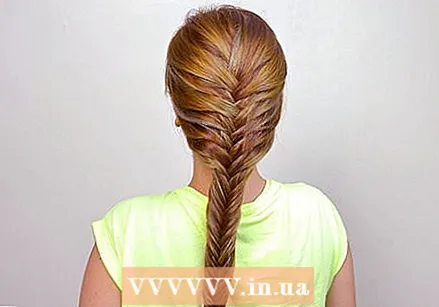 Ready.
Method 3 of 3: Side herringbone braid
 Comb all your hair to one side and secure it in a side ponytail with a thin hair tie. Tie the hair tie as high as possible. It is best to use a real hair tie because rubber bands can damage your hair if they come into contact with it for a moment.
  Divide your hair into two sections. It's okay if you have layers in your hair. Try to get an equal part of each layer in both sections.
  Start braiding and use the same method described for the regular herringbone braid. Grab a section of hair from the right section and pull it to the left. Then take a strand of hair from the left section and pull it to the right. Make sure you work with different strands of hair. Do this until you reach your ends.
 - It is easiest if you keep taking a strand of hair from behind, especially if you have layers in your hair. This ensures that the short strands are well absorbed into the braid and that they do not protrude from the braid in any way.
- Braid the last part of your hair in the usual way, if necessary. If you are running out of hair to work with, it may be easiest to make a regular braid from the last piece (about the last three strands).
 Secure the braid with a thin hair elastic. The rubber bands that you can buy in larger packs work best - regular hair ties are thick and can slide off your braid more easily.
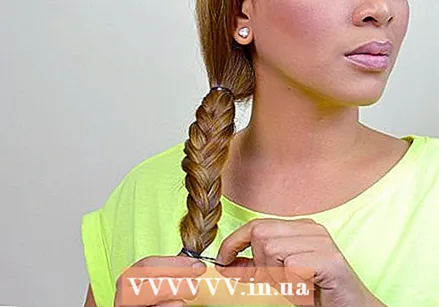
  Cut the top rubber band. The elastic band that is close to the bottom of your head was just to make braiding easier. Slide one or two fingers under the rubber band and cut it. Be careful not to cut your finger or hair.
 - Of course, it is not mandatory to attach a rubber band to the top of the braid, but it makes the braiding itself a lot easier.
 Loosen the braid if necessary. If you have some time left before you leave, you better not touch it. Your braid may loosen on its own. You can always loosen a braid, but not tighter.
 - Add a fun hairpin, make a bun from your braid, or tie it on top if you wish. A braid can look elegant and playful at the same time - what look would you like to have?
 Ready.
Tips
- It is important to hold the strands of hair tight if you are doing a normal herringbone braid.
- Play around with this hairstyle and you might find a better method to braid your hair.
Necessities
- Hair elastic or bow (it is best if the elastic has no metal)
- Brush or comb
- Bobby pins (optional)


