Author:
Morris Wright
Date Of Creation:
27 April 2021
Update Date:
1 July 2024

Content
- To step
- Part 1 of 3: Operating a typewriter
- Part 2 of 3: Cleaning a typewriter
- Part 3 of 3: Maintaining the typewriter
- Tips
At first glance, using a typewriter might confuse and frustrate you. However, using a typewriter is easy once you know how. To operate the typewriter, you must feed the paper into the machine and push the carriage back into place while you type. You should also clean the typewriter regularly to keep it in good working order. Work on maintaining the typewriter by storing it properly and protecting it from damage.
To step
Part 1 of 3: Operating a typewriter
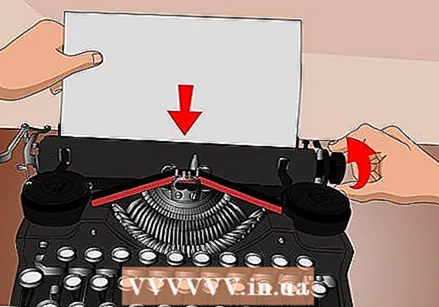 Insert the paper. The first thing to do with a typewriter is to stick the paper in it. Take two white A4 paper sheets and put them on top of each other.
 - Look at the top of the typewriter. A long cylinder should run across the typewriter. This is the role. Just behind the roll is a small, flat, angled piece of machinery that tilts back slightly. This is the paper table. The top of the paper sheet should be placed between the roll and the paper table.
- There should be a small button on the side of the roll. This is the scroll knob. Turn this knob counterclockwise. This should feed the paper into the roller. You have to keep turning the knob until the top of the paper is just behind the keys.
 Set up the car. The carriage of a typewriter is the part that moves the scroll across the page. Each time you press a key, the carriage moves the reel slightly to the left. You start with the cart as far to the left as the typewriter allows. Slide the roll to the left. The cart must stop the roll in the right place to set the margins.
  Start typing now. Typing on a typewriter is a bit tricky. Each key causes a stamp to hit the paper. You have to type hard enough for the letters to catch on clearly. You should also type slowly if you've never used a typewriter.
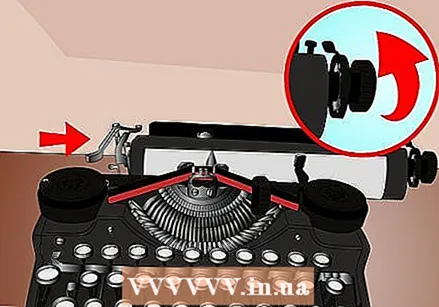
 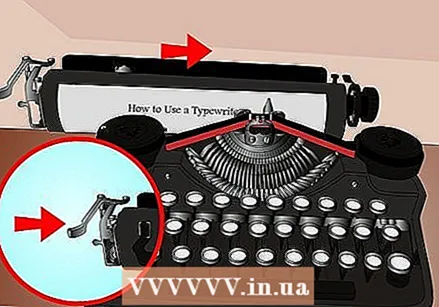 Bring the cart back while you type. At some point you will hear the typewriter make a jingling noise. This means that you have reached the end of the line you are currently typing on. You have to reset the car to start a new line.
 - On one side of the typewriter is a lever to reset the carriage: a carriage release. This is a metal handle. The car releaser moves down or to the side. Push the carriage releaser in the correct direction for the particular typewriter. This should ensure that the paper moves to the next line.
- From here, push the roller to the right until the cart stops it. Then continue typing.
 Correct any mistakes. When you use a typewriter you can sometimes make typos. Some typewriters have a backspace key; this key often has a picture of an arrow pointing to the left. Going back a space and typing over a mistake works well, but it mares your text and is harsh on the scroll. This last reason is why you are using two sheets of paper.
 - You can use a correction tool to delete the wrong letter or phrase. Then feed the paper back into the roll until you reach the line where the typing error is. Adjust the roller until the paper lies so that you can type the correct letter or phrase over the corrected part of the page.
- Most electric typewriters have an auto-correct feature that works somewhat like a backspace key. If your typewriter has an auto-correct feature, you can use it to fix typos. However, you can usually only correct typos of one letter. If you notice you've typed the wrong letter, press the auto-correct key. The typewriter slides back one space and prints a white version of that letter over the black ink. After this you can type the correct letter.
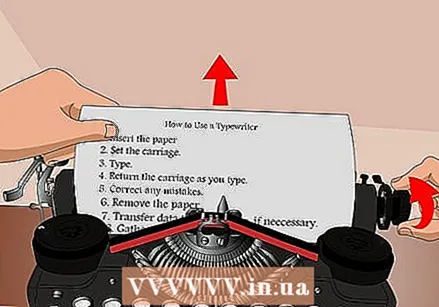 Remove the paper. Take the paper out when you are done with a page. Turn the knob at the roll clockwise until the paper comes out of the typewriter.
 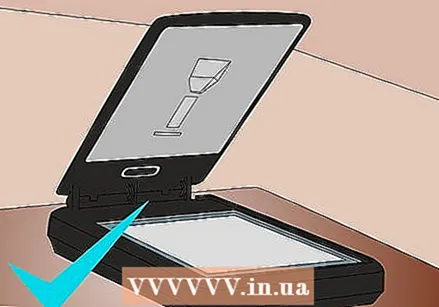 Transfer the data to a computer, if necessary. If you want an electronic backup of the work you did on a typewriter, use a scanner to scan in all the pages you typed. If you don't have a scanner, you can go to a print shop and use one there for a small fee. You can then email the pages to yourself so that you have a copy.
Part 2 of 3: Cleaning a typewriter
 Get the right supplies. Typewriters must be kept clean to be functional. Before you start cleaning your typewriter, get the following supplies:
 - Cotton rags
- Gentle liquid cleaner
- Paint brushes with hard bristles
- Vacuum cleaner with a crevice cleaner
- Car wash
- Typewriter oil
 Clean the surface of the typewriter with a mild detergent. To start, clean the surface of the typewriter with a mild detergent. You don't want to use something with too many chemicals, especially if the typewriter is a bit older. Slightly dilute the detergent with water before cleaning.
 - Dip a cotton cloth in the detergent. Scrub the outside of the typewriter until you remove all dust and dirt. Proceed slowly and use only a little force on the typewriter. Typewriters are often old machines, and you don't want to accidentally scratch or damage the paint when cleaning.
- Now get the paintbrushes with hard bristles. Dust the keys of the typewriter, removing any loose paint or dirt from the keys. Take the crevice attachment from the vacuum cleaner and run it over the keys, gently inserting it between the slits in the keys. This way you vacuum up any grit or dust that fell into the typewriter when dusting the keys.
 Grease the keys and moving parts. Typewriter oil, which you can buy online or at some hardware stores, can be used to keep the typewriter running smoothly. Only use a little bit of oil. A little oil goes a long way. Squeeze a moderate amount of oil onto the moving parts, as well as the inner parts of the keys.
 - Make sure you don't use too much. Less than a drop of oil should be enough.
 Scrub the typewriter. If you want the typewriter to look shiny and new after cleaning, use some car wax to give it a nice shine. Put some car wax on a rag and rub it on the outside of the typewriter until it looks shiny and new.
 - As when cleaning the typewriter, proceed with caution. Hard movements can damage the exterior of the typewriter, so don't scrub with much force.
Part 3 of 3: Maintaining the typewriter
 Cover the typewriter when not in use. Minimize the exposure of the typewriter to dust and dirt. Too much dust and material from outside can affect the operation of a typewriter. Cover the typewriter when you are not using it.
 - If the typewriter has a carrying case, put it in when not in use.
- If you don't have a carrying case, you can store the typewriter in a drawer or other small enclosed space where there is no dirt or clutter.
 Pull out the paper guide if you are not going to use the typewriter for a while. The paper guide is the lever that you press on some typewriters to release the paper. Not all typewriters have a lever like this, but if yours does, you should pull it forward when you don't use the typewriter for a while. If you don't use the typewriter very often, it's a good idea to leave the lever forward. If the handle is left closed for a long time, flat spots may form on the roll. Flat spots can wrinkle the paper and cause a messy appearance while typing.
  Store the typewriter at the correct temperature. Typewriters will be damaged if they are not stored properly. They should be kept at temperatures around 5 to 25 degrees Celsius. During the warmer months, keep your typewriter in an air-conditioned room. If you don't have air conditioning, keep your typewriter in the coolest room in your house, such as the basement.
 - A cold temperature can also have a negative effect on a typewriter. In winter, don't keep the typewriter in a cold place, such as your garage. Make sure to keep the typewriter indoors where it is warm.
Tips
- Type slowly. Correcting mistakes when using a typewriter can be a time consuming process, so type slowly to avoid typos and mistakes.
- Grab a black colored pencil or marker to fix any mistakes the typewriter made.
- Use a staccato when you hit the keys. Pretend the keys are hot lava and you don't want to touch them.


