Author:
Charles Brown
Date Of Creation:
1 February 2021
Update Date:
2 July 2024

Content
Body piercings are a great way to express yourself and can change your style in a fresh, cool way.Like ear piercings, body piercings need regular cleaning and care to aid in the healing process and to prevent infection.
To step
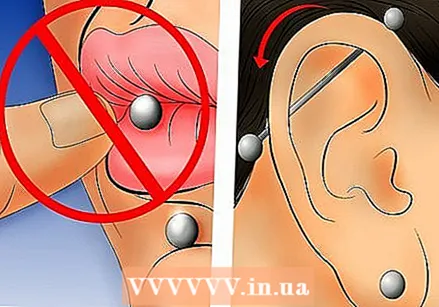
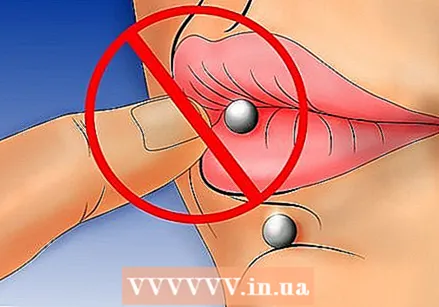 Try not to touch your piercing and the surrounding skin for the first 24 hours after piercing. Even after those first 24 hours, it is better to always wash your hands before touching your piercing. Foreign substances such as dirt and hand cream can slow down the healing process and eventually lead to infection. In fact, you should try never to touch your piercing except when cleaning it.
 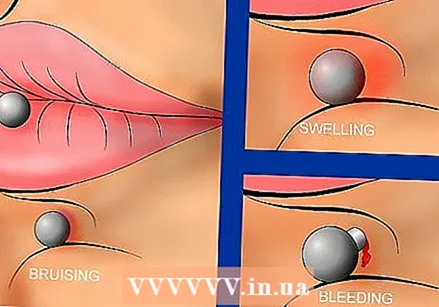 Know the signs of normal healing. It is good to be extra careful, but recognizing the characteristics of a normal cure will help you not to fear infections and will keep you from cleaning the area too often. Here are some of the symptoms that are part of the normal healing process:
 - Bleeding, swelling, tenderness and bruising. Minor bleeding and localized swelling can be expected after getting a new piercing. These can often also lead to tenderness and bruising. While these four things are normal in moderate amounts, you should call your piercer when these symptoms are severe or when the bleeding and bruising continues for more than a week after getting set. (Note that intimate piercings can keep bleeding for the first few days).
- Itching and discoloration. Itching is normal with any healing process, in part due to the growth of new skin. Discoloration can also often occur due to the white-yellowish liquid secreted from the piercing. This is called tissue fluid, or lymph, and is nothing to be concerned about. However, if you start to notice pus around the piercing, it is important to call your piercer right away.
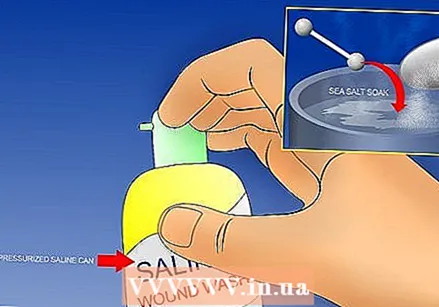 Choose your approved aftercare routine. Most professional piercers recommend soaking the piercing in sea salt once or twice daily for several weeks after it has been placed. If you notice that the method you are using is starting to irritate the skin around the piercing, it is good to ask your piercer about alternative methods.
 - Saltwater soaking will be easier with some piercings than others. For earlobes, you can simply dip the piercing in a cup of warm saline solution. For navel piercings it is useful to quickly place a small cup of saline solution upside down over the piercing; this creates a vacuum in which the piercing can soak. For most other piercings, it is sufficient to soak clean gauze with saline solution and then apply it to the piercing.
- Make sure the solution gets all the way IN the piercing, not just around it. Do not turn the jewelry around in the hole, but make sure you get close enough to the jewelry so that the saline solution gets all the way into the hole. Otherwise you run the risk of an infection developing on the inside.
- Use an aerosol saline spray. This can be used in place of or in addition to soaking in saline; ask your piercer about the benefits of both options. Saline solution sprays can be purchased at online piercing stores.
- Some people also choose to clean the piercing with warm water and mild soap. If you decide to do this, don't use soap more than once or twice a day. The best way to clean your piercing with soap is in the shower: use a pearl-sized dollop of mild soap and gently wash the piercing. Rinse off the soap after 15 to 30 seconds.
- Avoid dangerous methods and products. There are certain cleaning techniques that should be avoided, even if they sound like a good idea.
- Cleaning too much. Believe it or not, you can cleaning your piercing too much. Clean the piercing up to twice a day to avoid irritation and dryness.
- Aggressive soaps and antibacterial products. Dettol, Betadine, and hydrogen peroxide can all damage your healing cells and dry out the piercing, which can lead to crusting. For the same reason, cleaning alcohol should be avoided.
- Ointments. Healing ointments can limit the supply of air and will slow the piercing's healing process.
 Remove crusts. A clear, yellowish liquid (tissue fluid) will come out of the piercing; this is part of the healing process. Without daily cleaning, this liquid will form a crust around the piercing, creating unnecessary tension. Make sure to wash this off regularly by soaking a cloth or cotton swab in saline solution and rubbing it gently on and around the scab. Pull the crusts there never off.
 - If you are using a cotton swab, make sure it is completely soaked and that there are no loose threads that could get caught in your piercing. If threads do get into your piercing, remove them immediately to avoid irritation. Avoid using cotton balls. Never remove scabs with your fingers - unnecessary touch can lead to infection.
 Shower to help clean your piercing. Showering can also help - a direct jet of water can help remove crusts and dirt. Be careful of the surrounding area, and talk to your piercer about what soap and shampoo to use in the shower.
 - Do not bathe for the first few weeks after getting your piercing. Bathtubs often contain bacteria that can get trapped in the piercing and cause infections. If you have no choice but to take a bath, clean the bathtub thoroughly before taking a bath. Rinse and wash your piercing when you are done again.
 Avoid injuries in the area. Never play with or touch the piercing except during cleaning. Avoid friction / rough contact, oral contact, and contact with another person's bodily fluids. If the piercing is physical, wear loose-fitting clothing over the piercing until it is completely healed. If it's an ear piercing, wear your hair so that it doesn't get caught in the piercing.
  Keep the piercing away from dirty water sources. Lakes, pools, hot tubs, and other potentially harmful water surfaces should be avoided until the piercing has healed. Like bathtubs, these can contain bacteria that can promote infections. If you have to swim, find a waterproof bandage to cover the piercing while you swim.
  Be patient. Remember that piercings heal from the outside in. This can make a piercing seem healed before it actually is. Removing the piercing or inserting another piece of jewelry can tear the insides, requiring the healing process to begin again.
 - Never force the jewelry. If you don't clean every day, dirty-smelling secretions can collect inside the piercing, making it difficult to move the jewelry. Instead of forcing it, which can destroy the healed skin inside, continue cleaning until you can easily remove the piercing.
 Sleep on clean bedding. Be extra careful to change your sheets and pillows regularly. Always wear clean and breathable clothing when sleeping. Allowing air to help supply oxygen to the piercing will help the wound heal quickly and healthily.
  Stay healthy. As with any wound, the healing process is faster if your body doesn't have to fight off other problems or infections as well. So keep yourself and your body happy and healthy to keep your piercing happy and healthy.
 - Move. With a few exceptions, exercise and exercise are fine during the healing process. Make sure to clean any sweat that may build up around and in the piercing and listen to your body.
- Avoid excessive recreational drug use. Nicotine, alcohol and caffeine are included in this.
- Avoid stress. Too much stress in life will also put stress on the body, slowing down the healing process.
 Be vigilant for signs of infection. You can expect the healed piercing to be happy and healthy every day unless you bump it, get pulled, or have an accident with it. If you notice any swelling, pain or discharge, it is important to contact your piercer or you risk losing your piercing or causing damage to your body.
Tips
- Care for belly piercings. Wear loose-fitting clothes. Not only is this less painful than tight clothing, but it also causes less damage to the area and allows good ventilation.
- Consider placing an eye patch. If you do have to wear tight clothes, buy a hard eye patch with ventilation holes from the drug store. You can secure this under tights or with bandages to protect the piercing from rubbing against your clothing.
- Never turn your jewelry. It is normal for the skin to stick to the jewelry in the beginning, and turning this will tear the skin and push it away from the jewelry, causing damage and taking longer to heal.
- Avoid cosmetics and other cosmetic products, including makeup, creams, sprays, etc.
- If the piercing is still new, it will likely feel painful from time to time. Try making a cold compress by soaking a paper towel or gauze with cold saline solution and applying it to the area to relieve pain.
- Contact your piercer if you have any questions or concerns. They will probably be happy to hear from you!
- Get oral piercings. Oral piercings have a specific cleaning routine that must be followed and is slightly different from the routines of other piercings. Some things that are important to remember are:
- Avoid smoking. This will irritate the skin. It can also build up around the piercing, increasing the risk of infection.
- Use mouthwash without alcohol. This should be used 2 to 3 times a day, especially after eating (and smoking, if you cannot quit). Use sea salt and water or brush your teeth for extra rinses.
- Avoid beer and alcohol. These can lead to bacterial infections and irritation in the mouth. After two weeks it should be fine to drink liquor again, but keep avoiding beer until the piercing has healed completely.
- It is possible to over clean piercings and irritate the skin. Three times a day is more than enough for most people.
- Use the T-shirt trick to keep your pillow clean on face and ear piercings. Place a large, clean T-shirt over the pillow. Turn it over every night. This way, one clean T-shirt will provide you with a clean surface to sleep on.
- If you can't buy saline solution, you can make it yourself. Soak the piercing in warm water and sea salt without iodine. (Salt often contains iodine as an additive. Your piercer will probably give you some salt without iodine, but if not, it can be bought in most supermarkets). Do not use more than a pinch of salt per 250 ml of water; strengthening the solution can dry out the piercing.
- Do not hang charms on the piercing until it has healed.
Warnings
- If the piercing is seriously infected, DO NOT remove it. Contact your piercer as soon as possible. Removing the jewelry will remove the only exit the infection has.
- Do not use alcohol or hydrogen peroxide to clean a piercing. These will both dry out the surrounding skin.
- If you notice excessive swelling or pain, or see a green / gray or foul-smelling discharge from the piercing, see your piercer as soon as possible.
- Make sure you know which methods are appropriate for your specific piercing. Aftercare and healing time vary by piercing, although there are some principles that apply to all piercings.
Necessities
- Saline solution
- Sea salt


