Author:
Roger Morrison
Date Of Creation:
5 September 2021
Update Date:
1 July 2024
Content
- To step
- Part 1 of 3: Planning your sculpture
- Part 2 of 3: Starting your sculpture
- Part 3 of 3: Applying facial features
- Tips
Sculpting a face can be quite a challenge for the budding sculptor, but there are a few simple tricks that make it quite easy. It just requires a few simple techniques and the correct placement of the facial features. Basically, find a subject you want to model, grab a few tools to add the details, and start modeling.
To step
Part 1 of 3: Planning your sculpture
 Determine which clay to use. You have several options when choosing a modeling clay to sculpt a face. Every clay is different, so choose the clay that best suits the purpose.
 - Ceramic clay is water-based and easy to process right out of the package. It must stay moist while working as it can dry out and crack. Ceramic clay can also be heat set to make a permanent sculpture.
- Plasticine is an oil-based clay that does not dry out and cannot be hardened. It is popular with special effects professionals because it can display a high level of detail.
- Polymer clay needs a fixture, or wire skeleton, for support. This clay is weaker than other types of clay, but is easy to paint. Polymer clay can be hardened, but it is not as hard as ceramic clay.
 Pack your things together. In addition to the clay, you need a few other things before you can start modeling. A good clean workspace is necessary, as are some tools to help you get details on your image. You can buy sculpting tools at most hobby stores.
 - However, you don't need to buy special sculpting tools. It may be possible to find other tools suitable for the same purpose. The main functions of the tool are to cut, scrape and shape the clay.
- You can use sewing needles to draw fine lines in the clay and add details.
 Study your subject. If you know the person whose face you will be modeling, take pictures of him or her from all angles. Try to get some good shots of your subject looking straight into the camera. Also, take some of them aside to get a good profile.
 - If you take a famous person as the starting point for your image, find photos on the Internet and print them. Make sure you have different angles to get a good idea of the person's proportions.
- It can help to draw grid lines on some photos to see the relationship between facial features.
 Sketch your design. Think about how you want the person to look in your sculpture. Think about who the person is, what he or she does, and why you want to sculpt that person. Use these questions to add emotion to your sculpture. Draw a rough drawing of different expressions to get ideas about how you want your image to look.
 - The drawing does not have to be perfect. It is simply a tool to help you shape your sculpture.
Part 2 of 3: Starting your sculpture
 Make a ball. Roll out an oval and smooth the clay. The smoother you can make the clay in the beginning, the easier it will be to make the face.
 - Depending on the size of the image, it can be difficult to roll out a ball. If you're making a small statue, it shouldn't be a problem. However, if you are making a larger sculpture, you may need to roll out a neck as well.
- Keep the proportions of your subject in mind when shaping the oval. You are going to add clay to create the other facial features, but the oval should resemble the basic shape of your subject's head.
 Make a clay silhouette. An alternative method for creating the basic face shape is to create a silhouette based on the profile of your subject. When working with this method, it can be helpful to start at the bottom of the silhouette and work your way up.
 - Print a profile picture of your topic. Make sure the photo is the same size as the image you want to take.
- Roll out some clay about as wide as you want your figurine's nose to be. Lay it flat on a clean surface. Make sure you have enough clay to make a full profile.
- Take the cut-out profile and place it on the slab of clay. Trace the profile onto the clay and cut away the excess clay.
- This should produce a slice of clay that is the silhouette of your subject. Start by adding some clay to thicken the neck so you can let your statue stand while adding the width to shape the face.
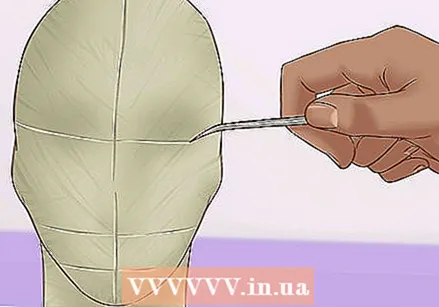 Set out guidelines to indicate the proportions. With a needle or with a rubber tip, draw a fine vertical line down the center of the face. This is the line that indicates the symmetry. Draw a horizontal line halfway along the symmetry line to indicate where the eyes should be.
 - Halfway between the eye line and the bottom of the face, make a second horizontal line. This is where the nose will be.
- Make a final line halfway between the nose line and the bottom of the face to mark where the mouth will go.
Part 3 of 3: Applying facial features
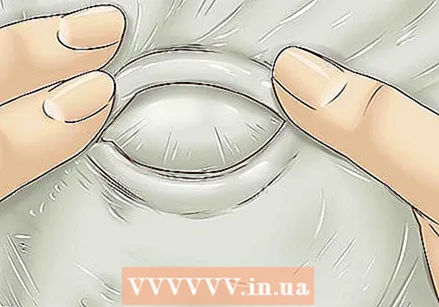 Make the eyes. Start making the eye sockets, just below the eye line, using a small spoon or a round tool. Be careful not to root in the clay.
 - Work carefully and take your time. Hold the tool flat on the clay and make small circular movements. Smooth the clay as you work. The eye sockets should be deep enough so that the eyes do not protrude from the image.
- Apply eyebrows by rolling two small clay cylinders and securing them just above the eye sockets. Make sure that the clay is easy to work with so that you can spread it well on the face. Using a small spatula, slowly work the brow bone into the forehead to create a small ridge. Work until there are no more wrinkles between the forehead and the brow bone.
- Make the eyelids the same way you made the eyebrows. Take two small clay cylinders and place them just below the brow bone and in the eye sockets. Smooth out any seam lines to blend the lids into the rest of the face. Repeat this process to create the lower lids as well.
- Roll small clay balls in front of the eyes and put them in the eye sockets. Finish the ball and place each eye in its own cavity. Try to keep the eyes symmetrical when shaping them.
 Make a nose. Make a pyramid from a separate piece of clay and attach it between the eyes. Apply the clay to the face, paying particular attention to the bridge of the nose. The bridge should blend evenly into the brows.
 - When making the nose, check the profile of your statue. Some noses stick out further than others, and some point upward. Consult the reference photo to make sure you get the nose just right.
- The shape of a nose gives character to the face. Play with different types of noses to see what effects you can create.
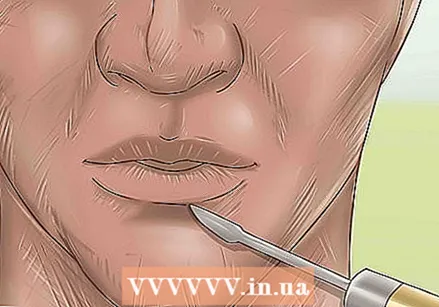 Hollow out the mouth. To make a mouth on your statue, scoop out a little bit of clay from under the nose. Only take enough clay to make the inside of the mouth. You make the lips with separate pieces of clay.
 - Using the same technique as for the eyebrows and nose, add some clay to shape the lips. Roll out a small cylinder and smear it on the face to shape the upper lip.
- Shaping a mouth takes a lot of practice. Keep referring to your reference photos and don't hesitate to start over if necessary.
- To make the bottom lip, leave some clay from the top lip and bend it down to form a horseshoe shape. Roll another cylinder of clay and attach it under the top lip. Leave a little space between the two lips so that it looks like the mouth is slightly open. Spread the clay until all seams have disappeared.
 Fill in the face. Once you add eyes, a nose, and a mouth, you may have to go back to build up the rest of the face. Add clay to make a chin, cheeks, hair or even a bigger forehead if needed.
 - When adding clay to your face, make sure to keep mixing to create a seamless image. It helps to work the clay a bit to warm it up. This way it is easier to knead when you add it.
- Add ears by making small flat circles and securing them to the side of the face. Hold the earlobe above the jawline, and fix the top part of the ear on the same path as the eye line. Sculpt the details of the ear with a small spatula or with a needle.
 Fix any errors. Before you finish your image, compare it to the reference photo. If you find something that you are not satisfied with, go back and improve it. Be patient and see your mistakes as an opportunity to improve your skills.
 - When you're happy with everything, go over the sculpted face one last time. Smooth all seams, remove excess clay, and clean the statue.
 Apply the finishing touches. Depending on the clay you used, you can bake it to complete your sculpture or make it into a mold.
 - Feel free to paint your creation or add decorations to bring your art to life.
Tips
- Modeling takes time. Go through all the steps calmly, without haste. Take the time to smooth and blend. However, don't spend too much time modeling one characteristic in particular. If you have problems with one feature, start with the rest of the face. If it still doesn't suit the rest of the face, then you can go back and rework the trouble spots.
- When shaping the facial features, look at the photos of your subject to make sure you get the correct shapes.


