Author:
Tamara Smith
Date Of Creation:
26 January 2021
Update Date:
29 June 2024

Content
Looking for a way to boost your Halloween decorations? Or do you need an eye-catcher for your Halloween party? Then build this coffin! It looks authentic enough to be a great Halloween decoration, everyone will want to check it out. It is made of plywood and therefore durable enough to be used multiple times, yet it is lightweight and inexpensive to build.
To step
 Gather the materials (see Necessities Below). All materials are inexpensive and can be purchased at a local DIY store.
 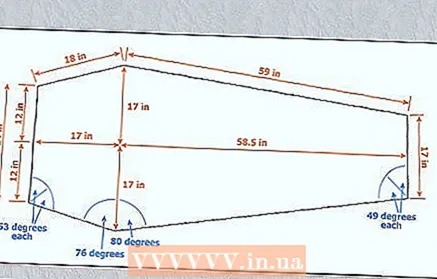 Make the design. Use baking parchment or another large piece of paper (wrapping paper or newspapers will also work, if you are on a budget) and tape the pieces together so that you have one large piece of paper large enough to format your design. This design will not be the base, it will be slightly smaller, but the coffin design where the side panels are already mounted on the base. The design allows you to measure the correct dimensions for the walls of the coffin, and measure the correct angles for the cuts. See figure 1 for the dimensions of the coffin. Use a set square to first draw the 2 perpendicular lines in the center. Then draw the top and bottom edges and then draw the missing lines that make up the walls of the coffin, as shown.
  Cut the walls of the coffin. The walls of the coffin will be 12 inches high. So take a plywood panel of 120x240 cm and cut out 4 pieces of 30x240 cm lengthwise (you will need 3 of these for the walls). Use a circular saw to cut the walls to the correct angles as shown in Figure 1. Make sure the corners are cut correctly so that the walls fit together properly. For example, the panel at the "head end" of the coffin should be 2 feet wide and the corners cut at 53 degrees.
 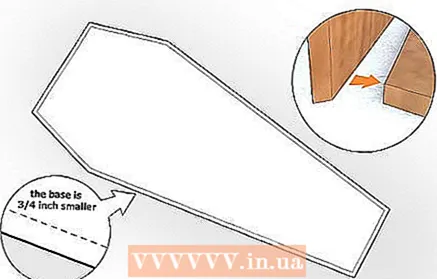 Draw a design for the base of the coffin. The wall panels are nailed to the edges of the base, so the base is slightly narrower (2 cm narrower on each side, assuming you are using 2 cm thick plywood boards) than the first design you drew. Stick pieces of parchment paper together, just like you did in step 2, and draw the base - again first draw the perpendicular lines - according to the dimensions in figure 2.
 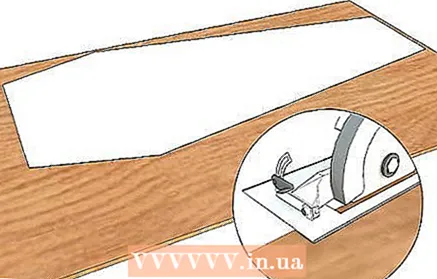 Cut the base of the coffin. Clip your paper design onto the second sheet of plywood measuring 120x240 cm. Do this in such a way that the vertex of the widest point of the coffin touches the edge of the plate. Use your circular saw to cut out the base.
  Saw the lid off the coffin (optional). Only use this step if you want a lid on the coffin. Place the first design (base + walls) on the rest of the piece of plywood so that it fits completely. Draw a line along the edges and then delete the design. Saw out the lid following the drawn lines.
 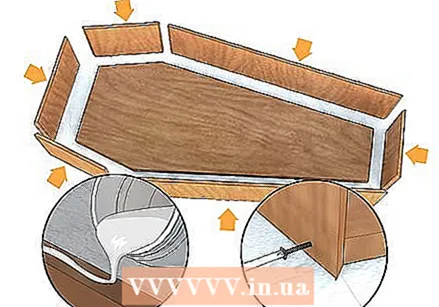 Assemble the coffin. It is now time to put it all together.
 - Try to fit the walls against each other and against the base. This is just to make sure everything will fit properly when you start gluing.
- Glue and / or screw the panels to the base and together. The bottom of each panel should be flush with the bottom of the base. Drive 3 cm screws through the wall of the side panels into the base. Use glue, screws or a router to attach the side wall panels together.
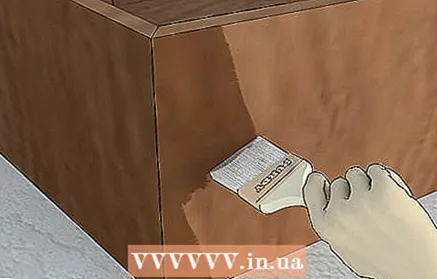 Finish the coffin. If there are holes or dents in the plywood, fill it with wood plugs or wood filler. Then stain or paint the wood as desired. You can be as creative as you want in decorating the coffin. If you want to cover the inside of the box with fabric, you don't have to stain or paint the inside. Simply glue or hammer the textile on the inside.
  Attach the coffin lid. If you're using the coffin for a funeral, you can just hammer the lid on. If not, attach the lid with hinges to one of the long sides of the coffin.
Tips
- If you hide yourself in the coffin, (then dress it up and) suddenly sit up when you hear someone coming. They will be shocked!
- Dress up as a vampire if you do this.
- When cutting the wood, make sure the saw is properly set. For example, to cut pieces that are 30 wide, you have to set the saw to 12 inches.
- You can sprinkle flour and dirt on the coffin to give it an old look. Add some fake spider webs to make it extra scary.
- This coffin can easily be converted into a bookcase if you add shelves. See the source page below for instructions.
- This design can be enlarged (for a larger coffin) or reduced (for a pet, for example) by increasing or decreasing the shell. As long as the dimensions are in proportion, the angles remain the same.
- Countersink all screw holes for extra strength.
- Plywood is great material for decorative use, but if you have one real to make a coffin, you better use real wood. Different types of wood can be used for coffins, including oak, pine and cedar.
Warnings
- Use caution when using a saw and other power tools. Follow the manufacturer's instructions and heed all warnings.
- Only apply stain, varnish or paint in a well-ventilated area. Follow the manufacturer's instructions and heed warnings.
Necessities
- Two pieces of plywood measuring 120x240 cm (or other suitable wood)
- Circular saw (or a regular wood saw, but this takes longer)
- Wood glue and 3 cm long screws
- Baking paper or another type of large piece of paper
- Hinges, if an openable lid is desired
- Wood plugs and / or wood filler
- Textile (optional)
- Stain or paint


