Author:
Eugene Taylor
Date Of Creation:
14 August 2021
Update Date:
1 July 2024

Content
Gift bags are very handy and available in many different colors and sizes. They are also expensive, especially if you buy a larger bag of a heavier quality. Moreover, you cannot always find a gift bag that exactly suits your needs. Make your own gift bags and save them for upcoming birthdays or other occasions when you want to give someone a gift.
To step
Method 1 of 2: Make a gift bag
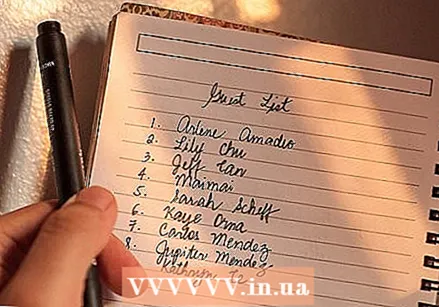 Count the number of guests you have invited so you know how much material you need. Buy a paper bag to use as a template. Choose a bag that is the same size as the one you have in mind for your gift bag.
 - You need just as much paper as is used for a brown paper bag. Add 5 centimeters in length per gift bag. These extra centimeters are for sticking together the overlapping edges of the paper. If you're using a standard paper lunch bag, include at least 10 centimeters in width.
 Open the seams of the brown paper bag. Make sure to also open the folded portion at the bottom. Use scissors to cut along the crease on the side and the bottom.
 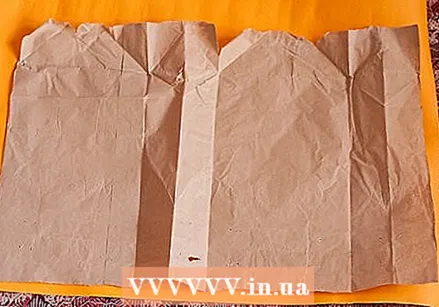 Place the wrapping paper roll on the table and place the cut-open brown paper bag on top. Trace the brown paper. This is the template for your gift bag.
 - Cut around the paper bag. If the paper bag is a little too small, leave some extra space to make your gift bag bigger. Just make sure you leave the same amount of space on all sides.
 Fold the wrapping paper in the same way that the brown paper was folded. Use the paper bag as an example when folding. The sizes listed here are for a standard paper lunch bag.
 - Make a 5 centimeter fold at the top and bottom of the paper.
- Fold over two inches of the paper on the left.
- Make a fold on the right side at three inches from the edge. This is the right side of your gift bag. Make another fold after 15 centimeters. This will be the front or back of the bag. After 7.5 centimeters you also make a fold. This will be the left side of your bag. Your bag should now have four different sections - two short and two long sides.
 Unfold the paper completely. At the top of the paper, line the edge of one of the long sides with a 5 centimeter long strip of cardboard. This will strengthen the part where the handles of the bag will soon be.
 - Apply glue to the back of the cardboard strip and tape it on both sides, from one fold to the other. The distance between them is 15 centimeters.
 Start gluing. Apply a layer of glue to the top fold (above the strip of cardboard). Fold the paper down onto the cardboard and the short sides. This is the top edge of your bag.
 - Apply glue to the printed side on the left. This is the 5 centimeter fold that will be turned over. Fasten it on the right side. Make sure you stick both sides together exactly right. This part is visible. You should now have the skeleton of a box or bag.
- Now edit the four folds again to make the shape of the bag more visible.
- Apply glue to the printed side on the left. This is the 5 centimeter fold that will be turned over. Fasten it on the right side. Make sure you stick both sides together exactly right. This part is visible. You should now have the skeleton of a box or bag.
 Make the bottom of the bag. This is the trickiest part. Think about wrapping a gift in wrapping paper - you want right angles and coordinated folds.
 - Fold the short sides over to form four triangles. Make firm folds along the top edges of the triangles. Fold the paper over so that the two sides touch and form the bottom of your bag.
- Apply glue to the folded sides on the bottom of the bag. Place the long sides over the short sides. Apply glue to the second, top long flap and press it down firmly. Fold the flap over the other long flap. The bottom of your bag should now be shaped like the letter "X".
- Put a piece of cardboard on the bottom to reinforce it. Apply glue to the piece of cardboard and insert it into the bag. Press down firmly on the cardboard.
 Make a hole in both tops of the bag. For best results, use a single hole punch. If your gift bag is 6 inches wide, make the holes approximately 2 inches from the edge.
 - Thread string, cord, or ribbon through the holes to make handles. Tie a knot in the ends of the rope.
- If you don't have these materials at home, you can make gift wrap handles. Just make sure to use enough paper so that the handles don't tear.
 Put colored tissue paper in the gift bag and let it stick out from the top. Then put your gift in the bag. You are now ready to give your gift bag away when it is time.
 - To give the tissue paper a festive look, hold your finger in the center and pull the paper up around it, loosening the pointed edges. Put the paper in the bag. It should keep its shape.
Method 2 of 2: Fill the gift bag
 Fill the gift bag with gifts you made yourself using wikiHow:
- Beer candles
- A bouquet of cookies
- Shot glasses with candles in them
- A knitted cherry pie
- A purse of playing cards
- A ring with beads
- A bag to keep tissues
- Chocolate nests
- Cocoa lip balm
- A poinsettia made from Christmas cards
- A picture frame in a book
- Lip gloss
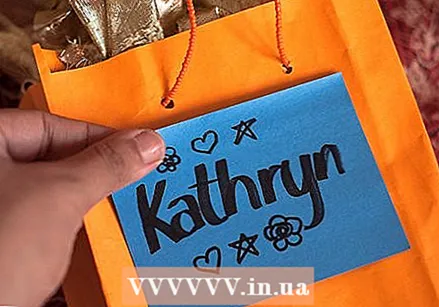 Make a decorative label. You can choose from several options if you want to give each gift bag to a specific person.
 - Attach a gift wrap tag to the bag or handle. Fold the label in half. If you want to attach the label to the handle, poke a hole in the label and secure it with a string.
- Write the person's name directly on the gift bag. Piece of cake!
- Tie a ribbon around the handle with a small piece of paper at the end with the person's name written on it.
Tips
- When shopping, ask for paper bags instead of plastic bags. This will give you the paper bags you need as a template for your gift bag.
- Make small tassels for your gift bag to make it look more stylish.
- Buy large rolls of Santa Claus or Christmas paper after the holidays. After all, wrapping paper is cheaper.
- Use ribbons or thick yarn for the handles.
- Prepare the gift bags well in advance to prepare for any birthday or holiday.
Necessities
- Brown paper bag
- Glue or paste
- Drawstring or ribbons
- Rolls of wrapping paper
- Scissors
- Blotting paper (to fill the gift bag)


