Author:
Charles Brown
Date Of Creation:
6 February 2021
Update Date:
28 June 2024

Content
World bridges are some of the most beautiful sights on this earth. However, it is impossible to place them on your kitchen table. Fortunately, with a few bridge building techniques, popsicle sticks, a creative mind, and a few other household items, you can build a great bridge yourself.
To step
Part 1 of 4: Planning your bridge
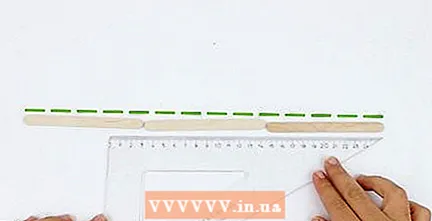 Determine the length of the bridge. You need to determine how long you want to make the bridge first, even before buying the supplies. There are different sizes of popsicle sticks for sale in the supermarket or hobby store. You need the following:
 - Place a folding rule on your workspace.
- Indicate the length of the bridge (approximately).
- Lay your folding rule across to indicate the width of the bridge.
- Estimate the number of popsicle sticks based on these dimensions and size.
 Gather your supplies. You can buy the popsicle sticks at a supermarket, grocery or hobby store. The type of stick you need will depend on the vision you have for your bridge, but make sure you have enough material so you don't run out halfway through the bridge. You need:
 - Ice cream sticks
- Glue gun (and glue)
- Large piece of cardboard or heavy paper
- Paper (for designs)
- Pencil
- Scissors or scissors (for cutting the popsicle sticks)
- Folding rule or ruler
 Decide what kind of bridge you will make. There are different types of bridges to choose from, such as suspension bridges, drawbridges and truss bridges. Because a truss bridge uses triangles in the frame to support and reinforce the structure, it is ideal for a lolly stick bridge.
 - To give an example, we are going to build the following bridge, modeled on the classic Warren truss bridge.
 Lay your beams flat and let the glue dry for a short time. If you used hot glue, this won't take long, but letting the glue dry completely will prevent you (or someone else) from working a popsicle stick out of your truss (beam). Other types of glue, such as wood glue or hobby glue, should be allowed to dry for 10 to 15 minutes.
 - If your glued beam feels weak, tacky, or loose, let the glue dry for another 15 minutes.
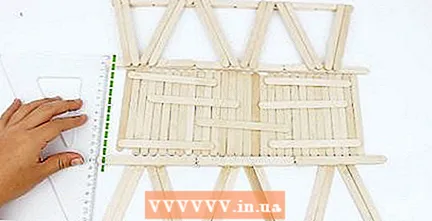 Measure the supports for the deck and the hinges of the beams. Take your folding rule or ruler and measure the length of your deck. You will need to make grout supports for your deck to rest on. This will also cross connect the walls of your beams. Take the size of your deck and the thickness of both beams.
  Add the top support beams. If you have long popsicle sticks, you can simply place them on the top of the truss and glue them on. However, if your popsicle sticks aren't long enough, you can make longer. Cut a few and glue them together to make a longer stick, attaching a stick to the bottom as a support.
 - Placing everything equidistant will make it look real.
Tips
- Two sizes of popsicle sticks were used for the construction of this bridge. However, you should also be able to create this design with just one kind of popsicle stick.
- If you are unable to get the glues to bond firmly, use binders to apply pressure to two glued popsicle sticks until the glue is dry enough.
- When gluing (laminating) sticks in layers, you can achieve better strength by placing your ice cream sticks in steps.
- Be careful not to touch the hot glue or get close to freshly applied hot glue until it is almost or completely clear!
Warnings
- Always be careful with a hot glue gun. Misuse can result in burns. Be very careful and be well prepared.
Necessities
- Ice cream sticks
- Glue gun (and glue)
- Large piece of cardboard or heavy paper
- Paper (for designs)
- Pencil
- Scissors or scissors (for cutting popsicle sticks)
- Folding rule or ruler


