Author:
John Pratt
Date Of Creation:
17 April 2021
Update Date:
1 July 2024
Content
- To step
- Method 1 of 4: Formal or business letter
- Method 2 of 4: Informal letter
- Method 3 of 4: Formal or business email
- Method 4 of 4: Informal email
- Tips
The correct format to use when writing a letter largely depends on the type of letter you plan to write and who you are writing it to. The formatting you can use when writing to a friend differs significantly from the formatting used in formal letters. Moreover, the format of a traditional letter that you send by post is different from an e-mail. Read on to learn more about the right way to write your next letter.
To step
Method 1 of 4: Formal or business letter
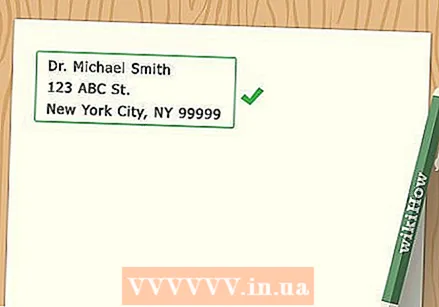 State your name and address at the top of the letter. Include the street name, city, state, and zip code on the left margin with a single spacing.
 - The city and zip code are on the same line, while the street name has its own line.
- If you are sending a letter with a professional letterhead that already contains this information, skip this step. Do not duplicate the sender's address.
 For letters in the United States, include the date directly below your address. For Dutch letters, state the place and date under the addressee's address. Use the date you wrote your letter or the date you finished it, whichever you prefer.
 - The date should be against the left margin, as should the address directly above it.
- Write the date in the order "month-day-year" for letters in the United States. For example: February 9, 2013. For Dutch letters you use "day-month-year". For example: February 9, 2013.
 Use a space between the date and the next part of the letter. This neatly separates the address from the next section.
  For letters in the US, use a reference rule, if applicable. If you are writing a letter related to something specific, it can help to use a reference line that starts with "Re:".
 - Place the reference line against the left margin and use single line spacing.
- Use a reference line when you respond to another letter, job advertisement or information request.
- After the reference line, use a space to separate it from the next section of the letter.
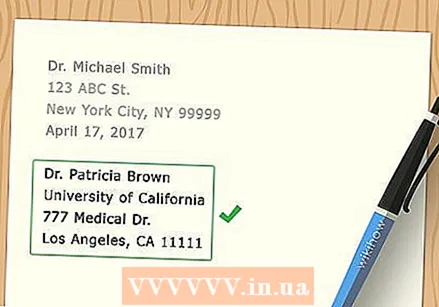 State the address of the addressee. Include the recipient's name and title, as well as the company name, street name, city, and zip code.
 - All this information should be against the left margin and a single line spacing. The recipient's name must have its own line as well as the recipient's title, company name, and street name. The city and zip code are together on one line.
- If you are sending the letter to another country, please include the name of the country in capital letters on its own line below the address.
- If possible, address the letter to a specific person and address that person with an appropriate title such as "Mr." or "Mrs.". If you don't know the recipient's gender, skip the title.
- Use a space after the complete address.
 Begin the body of your letter with a polite salutation. A normal salutation starts with "Dear", followed by the recipient's personal title and last name. The name is followed by a comma.
 - The salutation should be against the left margin.
- If you don't know the recipient's gender, you can address the individual with his or her full name, or prefix the last name with the job title.
- Use a space after the salutation.
 Use a subject line, if desired. In Dutch letters, state the subject line above the salutation and for letters in the US below the salutation.
 - Keep the subject line short but clear. Try to keep it one line.
- In the US this is not common and should rarely be used. In the Netherlands it is more common.
- If you used a reference line, don't use a subject line.
- Use a space after any subject line.
 Begin the middle section with a short introduction that explains the purpose of your letter. Place the paragraphs against the left margin, but feel free to indent them.
  Continue your introduction with a longer section of the centerpiece. This section should explain more about the purpose of your letter and also include a conclusion that summarizes everything.
 - Write a concise middle section. Use a single line spacing for each paragraph, but leave a space between each paragraph and after the last paragraph.
 End your letter with a polite ending. Examples of polite closings include "Sincerely," "Sincerely," or "Thank you." Don't forget to put the closing on the left margin and follow it with a comma.
 - Use a capital letter only for the first letter of the first word in the closing.
 Follow the closing with your name. However, use three spaces below the closing before entering your full name, followed by your job title in the line below.
  Please include any attachments at the very bottom of your letter. If you have any attachments, write "Attachments" in the line below your typed name and title, and indicate how many attachments they are.
 - Note: this is not necessary if you do not have any attachments.
- Use single spacing and place the attachment portion against the left margin.
 Include the typist's initials, if applicable. If someone else wrote the letter and you dictated it, include the typist's initials at the bottom of the letter on a line below the attachments.
  Place your signature after you have printed your letter. Write your name by hand, preferably in italics, between the closing and your typed name. Signing your letter by hand shows the addressee that you used your own time to send them this letter, so it's important.
Method 2 of 4: Informal letter
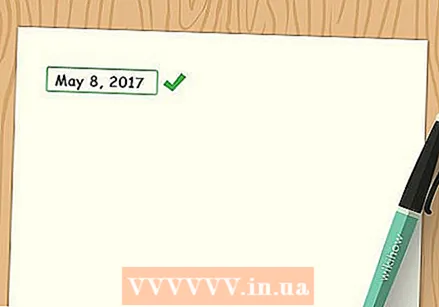 Please indicate the date. State the date on which the letter was written or completed in the top right-hand corner of the letter.
 - Write the date in "month-day-year" order for letters in the United States. For Dutch letters you use "day-month-year". Unsubscribing the month is usually the default, but you can also write the whole date in numbers.
- The date should be against the left margin.
 Write a friendly salutation. The salutation "Dear" is still the most common, but depending on your relationship with the addressee, you may be able to write the addressee's name without formalities.
 - The salutation must be against the left margin and followed by a comma.
- When writing to your friend or peer, you can usually only write their first name. For example: "Dear John".
- For even more informal letters, you can replace the "Dear" with an informal greeting such as "Hello", "Hi" and "Hey".
- If you are writing to an older person or someone you need to show a little respect for, include the personal title and last name. For example: "Dear Mrs. de Wit".
- Use a space between the salutation and the body of the letter.
 Include an introduction, middle section and conclusion in your letter. The introduction and conclusion should only be a short paragraph, but the middle part is usually significantly longer.
 - Place the body of the letter against the left margin, but indent the first line of each paragraph.
- All text must be single line spacing. You usually don't skip lines between paragraphs in an informal letter, but you can do it if it improves the readability of your letter.
- Use a space after the last sentence of your body text to separate it from the closing.
 Close with an appropriate closure. "Sincerely" is still a fairly common ending, even for casual letters. However, if the letter is very informal, you can use a less conventional closing. Try something like "See you next time!" Or "Talk to you later!" When writing to a close friend.
 - Follow the closing with a comma, but don't use a typed version of your name after it.
- The closing must match the salutation.
 Put your name. Put your name directly below the closing. Usually your name is written in italics instead of typing it.
 - If you normally call the recipient by their first name, you can write your first name and leave it at that. If the recipient may not be able to tell who you are by just your first name, make sure to include your last name as well.
Method 3 of 4: Formal or business email
 Start with a brief but clear description of the purpose of your email. This description should be in the subject line of the email, not in the email itself.
 - If the addressee expects your email, this description can simply refer to the subject. If the email is unexpected, the description may be a bit trickier. The goal is to let the reader know what to expect when they open your email. This means that you have to motivate the reader to open it.
 Start the email with a formal salutation. This usually starts with "Dear" and is followed by the formal title of an individual or company you are writing to.
 - Address the email to a specific recipient, if possible. Avoid sending the email to unaddressed recipients. Only use "L.S." as a last resort.
- Strictly speaking, the most appropriate punctuation mark to use after a salutation is still a colon. That said, most people today use a comma after the salutation of a formal email.
- If you are unsure whether to address the recipient as "Mrs." or "Mr.", write their full name instead.
- Follow the formal salutation with a space.
 Write the text of the letter and keep it short but informative. As with all letters, the main text should include an introduction, body, and conclusion. Keep everything, including the centerpiece, as short and direct as possible.
 - Place the body text against the left margin.
- Do not indent the text.
- Use single line spacing for the body text, but use a space between each paragraph and after the last paragraph.
 Use a polite ending. After the body of your letter, write "Sincerely" or another similar polite closing, followed by a comma.
 - Don't forget to put the closing on the left margin and only use a capital letter for the first letter of the first word.
- Other potential formal closings include "Thank you," "Sincerely," and "Best wishes."
 State your name directly below the closing. Unlike a paper letter, you cannot place a signature in an email by hand.
 - Put your name against the left margin.
 Include your contact details at the bottom. Skip a line after your name and include your address, phone number, email address, and website or blog, if applicable.
 - Put all this information against the left margin and use single spacing. Give each new piece of information its own line.
Method 4 of 4: Informal email
 Start with a short but clear description of the subject of your email in the subject line. This allows the recipient to quickly see the subject before opening the email, and it gives them enough information to know what to expect.
  Start with a polite greeting or salutation in the body of the email. You can use any polite greeting you want, such as "Dear". Follow this with the recipient's name.
 - Place the salutation against the left margin.
- If you're writing to a close friend, you can ignore the salutation completely and just write their first name followed by a comma.
- Use a space between the greeting and the body of your email.
 Write the body of your email. Like other letters, the body of your email should include an introduction, body, and conclusion. However, if you are writing the email to a close friend, this type of formatting is not necessary.
  Close your email with a closing greeting. When closing an email to a friend, the closing does not have to be formal, but should indicate that your email is ending.
 - If you're writing to a very close friend, sometimes it's perfectly okay to close your email with just your name, and you can ignore the whole closing greeting.
Tips
- Note that there are a few differences between formal letters in the United States and those in the United Kingdom (or other countries). In the UK, the return address and date are in the right margin, and the subject line in the center. In addition, the date is written as "day-month-year," and the salutation is followed by a comma instead of a colon.
- If you don't like the block formatting shown here, you can also use custom blocks or semi-blocks. This layout basically contains the same information, but is just organized differently.


