Author:
Judy Howell
Date Of Creation:
2 July 2021
Update Date:
1 July 2024
Content
USB flash drives make it easy to keep frequently used files on hand for use on a computer with a USB connection. These handy little memories can store up to a terabyte of data in a device no larger than five centimeters, although they are more common (and more affordable) in a smaller storage capacity. Copying your files to a USB stick is incredibly easy, even when doing this for the first time.
To step
Method 1 of 2: Using Windows
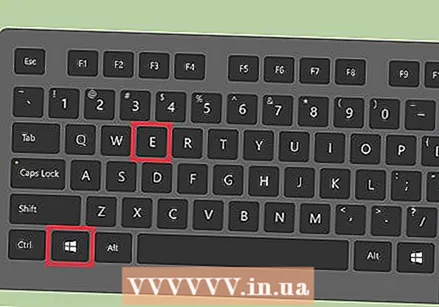 Navigate to the folder containing the files you want to copy. Open the file explorer (Windows Explorer) by clicking ⊞ Win+E to push. Scroll through the list of drives and folders on the left until you find the one that contains the files you want to save to your USB stick.
 - Private files are often stored in the "Documents" folder (also called "My Documents" or "[username] Documents").
- If you are looking for photos or music stored on your computer, look in the "Photos" and "Music" folders.
 Connect the USB stick to the USB port on your computer. USB ports can be found in different locations, depending on your computer. Desktop computers often have these ports on the front of the cabinet, although you can also find them on the back of the monitor. Laptops usually have USB ports on both sides of the device.
  Find a place on your USB stick to place the copied files. You can copy files to any folder on the USB stick.
 - Your system will likely display a dialog shortly after you plug in the stick. One of the options should be "Open folder and view files". Click on the link to get to the root (root directory) of your USB stick. Files can be copied directly to this folder, or to any of the folders you see here.
- If no window appears, press ⊞ Win+E to open a new Explorer window, and double-click the name of your USB stick on the left side of the screen. This is called something like "USB Drive" or "Removable Storage" or perhaps the name of the manufacturer (eg, "Sandisk").
- Create a new folder with a name you can remember to keep everything organized. Create a new folder on your USB stick, by clicking Ctrl+⇧ Shift+N., and then type in a name for the folder (e.g., "Private," "Photos," etc.). Press ↵ Enter. Double-click on the new folder to open it.
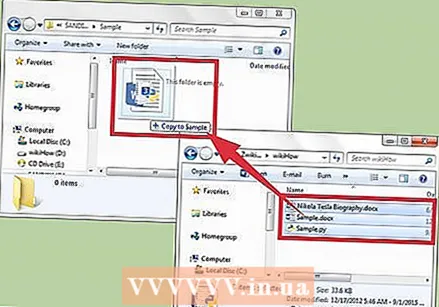 Drag the files to the computer from the USB stick. Make sure you have two Explorer windows open (one from the computer and the other from the USB stick), and drag a file from the computer to the USB stick. Dragging a file to the USB stick will create a new copy of the file without deleting the original on the USB stick.
 - To copy multiple files at the same time, hold down Ctrl and click once on each file. When all files are selected, click anywhere in the selected area and drag the group of files to the USB drive.
- You can also drag entire folders to your computer in the same way.
 Save an open file directly to a USB stick. If you have a file open in a program such as Microsoft Word or Photoshop, you can save it directly to a USB stick, without having to drag it between Explorer windows. Click on "File", then "Save As", and select a save location on the USB stick.
  Eject the USB stick safely. To make sure that you do not damage the data on the USB stick, you must safely remove the stick.
 - At the bottom right of the screen near the clock you will see the USB icon (depending on your version of Windows, this may be a green check mark). Right-click the icon and choose "Safe Eject".
- When you see confirmation stating "It's safe to unplug your device," you can remove the USB drive from the port.
Method 2 of 2: Using a Mac
 Connect the USB stick to a USB port. If you use a laptop, you will find the USB ports on the sides of the device. On a desktop Mac, the ports are usually located on the back of the monitor. The stick will be automatically mounted on the computer, and once it is, you will see a new icon on the desktop that looks like a small white hard drive.
  View the files on your USB stick. Double-click the new USB stick icon on your desktop. The contents of the USB stick will appear in a new window. You can copy files directly to the root (root directory), or to another folder in the right pane.
 - At the bottom of this window you can also see how much storage space is available on the USB stick.
- You can also access the USB drive through Finder, then select the USB drive through "Devices" on the left side of the screen.
 Create a new folder for copying the files. It is sometimes useful (but not necessarily necessary) to create a new folder on the USB stick for the files you are copying. Naming files appropriately with regard to their content will help you keep things in order.
 - When the file window of the USB stick is open, press ⇧ Shift+⌘ Command+N. to create a new folder.
- Type a name for the folder and press ⏎ Return.
 Find the files you want to copy from your computer. Open Finder and navigate to the folder containing the files you want to copy to the USB drive.
  Drag your file (s) to the USB stick. To copy a file without deleting it from your computer, drag it to the open folder on the USB stick.
 - Once you've created a new folder for the files to be copied, drag those files directly into that folder.
- To select multiple files at the same time, press and hold Control while clicking each file you want to copy, and drag the selected files to the new location.
 Eject the USB stick. Don't forget to eject your USB stick before removing it from your computer's USB port. This prevents data corruption. Go to the desktop and drag the USB stick icon to the Trash (the trash changes to an "eject" icon as you drag). You can then safely remove the USB stick.
Tips
- If you can't find the USB stick in the file explorer after connecting it, you can try removing it and connecting it again.
- Make sure your USB stick has enough memory space. A 2 GB (gigabyte) USB stick should be sufficient for most school assignments or transferring documents. If you plan to store music and / or photos on the device, consider one of 64GB or 128GB.
- According to experts, half of all USB sticks found are used, often by malicious parties. Consider encrypting the data on your USB stick to protect yourself from data or identity theft.


