Author:
Alice Brown
Date Of Creation:
24 May 2021
Update Date:
1 July 2024

Content
- Steps
- Part 1 of 3: Preparing the tools
- Part 2 of 3: Sharpen the chisel
- Part 3 of 3: Additional finishes
- Warnings
- What do you need
As the saying goes, a sharp blade is safer than a dull one. This is true for both the chisel and any other tool, so it is very important that the sharp edge of the chisel is cleaned once or twice a year, depending on how often you use the tool. See step 1 to get started.
Steps
Part 1 of 3: Preparing the tools
 1 Sharpen your chisels before use. A set of brand new chisels may not be sharp enough to tackle complex woodworking, so you must sharpen them before starting a project. They stay sharp for a long time, so sharpen them about once or twice a year if you use them very often.
 - If the chisels are old and have uneven or damaged chamfers, you can change them with a grinding wheel. Hold damaged chisel chamfers near the grinding wheel to remove large galls, dirt, or rust.

- If the chisels are old and have uneven or damaged chamfers, you can change them with a grinding wheel. Hold damaged chisel chamfers near the grinding wheel to remove large galls, dirt, or rust.
 2 Take out the whetstone. You will need a stone with three levels - beginner, medium and fine to achieve the sharpest condition. Sharpening stones are available at garden and hardware stores. The stone you choose comes with a lubricant (or you may be advised to buy it separately). There are two main types that are quite effective:
 - Water stones use water as a lubricant. They are soaked in water for a few minutes before use. This type of stone is preferred in Japan.
- Oil stones are lubricated with petroleum based oil before use.
 3 Prepare the stone. Prepare it according to the instructions that came with it. To soak the water stone, you will need a water bath. The oil stone must be lubricated with an appropriate lubricant.
Part 2 of 3: Sharpen the chisel
 1 Start on the flat side. The flat side of the chisel should be like a mirror image if sharpened correctly. Begin to move the chisel back and forth along the stone chips. Use both hands to keep it level as you go back and forth. Your movements should be smooth and gradual, without jerking. When scratches appear on the flat surface of the stone, continue to do the same on the medium-grain stone, and then on the fine one. The flat side of the chisel is ready when it looks like a mirror image.
 - Do not move the chisel from side to side or the stone back and forth.

- Use the entire surface of the stone until completion.

- Clean the blade and your hands so that dust does not obscure the view of the chisel surface.
- Do not move the chisel from side to side or the stone back and forth.
 2 Use a sharpening tool to set the tilt angle. It is possible to sharpen the chamfer by hand, but it is very difficult to obtain an exact angle without a special device. Place the chisel in the sharpener and tighten the screws on both sides to hold it in place. Depending on the type of chisel you will be using, you will need to set up a device to create an angle of somewhere between 20 or 35 degrees.
 - For a cleaning chisel, set it at a 20 degree angle.
- For a regular chisel, set at a 25 degree angle.
- If you don't want to buy a sharpening device, you can make one out of wood. You should cut the wood wedge at an angle, apply superglue on both sides of the wood pieces as rails (the chisel is in between), then screw another piece of wood over the rails so you can tighten the chisel.
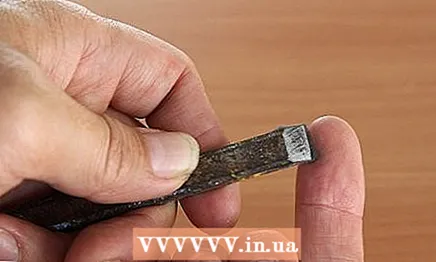
 3 Sharpen the chamfer. Place the chamfer against the coarse grit stone. Use both hands to hold the device, move the chisel back and forth over the thin stone, as if taut, as in Figure 8. When you see scratches on the chamfer, change the stone to medium grit, then to fine, wiping the blade between shifts.
 - Use the entire surface of the stone until you sharpen. If you use the same area for too long, it will create a dimple that will not sharpen the edges properly.
- After sharpening the corner, you may notice a slight indentation on the flat side. This is called a grinding cavity, and in Japan the chisels are specially sharpened to make them easier to sharpen next time.
Part 3 of 3: Additional finishes
 1 Add a micro bevel. In most cases, the chisel is ready after you've finished sharpening, but if you want the chisel to be sharper, add a microfilm. This is essentially a miniature second bevel made at the end of the chamfer. This is the right step if you are doing work that requires utmost precision. To create a micro chamfer, adjust the sharpener to a 5 degree angle and repeat only on fine stone.
 - You only need to make a few strokes on the fine grain to create the micro bevel as you are shooting a little metal.
 2 Chisel polishing. Some people prefer to finish with a polish, which gives the chisel a beautiful shine. Place a piece of leather on a flat surface and cover with an even layer of buffing. Wipe the flat side of the chisel against the joint several times, then wipe the chamfer (or micro-chamfer). When done, wipe off the blade.
Warnings
- Always wear safety glasses when using the grinding wheel.
What do you need
- Grinding wheel (optional)
- Water or oil whetstone
- Sharpening device
- Leather and polish (optional)
")


