Author:
Gregory Harris
Date Of Creation:
11 August 2021
Update Date:
1 July 2024

Content
- Steps
- Part 1 of 3: Winding the bobbin
- Part 2 of 3: Threading the Needle
- Part 3 of 3: Threading and Tightening the Bobbin Thread
- What do you need
The Brother LS 1217 sewing machine is the standard model, so threading is no more difficult than any other machine. However, you should read the refueling instructions carefully before using.
Steps
Part 1 of 3: Winding the bobbin
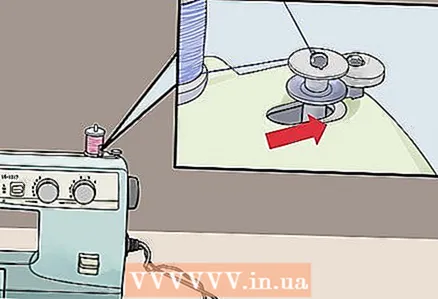
 1 Extend the spool of thread. Place the spool of thread on the spool pin at the top of the machine.
 - Please note that the machine must be turned on when you wind the bobbin.
- If you are using a pre-wound bobbin, skip this section and go directly to the Threading the Needle and Threading the Bobbin Threads sections.
 2 Wrap the thread. Draw the free end of the thread from the spool, through the top of the machine and around the bobbin tension disc on the other side of the machine.
 - Make sure the spool turns clockwise as you untangle the thread. If the coil does not turn correctly, you should change its position on the shaft.
- Wrap the thread around the front of the disc first. She should walk along the left side of the disc, then turn and go in front of the car.
 3 Pull the thread through the hole in the bobbin. Pass the free end through the hole in the bobbin.
 - The thread should pass through the bobbin from the inside to the top.
- Pull at least 5-7.6 cm of thread through the bobbin.
 4 Fasten the coil. Place the spool on the bobbin winder and slide the bobbin winder to the right to secure.
 - Make sure the free end of the thread is in the right place, 'face' up.
- Gently turn the spool clockwise by hand until you notice that the winder's spring enters the slot in the spool, thus securing it.
 5 Place the thread around the bobbin. Hold the free end of the thread and gently push down on the control pedal. Wrap the bobbin with thread several times, then take your foot off the control pedal.
 - When the bobbin starts to work, trim the free end of the thread that is sticking out of the bobbin.
 6 Wind until the bobbin winds. Step on the control pedal again and allow the bobbin to wind faster. Continue to wind the bobbin completely.
 - Remember that the machine should stop automatically when the bobbin is wound.
- The flywheel will rotate while winding the bobbin. But do not touch it, as this may damage the clipper.
 7 Remove the coil. Cut the thread that connects the spool and bobbin, and then remove the spool from the spool pin.
 - Move the spool pin to the left. You should be able to remove the coil by simply lifting it up.
Part 2 of 3: Threading the Needle
 1 Raise the take-up lever. Turn the handwheel on the right side of the machine until the take-off lever on the left front channel is at its highest position.
 - Please note that the clipper must be turned off at this stage to avoid damage or injury.
- Turn the flywheel counterclockwise, or toward you. Do not turn it away from you.
- Raise the foot while pressing the presser foot lever.
 2 Install the spool of thread. Place the spool of thread on the holder at the top of the machine.
 - You may need to pull the holder upwards before installing.
- Remember that the spool of thread should be in such a position that the free end of the thread will separate from the back, not the front, which will cause the spool to turn counterclockwise when unwinding.
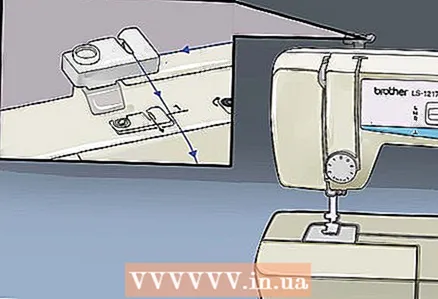 3 Pull the thread into the right channel. Draw the thread through the top of the machine and through the top of the guide, then down to the right channel.
 - The upper thread guide is a hook-shaped piece of metal attached to the bobbin-winding disc.
- The thread should pass through the right channel at a straight, not diagonal, angle.
 4 Wrap the thread around the thread tensioner. Wrap the thread around the back and around the thread tensioner between the front channels.
 - You may need to apply pressure to the string as it passes over the right channel.
- Wrap the thread around the device from right to left. Make sure the thread enters the take-up spring to the left of the device before proceeding.
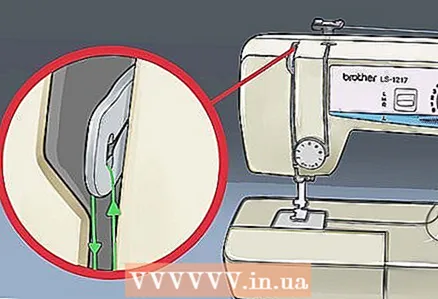 5 Draw the thread around the take-up lever. Pull the thread up the left channel, through the hook of the take-up lever, then back down the left channel on the other side of the lever.
 - The thread must be to the right of the take-up lever before you attach it to the lever. The thread should then come out down the left side of the lever.
- The thread should naturally flow into the hook of the lever when you pull it from the back of the lever.
 6 Secure the thread in the last thread guide. Draw the thread down to the needle, then pull it through the last guide above the needle.
 - This thread guide looks like a small block that sits horizontally at the top of the needle. Pull the thread through the hole in this block until it reaches the inner bend.
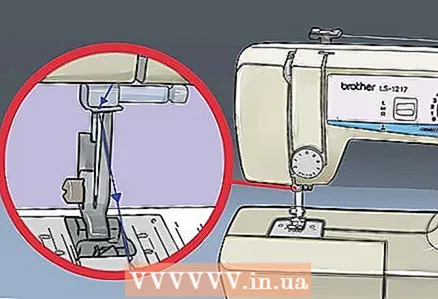
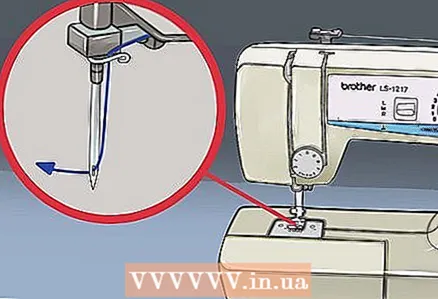 7 Thread the thread through the eye of the needle. Pull the thread through the needle from front to back.
 - Leave a free end of the thread 5 cm long. Position this end of the thread so that it is at the back of the machine.
Part 3 of 3: Threading and Tightening the Bobbin Thread
 1 Raise the needle. Turn the flywheel on the right side of the machine until the needle is at its highest position.
 - Remember to turn off the clipper to minimize the risk of damage or injury.
- Rotate the handwheel towards you, counterclockwise. Don't do it backwards.
- If necessary, also move the presser foot lever up.
 2 Remove the bobbin case. Open the cover and remove the bobbin case from the machine by sliding the latch.
 - The cover should be located behind the draw-out table in front of the machine.
- Pull the bobbin case latch towards you. You should feel the cap loosening inside the machine. Continue to pull the latch towards you to completely remove the cap from the machine.
 3 Insert the bobbin into the bobbin case. Insert the bobbin into the cap and thread the free end of the thread through the hole in the cap.
 - Unwind about 10 cm of thread before placing the bobbin in the cap. You will need this length of thread for your work at this stage.
- Hold the bobbin case with the latch hook on your thumb. Hold the bobbin so that the threads rotate clockwise.
- Place the bobbin in place, leaving the free end of the thread hanging down.
- Pull the free end of the thread into the groove of the cap until it enters the spring clip and exits through the hole in the cap's thread guide system.
 4 Place the cap back on the machine. Grasp the bobbin case by the latch again, then insert it back into the machine. Release the latch after the bobbin case is in place.
 - The latch on the cap must match the groove in the upper interior of the machine.
- If everything was done correctly, the cap should not turn in the middle of the machine.
 5 Launch the needle once. Turn the flywheel on the right side of the machine toward you (counterclockwise). The needle should enter the base of the machine and move up again.
 - Hold the end of the upper needle firmly with your left hand and apply some tension in the thread as you turn the handwheel with your right hand.
- Do not turn the flywheel away from you (clockwise).
- If done correctly, the upper thread should be in contact with the lower thread so that the lower thread comes out of the base of the machine and forms a large loop.
 6 Grab the loop. Use your finger to gently grasp the loop of the thread that has just formed as you untie it.
 - You should see two separate ends of the thread, one coming out of the needle (top thread) and one coming out of the machine's base (bottom thread).
 7 Pull out both threads. Pull the ends of both threads separately until you have a length of 15 cm. Spread the extended threads so that they are at the back of the machine.
 - Both threads should be behind the foot.
- The top thread should run between the 'feet' of the foot.
 8 Check again. Read the instructions again and check the position of the upper and lower threads. If done correctly, the machine will be primed and ready to use.
What do you need
- Sewing machine Brother LS 1217
- Spool of thread
- Bobbin
- Scissors


