Author:
Clyde Lopez
Date Of Creation:
26 June 2021
Update Date:
1 July 2024

Content
- Steps
- Method 1 of 3: How to disinfect an earring and earlobe
- Method 2 of 3: How to "open" a puncture
- Method 3 of 3: How to care for your earring and piercing
- Tips
- Warnings
- What do you need
Wearing earrings in your ears is a great way to complement your look with accessories, but if you do not wear earrings all the time, the piercing can overgrow and close over time. In some cases, professional help is required, but the puncture can be reopened at home, if everything is properly disinfected, work slowly and carefully to prevent pain and infection of the puncture. Careful preparation and patience - and you will have a puncture in your ear again in order to wear earrings.
Steps
Method 1 of 3: How to disinfect an earring and earlobe
 1 Soften the skin around the earlobe. Before attempting to open the puncture again, you need to soften the skin of your earlobe. To do this, take a warm, damp cotton pad and briefly apply it to your earlobe. You can just take a warm shower. Thus, it will be much easier for you to "pass" the puncture.
  2 Wash your hands and put on latex gloves. Wash your hands thoroughly with water and antibacterial soap for 30 seconds to remove any dirt, sebum, and germs.After you've rinsed and dried your hands, put on a pair of latex gloves. This ensures that bacteria do not enter the wound.
 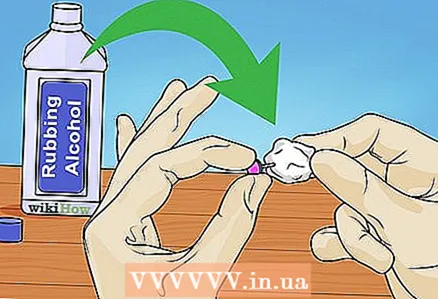 3 Disinfect earrings with rubbing alcohol. Isopropyl alcohol (also known as isopropanol) or rubbing alcohol, which can be found at your drugstore or grocery store, will work. Wipe your earlobe with alcohol - alcohol has a strong disinfectant effect, killing most bacteria, fungi and viruses that live on the surface of the skin. Moisten a cotton swab or cotton pad with alcohol and wipe the earrings (the part with the thin rod). It is with this part of the earring that you will "open" the puncture. The surface must be thoroughly cleaned. Place the earrings on a clean surface to dry.
 - If you have allergies, be sure to buy silver or gold (hypoallergenic) earrings so you don't have an allergic reaction.
 4 Disinfect your earlobe. Take a new cotton ball or cotton ball soaked in alcohol and disinfect your earlobe. Be sure to wipe the front and back of your earlobe, but pay the most attention to the puncture site.
Method 2 of 3: How to "open" a puncture
 1 Feel the back of your earlobe. You may feel a small knot where the puncture was. This nodule is made up of dead skin cells that block this puncture as it heals.
 - If the hole is completely overgrown, you may need to seek professional help to wear the earrings again. Keep in mind that the time for complete healing is different for everyone. You may not wear earrings for several years, but you can still easily "open" the puncture at home, or this puncture may completely heal within a few months.
 2 Lubricate your earlobe. Apply a generous amount of petroleum jelly or antibiotic ointment to your earlobe to lubricate the area and reduce friction. Using your fingers, gently apply the ointment to your earlobes. The warmth of your hands helps soften the skin.
  3 Pull your earlobe. Using your fingers, gently pinch the edges of your earlobe and pull gently in opposite directions. This will make it easier to "pass" the puncture. In addition, in this way you will fill some part of the puncture (what is left of it) with ointment. Do not rub it into the lobe or stretch it too much.
  4 Apply the ointment to the disinfected earrings. Take petroleum jelly or antibiotic ointment and lubricate the shank of the earring. Be careful not to rub the rest of the earring with the ointment so that it does not accidentally slip out of your hands.
 - Take earrings with a thin rod. It is very difficult and problematic to pass a narrow, overgrown puncture with a thick rod. If you try to forcefully "drive" the thick shaft of the earring into the puncture, it will cause not only pain, but also bleeding and scarring.
 5 Insert the shank of the earring into the puncture. Stand in front of a mirror and slowly insert the rod while holding the earring with one hand. Stretch your earlobe with your other hand. Press lightly with your thumb on the back of your earlobe (puncture area) where you felt a small knot.
  6 Try to "screw" the earring into the puncture. Gently twist the shank of the earring, gradually inserting it deeper and deeper into the puncture. It may take a few minutes to find a suitable angle and push the stud of the earring into the hole. Place your thumb on the back of the earlobe (over the pierced area) to feel the position of the earring shaft.
 - If you feel uncomfortable or painful, try numbing your earlobe by applying ice to it for a few minutes, then try again. If you still feel pain and discomfort during this procedure, seek the help of a specialist.
 7 Rotate the shank of the earring to open the puncture again. Once you find a puncture and a suitable angle, slowly begin to rotate the earring, gradually introducing it into the puncture. Don't push too hard.Since the piercing is partially open and the earring and earlobe are well lubricated, the rod should easily penetrate the piercing.
 - If you are unable to roll the earring, stop and try slowly and carefully inserting the earring at a different angle.
 8 Push through the earring. After you have rolled the shank of the earring into the puncture, gently push the earring so that it goes all the way into the puncture, and then fasten it with the clasp.
 - Do not try to force the earring into the puncture. This can lead to injury, scarring, and infection.
 9 It is important to prevent infection of the earlobe after you have managed to pierce the piercing with the earring. As soon as you insert the earring into the piercing, you need to rinse your earlobe with warm water and antibacterial soap to prevent irritation and infection. It is important to avoid touching your earlobe with your hands frequently to avoid infection as the puncture site begins to heal. Try not to use any hair products or powder for several days so that nothing gets on the puncture area.
  10 See a specialist. Reopening the puncture without proper care and sterilization can result in blood loss, infection, and nerve damage. If you are in pain and your attempts to "pass" the puncture have not been successful, do not continue. Talk to your doctor or consultant at your piercing or beauty parlor to find out how to quickly and safely re-pierce your earring.
Method 3 of 3: How to care for your earring and piercing
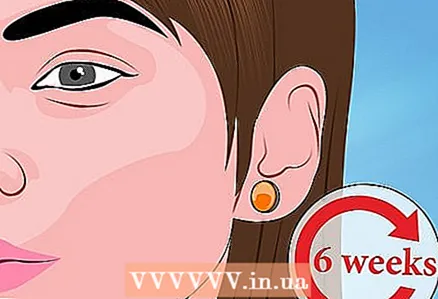 1 Wear your earrings for several weeks. After you have your puncture open again, start wearing small stud earrings (without removing). They must be worn for at least 6 weeks. If you remove the earrings for a while, keep in mind that the puncture may heal again.
 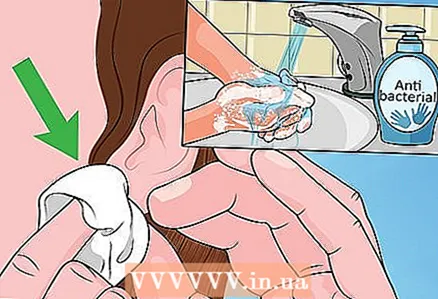 2 Wash your ears regularly with soap and water. This procedure should become a habit for you every morning and evening. Wash your hands with antibacterial soap, then wash your earlobes with warm water and soap. This way, you can keep your earlobes clean and prevent infections from developing.
 - You can prevent crusting by wiping the area of the earlobes with a cotton pad moistened with alcohol twice a day. Take a cotton swab, put some rubbing alcohol on it and wipe the stem of the earring.
 3 Roll the earring every day without removing it from your earlobe. With clean hands, gently grasp the earring and start twisting. This should be done every day to prevent the puncture from re-clogging.
Tips
- If you are having trouble inserting the earring through the front of the lobe, try threading the shank of the earring through the back of the lobe.
Warnings
- If you notice severe redness, swelling and pain in your earlobe, see a specialist.
What do you need
- Thin-shank earrings
- Antibacterial soap
- Clean hands
- Latex gloves
- Rubbing alcohol
- Cotton swabs or cotton pads
- Petrolatum
- Antibiotic ointment


