Author:
Eric Farmer
Date Of Creation:
4 March 2021
Update Date:
1 July 2024

Content
If you are a frequent flyer, then you have probably had to "wait" at one point or another. Waiting is when an aircraft makes several 360 ° turns to avoid collisions with other aircraft, or while waiting for clearance to land.
While this is not as common today as it used to be, you may still face the wait requirement, especially if you are an instrument pilot. With this in mind, the following article is written from the perspective of a private pilot (foolishly) believing that you know how to use airborne navigation equipment such as azimuth beacons (AR), rangefinder beacons (RL) and non-directional beacons (NR).
Steps
 1 Determine the benchmark of the waiting pattern. The Air Traffic Control Service (ATC) will instruct you to wait North from the "specified SKI intersection", or give you specific waiting instructions such as "wait South East from AR Falcón Victor 366, left turn". The holding pattern reference can be identified from the instrument flight schedule and will typically be at the intersection of Victor Airlines (pre-assigned flight routes between azimuth beacon navigation equipment), BPM (omnidirectional beacon), or NR (non-directional beacon).
  2 Imagine the course in the holding area clearly. This position is relative to the waiting pattern benchmark where you were directed to the ATC. You may be told "expect west of Victor 8" or "wait on the Kremlin 260 ° radial". Before flying in the holding area, you need to familiarize yourself with the radials and azimuths of AR and HP. The holding course is the flight path "to" the station.This will always be the reciprocal of the radial or azimuth "from" the station (eg a 260 ° radial would result in a 080 ° holding course). To quickly identify it, take a piece of paper and place a dot as a reference point for the holding pattern and draw a line in the direction of the radial or airline to fly in the holding area. Position the directional arrow towards the station to determine the holding course.
 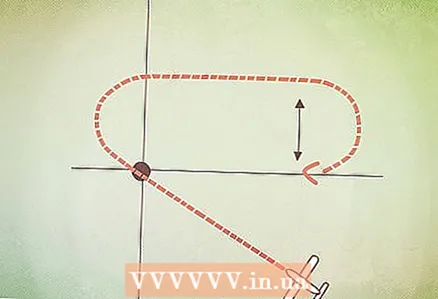 3 Lay out a flight plan in the holding area. Once you have a reference and course, then mentally or physically map out a flight pattern in the holding area. You will need to determine whether it is standard or not. The standard flight pattern assumes a turn to the right, while the non-standard flight pattern assumes a turn to the left. If the flight pattern is not standard, then this will be indicated on the graph, in the form of a left turn, or the air traffic control service will transmit a "non-standard flight pattern" or a "left turn". Starting at the holding pattern fix, rotate 180 ° in the direction indicated (left or right), continue parallel to the holding course, and make another 180 ° turn to return to the holding course. This is the famous "race track" or holding pattern. you back to the Holding Course. This is the famous "racetrack" or Holding Pattern.
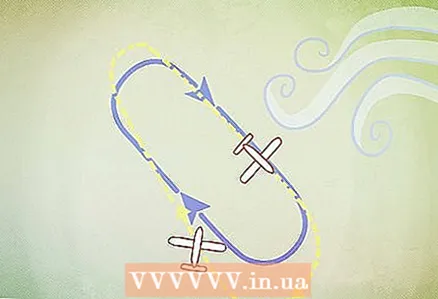
  4 Determine the correct scheme for entering the control room. Depending on where you enter the holding pattern, you will be forced to adhere to the control area entry pattern. If you are approaching 70 ° to the left (to the right in case of non-standard flight patterns) of the holding course, then use the teardrop method. When approaching 110 ° to the right (or to the left in case of a non-standard flight pattern), use the parallel method. And, using the remaining 180 °, do a direct entry. Login methods are shown below:
 - Parallel way. When approaching the holding pattern from either side of sector (a), turn towards the parallel holding course, departing to the non-holding side within the appropriate length of time (see point 5), turn towards the holding area more than 180 degrees and return to holding pattern, or interrupt the course entry in the holding area.
- Drop-shaped method. When approaching the holding pattern from either side of sector (b), turn 30 ° off the holding course to the holding side for the appropriate amount of time, then turn toward the holding pattern to interrupt the holding course.
- Direct login method. When approaching the holding pattern fix from either side of sector (c), fly directly to the landmark and turn to follow the holding area.
 5 Calculate the circles. The area must be flown, so the return course will be 1 minute longer if you are flying to / below an altitude of 4200 m mean sea level (MSL), or 1.5 minutes if over 4200 m MSL. Perform a 180 ° turn in the standard pattern (3 ° / s) at the reference point in the direction indicated for the holding area (standard or non-standard). If you are abeam of the reference point (or after exiting a reversal, in case you cannot determine the traverse of the reference), then start counting the outer circle. After 1 minute (1½ minutes if you are above 4200 m), make another 180 ° turn in the same direction to interrupt the hold course. Count the reverse circle until you reach the reference point. With light or no wind, this will take 1 or 1½ minutes, respectively. Otherwise, you will have to adjust the outer circle to complete the inner circle in the appropriate amount of time. For example, if you are flying at an altitude of 3600 m and you notice that it takes 45 seconds to complete the inner circle after completing the outer circle, which took 1 minute, then complete the outer circle in 1 minute, and the next time in 15 seconds.Likewise, if it takes 1 minute 30 seconds to complete the inner circle, then shorten the outer circle by an additional 30 seconds.
Do not begin counting the outer circle until you are directly abeam the reference point. 6 Control your speed. The maximum speed in the holding area between the minimum holding height and 1800 m is 200 instrument cluster knots (SCP), unless otherwise indicated in the schedule or communicated by the dispatch service. Fly at a speed not exceeding 230 soft starters at an altitude between 1801 m and 4200 m and not exceeding 265 soft starters at an altitude of over 4200 m.
Method 1 of 2: Wind Correction
 1 Allow for wind correction to complete the inner circle in the correct amount of time. If the inner circle is shorter than it should be, then increase the outer circle by the amount of the difference. If the inner circle is longer, then shorten the outer circle for the time of the excess. For example, if flying below 4200 m it took 1 minute 45 seconds to complete the inner circle, then count 15 seconds for the outer circle (1 minute minus the additional 45 seconds for the inner circle).
 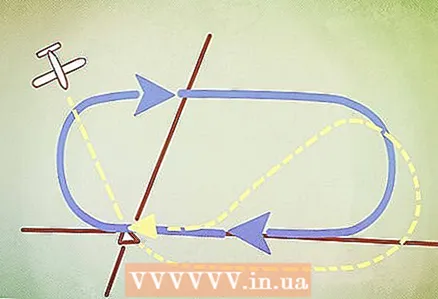 2 Triple the offset for wind drift on the outer circle. If you have a 10 ° drift offset to maintain your trajectory on the inner circle, fly the outer circle with a 30 ° offset. Stick to standard cornering figures.
Method 2 of 2: Waiting with a Rangefinder Beacon
 1 Some holding areas require the use of ranging beacons or GPS-based distance traveled distance measuring equipment (TRD). The basics of flight operations are the same as above, except that the distance along the RL is used as a reference point.
 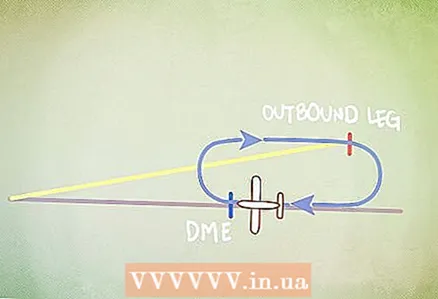 2 Enter the area using the appropriate method (drop-shaped, parallel, or directly).
 3 Begin turning to the outer circle at the DR / OIRPO landmark.
 4 Instead of counting the circle, complete the outer circle and turn to enter the inner circle at the required distance. For example, if you are expecting 10 AR on the landmark while flying to the navigation equipment and as directed by the air traffic control, you are circling 5 miles (8 km), then you will complete the outer circle at 15 miles (24 km) AR (see chart above). If you steer the aircraft away from the navigation equipment, then you need to subtract the length of the circles from the reference point. For example, if you expect 20 AR on the landmark and steer the aircraft away from the navigation equipment, then complete the outer circle at 25 AR.
Tips
- To increase your orientation in a given setting, quickly sketch the waiting pattern on a piece of paper.
Warnings
- To avoid collision with the ground or other obstacles, all maneuvers must be performed on the holding side.


