Author:
Janice Evans
Date Of Creation:
1 July 2021
Update Date:
1 July 2024
Content
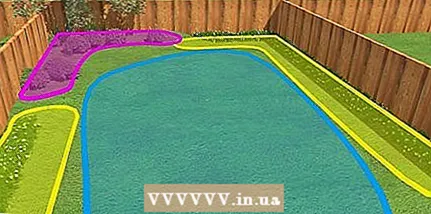
1 Identify areas in your garden that need different amounts of water. Before you buy everything you need, you need to understand what exactly to buy. Sketch a map of the garden and mark the area to water. Divide this area into several parts depending on the following factors:- The need for water of each of the plants. Some plants will need a lot of water, some - an average amount, some - little.
- Lightness and shadow. If all of your plants have approximately the same water requirement, divide the garden according to light zones. Plants in full sun will need more moisture than plants in partial or full shade.
- Soil type. If you have more than one soil type in your garden, consider this factor. This will be discussed below.
 2 Draw a diagram of the location of the drip irrigation system. Typically, the irrigation pipe can be up to 60 meters in length or 120 meters if water enters the system through the center. If you need several pipes, you can connect them together using a valve. If you have a large garden, you will need to use a pressurization system to get the water to all the pipes. Draw everything on the diagram.
 - It is best to make sure that each tube is responsible for an area with a similar water demand.
- Instead of a drip irrigation system, you can use hose... It can be up to 9 meters long. The hose is best installed for potted plants and hanging plants to prevent over-watering.
- Typically, the main line of the irrigation system runs along one side of the garden, or around the perimeter if the garden is large.
3 Decide how the water will flow to each area in the garden. There are several ways to deliver water to the plant. Choose the appropriate method from the following: - Drip irrigation... This is the most popular option. Special nozzles can be inserted almost anywhere in the pipe along its entire length. Below we will discuss the types of atomizers.
- Fixed sprayers... The nozzles are at the same distance from each other. This system is suitable for watering fruit-bearing plants, orchids, vegetables.
- Hole tube... It is an inexpensive alternative to drip irrigation. There are holes along the entire length of the tube, from which water constantly flows. There is no way to adjust the pressure and frequency of watering. Such tubes quickly become clogged, and their length is limited to a small section.
- Standalone micro sprayers... This system sits somewhere between the drip system and the sprinkler. These nebulizers are not as effective, but they are almost non-clogging. This system will work for you if the water contains a lot of minerals.
 4 Select spray type. If you decide to install a drip outlet system, you have many options.The simplest sprayers will work for just about any garden, but if you have a special situation, the following tools may come in handy:
 - Sprayers with pressure compensation, if there are differences in height on the site up to one and a half meters. They do not work in low pressure systems. Please read the description before purchasing such atomizers.
- Sprayers with adjustable water pressure. They have worse pressure compensation. These sprayers are only recommended for plants with varying watering needs, or for plants that need to be watered with a small number of powerful sprayers.
- Vortex sprayers are a good and inexpensive option for a wide variety of gardens. All sprayers of this type are reliable. Their differences from each other are insignificant.
5 Consider the number of nozzles and the distance between them. It's time to decide how many units you need. Each sprayer has its own indicator of the liquid flow rate, which is expressed in liters per hour. Below we provide a guide to choosing spray nozzles based on soil type: - Sandy soil. This soil crumbles into fine grains of sand when rubbed with your fingers. Place nozzles with a water flow rate of 3.5-7.5 liters per hour, at a distance of 30 centimeters from each other.
- Loamy soil. It is a good soil, not too dense and not too viscous. Place nozzles with a water flow rate of 2-3.5 liters per hour at a distance of 45 centimeters from each other.
- Clay soil. It is a dense clay that does not absorb water well. Use nebulizers at a rate of 2 liters per hour, spaced 51 centimeters apart.
- If you have micro sprays, add 5-7 centimeters to all distances.
- If you have trees and plants with a high water requirement, place two sprayers side by side. These nozzles must have the same water flow rate.
6 Buy the equipment you need. You not only need pipes and nozzles, but plastic connectors for each connection and a plug or valve for each pipe. In the next section of this article, we will explain how to connect all the elements of the system. - Compare all sizes before purchasing. You will need adapters to connect different tubing sizes or to connect a hose to a tubing.
- If you have a simple system, use regular plastic pipes. Wrap them with aluminum tape in several layers to protect them from the sun.
- If you have one main piping, choose copper, galvanized steel, durable plastic, or polyethylene pipes. Bury the pipes in the ground or wrap them with aluminum tape to protect them from sunlight. Pipes of standard diameter are suitable for this.
- Typically, irrigation systems use tubing with a diameter of 1.25 centimeters.
Method 2 of 3: Build the system
- 1 Install the main pipe. If your diagram has a main pipe, connect it to the water supply. Turn off the water supply, remove the tap, then insert the pipe and fix it with a special adapter. Cut the valves into the pipe. To prevent leaks, wrap all connections with Teflon tape.
- Everything that will be discussed below will need to be installed on each of the valves.
- 2 Slip on the Y-piece. It will allow you to use the crane even after the irrigation system is working. Everything else will be put on one end of the adapter, and you can connect a hose to the other or screw a valve onto it.
- 3 Set a timer (optional). If you want your garden to water automatically, attach a timer to the Y-piece. It can be set to run at a specific time every day.
- You may be able to buy a device that integrates a timer, backflow prevention device, and / or filter. This will save you time and money.
- 4 Install a device to prevent backflow. In many countries this is required by law, as it prevents contaminated water from mixing with drinking water. Often these devices have to be installed above a certain level in order for them to work.
- Vacuum breakers will not work if they are installed in front of other valves and valves, and this makes them useless.
- 5 Buy a filter. The tubing is often clogged with rust, minerals and other particles in the water. Use a 100 micron or larger filter.
- 6 Connect a pressure regulator if required. This device reduces and regulates the water pressure in the system. If your system pressure exceeds 2.8 bar, install this regulator.
- If you want to place a regulator in front of four or more valves, you will need a custom regulator that can be adjusted.
- 7 Install the side pipe. If several tubes are going to leave from it, you first need to put it down. Each additional handset will connect to this one.
- Remember to wrap the pipe with aluminum tape.
Method 3 of 3: Connecting the system
- 1 Connect the irrigation pipes. Cut off excess if the tubes are too long. Insert the tubes into the adapters, and connect the adapters to the pressure regulator or to the water supply pipe of the system. Spread the tubes out on the ground.
- Do not bury the tubes as they can be damaged by insects and moles. If you want to hide them, cover them with mulch, but only after everything is connected.
- Insert a valve in front of each pipe if you want to be able to turn off or adjust them manually.
- 2 Place the tubes in their places. Fasten them securely.
- 3 Connect sprayers. Insert them into the tubes, puncture the tubes with a special tool ..
- Do not use nails or other improvised means for these purposes, as the holes will turn out to be uneven.
- 4 Cap or plug the end of each tube. This is necessary so that water does not flow out from the ends. You can bend and pinch the tubing, but the cap will make it easier to inspect and clean the tubing.
- 5 Check the system is working. Set the timer to manual mode and turn on the water supply. Adjust all valves so that the water is supplied with a uniform pressure. Then set up the timer the way you want.
- If you notice leaks, wrap the connections with Teflon tape.
Tips
- The valve should be installed at the lowest point in the system so that water can be drained from the system for the winter.
- If you are unsure how much water your system can supply, check this. Time how many liters of water the tap fills in a minute. Multiply this value by 60 and you get the number of liters per hour. This is the maximum capacity of your system divided by all nozzles.
- If you already have an underground irrigation system, you can buy a kit that will convert it to a drip irrigation system.
Warnings
- If two pipes fit into each other, but they cannot be tightly connected, they may have different connectors. Connect them with a hose-to-pipe adapter. (You will need male and female adapters if the pipes are not connected anyway.)
- Due to other measuring systems, pipes with a diameter of 16 and 18 millimeters are considered the same in some countries. You will need an adapter to connect them.
What do you need
- Plastic, copper or galvanized steel tube (Refer to instructions)
- Tubes (Refer to instructions)
- Pipe cutter or scissors
- Various Connectors - Tees (T-piece), Elbow (Right Angle), Y-piece
- Sprayers (Refer to instructions)
- Battery operated timer
- Pressure regulator
- Backflow prevention device
- Hose-to-pipe adapters (if necessary)
- Roulette


