Author:
Carl Weaver
Date Of Creation:
21 February 2021
Update Date:
1 July 2024

Content
- Steps
- Part 1 of 3: Finding a tent site
- Part 2 of 3: Setting up the dome tent
- Part 3 of 3: Packing the tent
- Tips
- Warnings
- What do you need
It is very important to make sure you know how to put your tent up before you find yourself in the dark in the middle of the forest. Fortunately, the dome tents are fairly easy to assemble. A portable, comfortable and simple dome tent is a great option for camping. Learn how to find the right camping site and set up and maintain your tent.
Steps
Part 1 of 3: Finding a tent site
 1 Search for a suitable camp. Wherever you are, on a hike, in your backyard, or in the backyard, you should look for the right space that will provide you with the most comfortable tent spot. There are several factors to consider, but the first is to make sure the area you choose is legal and accessible for camping.
 - If you are in a state or national park, make sure to pitch your tent in an area where you are allowed to do so. Often these sites are marked with numbered metal plaques and are equipped with picnic tables, campfire sites, and sometimes water.
- If you are in a remote area, make sure you follow the rules of the park or reserve where you pitch your tent. Different parks have different requirements for how close to the water you can pitch your tent or how close to trails.
- Wherever you camp, always avoid private property, lest you get bitter disappointment in the middle of the hike as an angry host. Never camp in a place where you can't.
 2 Look for a flat surface for your tent. When you have chosen a suitable camp, it is time to choose a place where to put your tent. There are several factors to consider, and your comfort should be the first one. It is difficult to sleep in a tent that stands at an angle, so it is advisable to find a flat surface, preferably with bush.
 - Find an elevated spot if possible. If it rains, you should not be below where the water will flow. For this reason, avoid dry coves, small sod and pits. You don't want to wake up in a puddle!
 3 Look for a place to hide from the sun and shade. Ideally, the tent should be positioned so that it remains in the shade for the next morning, especially if it is hot. Although the dome tents are wind-resistant, it is also good to find a place hidden from the wind in case you will be away from the tent. The last thing you would like is to return to an empty campsite! Setting up your tent on the western side of the hill is the best way to comfortably spend the night and cool mornings inside.
 - Never pitch your tent under trees. In the event of rain, it is tempting to think that a tree crown would be a safe alternative to an umbrella. Unfortunately, there is a risk of lightning and other hazards here. The tent will not stop the tree falling if something happens. Better to stay away from such danger.
 4 The tent should be away from the fire. Ideally, you should place your tent against the wind that blows from the direction of the fire. Make sure that no coals or sparks will fly towards the tent to avoid fire hazards.
 - A smart solution is to pitch your tent on the windy side of the toilet if you are going to be camping for a long time.
 5 Clear out debris from the tent site. When you install it, it will be impossible to clear the place of stones, branches and other debris. Do this work ahead of time and you will provide yourself with a much more comfortable sleep.
 - If you can, look for dense areas of needles if you are near fir trees. Pine needles can provide a great soft natural mattress that will help keep you comfortable.
Part 2 of 3: Setting up the dome tent
 1 Place a tarp underneath. While most tents are sold without one, buying one is necessary as a plastic or vinyl tarp provides moisture protection between the tent and the ground. While it is not necessary to use a tarp to keep the tent from leaking from underneath, if it rains, you will be happy to have it.
 - Fold the tarp according to the shape of the tent, but should be slightly smaller than the tent. If there is a risk of rain, you should not have any open corners. Don't worry about pitching the tarp perfectly, because you can do this after you set up the tent.
 2 Place all tent parts on a tarp. Remove all tent components and inspect them to ensure all components are included and in good condition. You won't be able to pitch your tent with broken or missing parts, so make sure everything is in place. Each tent will vary slightly depending on size, style and brand, but the main components of new dome tents should be versatile. Should be:
 - The tent itself, which should be made of vinyl, plastic and other materials, with opening zippers and flaps when the tent mounts are in place.
- A fly and rain cover that will approximate the size and shape of the tent, but without zippers and opening flaps.It is used to protect the tent if needed.
- Tent bindings, which are usually tied with bandage straps or other elastic material to maintain balance, may not work with old bindings that need to be screwed on. There are at least as many as five or six different bindings that are made from segments of varying lengths. You don't have to use any tools to set up the tent bindings.
- Poles need to be set up to fix the tent to the ground, through the small flaps at the base of the tent, and possibly an awning. There should be four to ten tent poles. You can also use a hammer to hammer them into the ground.
- Bandages can also be included to secure the awning to the poles and the tent to the stakes. All tents are slightly different from each other.
 3 Connect the fasteners. All shawl fasteners should not exceed 1.8 - 3 m in length when snapped on, fixed or screwed on. All racks will assemble a little differently, but most modern mounts involve a bandage that allows them to simply snap into place without too much effort. Fasten them first, then lay them on the ground.
  4 Insert the posts through the tent flaps. Line up the tent over the tarp with the poles where they should be to make sure everything is in the right place. The base of the shawl has long, crossed X-shaped posts that run through the flaps. When you are sure they are in the correct position, push the post through the flaps and leave it on the ground. Insert both posts.
 - Different tents can have several different pole sizes, so you'll have to use your wits to figure out what, where, and where. You can read the instructions. This can be the hardest part of setting up your tent if you don't have instructions, but try holding the tent to see its shape and what should be where.
 5 Set up your tent. Insert the tips of each pole into the holes at each corner of the tent to raise the tent and begin to take shape. The uprights should bend with a slight amount of force to help the tent straighten. This is usually much easier to do with a helper when you are facing each other and you can see the bend of each post in tandem. A friend will also help support the tent.
 - When you set up the poles, you may want to shake the tent a little so that the whole structure settles down. All dome tents will be slightly different.
 6 Place your tent on the ground. The tent should have vinyl bands or small holes in each corner and center of each side of the tent that you should use to place the tent on the ground. Click on the racks to secure the tent.
 - If you are going to sleep in a tent right away, you may not need to tie it, especially if you are in an area with large coverage and in light winds. If you are going on a hike or in windy weather, you need to attach the scarf to the pegs to prevent it from blowing away.
 7 Reinforce the awning over the tent. On some tents, it is attached with Velcro in different places, on others they are attached with banding cords for stretching on the racks.
 - Some people choose not to put an awning over their tent if they are confident it will not rain. Some awnings cover the windows and you won't be able to see what is happening outside. But, as a rule, it is better to be safe and use the awning.
- Once you've set up your tent, tuck the corners of the tarp under the awning to make sure nothing is left outside. If there is even a small piece left outside, it could threaten water to enter the tent from below during rain.
Part 3 of 3: Packing the tent
 1 Let the tent dry. The tent must be completely dry in the sun before you begin to dismantle it to avoid mold inside.Remove the tarpaulin, racks and anything inside and shake gently.
  2 Roll up the awning and tent. Never fold your tent like a shirt or a flag. To avoid creases, you need to roll up the tent and put it in a bag. This will help keep the tent firm and waterproof, which is an important step in keeping the tent alive. Put the tent and awning in the bag first, then the rest.
 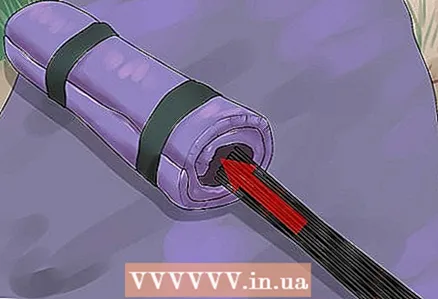 3 Fold down the mounts and stands. After you have folded up the tent and tent, place the poles and bindings in the bag, away from other materials, being careful not to snag or rip the tent. Sometimes there are separate bags for the uprights and bindings to help keep them together.
  4 Ventilate the tent if necessary. Pull the tent out of the bag periodically and let it ventilate, especially if it gets wet during use. If you haven't lived in it for too long, it's important to ventilate it so that it doesn't smell like mold after a year. Let it ventilate in the sun if necessary.
Tips
- Squeeze the uprights through the sleeves. Never pull them out, as the rack may fall apart into small rods and be difficult to assemble.
- If you are installing a peg in the wrong place, you must remove it using a different peg.
- Lay the tent fabric so that the poles can slide through it smoothly.
Warnings
- Do not step on the stands as they may break.
- Be careful not to scratch the fabric of the tent with something sharp, as it may tear.
What do you need
- Dome Tent Fabric
- Folding rods
- Tarpaulin or thick fabric


