Author:
Joan Hall
Date Of Creation:
26 July 2021
Update Date:
1 July 2024

Content
A good speaker is essential to any good sound lover, but getting a good speaker is just the beginning. To get high-quality sound, you need to correctly install and configure the speaker system. This article will guide you on how to set up your home theater, computer, and car speaker system.
Steps
Method 1 of 3: Home Theater
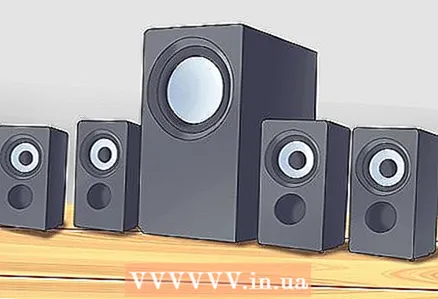 1 Correct speaker placement is very important to get the best sound in your home theater system. The placement of the speakers is highly dependent on where the audience is seated; this is usually the sofa in the living room where you want to focus the sound.Below are tips for the location of the various parts of your speaker system.
 - Subwoofer. Sound from the subwoofer travels in all directions, so place it anywhere in your living room (but it's best not to place it against a wall or in a corner). It is best to place the subwoofer near your home theater to make wiring easier.
- Front speakers. Located on both sides of the TV (at a distance of 1 m from it). Position each speaker so that the speakers are facing the couch and, if possible, raise the speakers off the floor so that the speakers are at ear level when seated.
- Center column. Place it on the TV, or under it, or in front of it. Do not place the center speaker behind your TV - this will result in a muffled sound.
- Side speakers. Place them to the side of the seated audience. Position each speaker so that the speakers are facing the couch and, if possible, raise the speakers off the floor so that the speakers are at ear level when seated.
- Rear speakers. Place them behind the sofa, but at an angle to the center of the sofa. If possible, raise the speakers off the floor so that the speakers are at ear level when seated.
 2 Place the receiver next to or under your TV for easier wiring. Make sure that air circulates freely around the receiver.
  3 Run the wires from the speakers to the receiver (after you have placed all the speakers). Leave some headroom for each speaker so you can move them around if needed.
 - For floor-standing speakers, hide the wires in baseboards or under carpet.
- In the case of ceiling speakers, you need to either drill the ceiling panels and run wires, or build the speakers into the ceiling itself (in the latter case, you can damage the thermal insulation of the attic, and it will be difficult for you to direct the speakers towards the audience).
 4 Connect your speakers to the receiver. Some wires are plugged and some are not; in the latter case, you will need to strip the wires (that is, remove the insulation from their ends).
 - Connect the wires from the speakers to the terminals on the back of the receiver, observing the correct polarity (+ or -). Most plugs are color-coded with black for plus (+) and white for minus (-). The stripped wires also have a different color: copper wire is plus (+) and silver wire is minus (-).
- Bare wires are also connected to the rear of the receiver. Double check that the speakers are connected to the receiver correctly.
 5 Connect the TV to the receiver so that the sound from the TV goes through the speaker system. It is better to use an HDMI cable for this, but you may need an optical cable.
 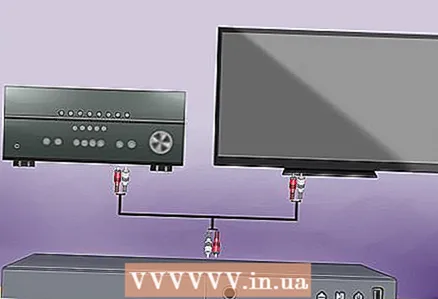 6 Connect other devices to the receiver or TV, such as a DVD player, Blu-ray player, or cable box.
 7 Test and tune your speakers. Many receivers and televisions have sound tests, and modern receivers have automatic sound tuning tools. Experiment with sound when watching movies and listening to music, and adjust the levels of each channel.
Method 2 of 3: Computer
 1 You can have one speaker, two speakers, a subwoofer and two speakers, or a speaker system. Computer speaker installations are often less complicated than home theater installations, but speakers still include many speakers.
  2 Locate the speaker connectors on your computer. In most computers, these connectors are located on the back of the system unit (they are integrated into the motherboard). In laptops, this is the headphone jack. If you cannot find the correct connector, see your computer documentation.
 - If you have an older computer, you may need to install a sound card in order to connect speakers to it.
 3 Almost all audio connectors on your computer are color-coded to help you avoid confusion when connecting different devices. Most of the plugs on speaker wires are color coded similarly.
 - Pink - for connecting a microphone
- Green - for connecting front speakers or headphones
- Black - for connecting rear speakers
- Silver - for connecting side speakers
- Orange - for connecting a center speaker or subwoofer
 4 Arrange your speakers. For a speaker system, place the speakers around the computer table (point the speakers at the table). If you only have two speakers, place them on either side of the monitor.
  5 Connect the center speaker and front and rear speakers to the subwoofer (if necessary). Different speaker models are connected differently. Sometimes you need to connect the center speaker and the front and rear speakers to a subwoofer, which is then connected to the computer, and in other cases, the corresponding speakers are connected directly to the computer.
  6 Connect the speakers to the appropriate jacks. To do this, simply connect a plug of a specific color to a jack of the same color.
  7 Test your speakers. Decrease their volume using the knob on one of the speakers or on the subwoofer. Play a song or movie on your computer and slowly increase the volume until you reach a comfortable level. Then search the internet for an online sound test to make sure your speakers are placed correctly.
Method 3 of 3: Car
 1 Determine if your stereo system supports the speakers you are installing, as the speaker output may exceed the maximum output of the stereo system (especially if you are installing additional speakers or replacing old ones with more powerful ones). To do this, refer to the documentation for your stereo system.
  2 Make sure you can fit the speakers into the existing holes; otherwise, modification of the interior panels or installation of mounting brackets may be required.
 3 Take the tools you need, depending on your car model and speaker layout. In most cases, you will need the following tools:
 - Screwdrivers (flat, Phillips and others).
- Torx screwdriver
- Drill and drill
- Allen wrench
- Nippers
- Soldering iron
- Crimping Tools
- Panel Removal Tool
- Insulating tape
 4 Disconnect the battery as you are going to work with electrical wiring. To do this, take a suitable wrench and disconnect the negative (black) terminal from the battery.
 - Read this article for detailed instructions on disconnecting your car battery.
 5 This article cannot describe the installation of different speaker models, so always read the documentation that came with your speakers, or find instructions on the speaker manufacturer's website.
 6 Remove the speaker grill. To do this, pull it towards you or unscrew the screw holding it. If you are doing this on the dashboard (under the windshield), you may need a special screwdriver.
  7 Remove the old speaker by unscrewing the screws that secure it. When removing the speaker, be careful not to cut the wires connected to it. Sometimes the speaker is glued to the panel; in this case, try to remove it carefully.
 - After you have removed the speaker, disconnect it from the mounting assembly. You will connect a new speaker to this node. If there is no wiring harness, you can cut the wires.
 8 Cut holes (if necessary). If the speakers will not fit into the existing holes, use a drill to enlarge them. Before doing this, measure the column and mark the dimensions on the panel so as not to make a too large hole.
  9 Connect a new speaker. In most cases, just plug the speaker wires into the mounting points. If there are no subassemblies, solder the wires of the new speaker to the corresponding wires in the car's wiring harness.Make sure you connect the positive and negative wires correctly. In most cases, the positive terminal on the back of the speaker is larger than the negative terminal.
 - Be sure to insulate the solder point on each wire to avoid degrading sound quality.
 10 Test the speaker by connecting the car battery. Make sure that the sound is not distorted and that it is quite loud. Make sure the speakers are connected correctly before installing them.
  11 Install the speakers. After testing the speakers, install them using the mounting brackets and screws sold with the speakers. You can also glue the speakers. Make sure that the speaker is installed so that it does not rattle or make abnormal noise.
Tips
- If you can temporarily attach the speakers or hold them in the place where you intend to install them, you can see how and in what position they are effective before you install them permanently.
- Use the shortest cords recommended by the speaker manufacturer. The greater the distance, the thicker the wires and the more powerful the components.


