Author:
Carl Weaver
Date Of Creation:
22 February 2021
Update Date:
1 July 2024

Content
In this article, you can learn how to download, install and configure the Apache web server to host a website on your Windows home computer.
Steps
 1 Go to www.apache.org and download the latest version of Apache webserver.
 2 Install Apache.
 3 During installation, a window will appear with the following fields: domain name, network name and email address. You can write whatever you want. Use this format:
 - Domain name: example.com
- Network name: www.example.com
- E-mail address: [email protected]
 4 After clicking Next, you will be asked to select your web server type. You can choose Apache.
  5 Then the error “Apache could not be configured.”" Edit you Apache.conf file "
  6Go to Start-Programs-Apache HTTP server version number>
  7 Select "Configure Apache Server".
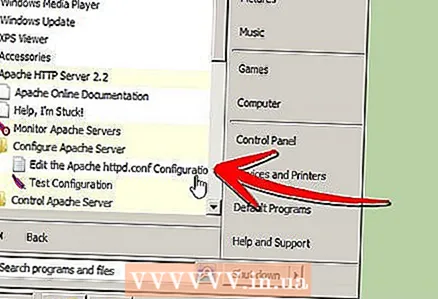 8 Select "Edit the apache.conf configuration file".
 9 Open the Document Root "drive:/ location "
  10 Modify the document root to point to the location of the website directory in the above style, using / instead of .
 11 Do the same for the Directory "drive:/ location ">
 - 12 To check your settings:
- Go to Apache on the taskbar and stop the service.

- Restart the service.

- If it does not start, edit the conf file.

- After successful launch, open any web browser and write localhost or 127.0.0.1 in the address bar.

- Go to Apache on the taskbar and stop the service.
Method 1 of 1: To restore httpd.conf
 1 If you mess up your httpd.conf file, don't worry, go to the main Apache directory. Further in the conf.
  2 There you will find a folder called "Original". All original files are in this folder. Open it.
  3 Select the httpd.conf file.
 4 Go to Edit-Select All.
 5 Copy.
 6 Next, open the corrupted httpd.conf file.
 7 Select Edit-Select All.
 8 Click Remove.
 9 Paste the copied text.
 10 Press CTRL + S or Save.


