Author:
Virginia Floyd
Date Of Creation:
12 August 2021
Update Date:
22 June 2024

Content
- Steps
- Part 1 of 4: Sizing and Selecting Materials
- Part 2 of 4: Knit the front and back of the sweater
- Part 3 of 4: Knit the sleeves
- Part 4 of 4: Sewing a sweater
- Tips
- What do you need
Knitting a sweater seems like a daunting task for those who are just starting to knit. However, this is much easier than it sounds. You can knit a sweater using a very simple pattern below. When you feel confident with this sweater pattern, you might want to try more complex patterns.
Steps
Part 1 of 4: Sizing and Selecting Materials
 1 Determine your size. The number of loops to be cast and the amount of work done on each part of the sweater will depend on the size you want. Measure your bust and select a size based on it. The chest circumference will correspond to the following sweater sizes:
 - XS (very small): 81cm
- S (small): 91cm
- M (medium): 102cm
- L (large): 112cm
- XL (extra large): 122cm
- XXL (super large): 132cm
 2 Prepare enough yarn. Once you have determined your size, you can buy yarn. The amount of yarn required depends on the size of the sweater. Choose a chunky yarn for your sweater, such as Winter Version. Compare your size to determine how many skeins you need.
 - XS (very small): 3 skeins
- S (small): 4 skeins
- M (medium): 4 skeins
- L (large): 5 skeins
- XL (extra large): 5 skeins
- XXL (super large): 5 skeins
 3 Prepare all tools. In addition to yarn, you will need several special knitting tools. Before you start, prepare:
 - knitting needles, size 10 (6 mm);
- knitting needles, size 8 (5 mm);
- scissors;
- needle for yarn.
Part 2 of 4: Knit the front and back of the sweater
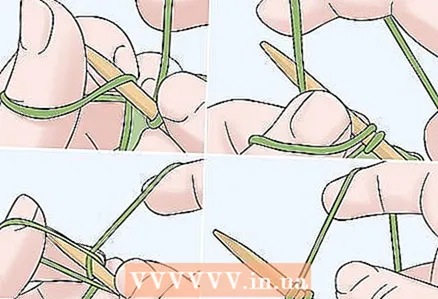 1 Cast on the knitting needles the number of stitches that match your size. Start with a set of stitches on the needles according to the selected size. The number of loops will be the same for the front and back. Use smaller knitting needles (size 8.5mm) for stitching. Correspondence of the number of loops and size:
 - XS (very small): 56 stitches
- S (small): 63 loops
- M (medium): 70 stitches
- L (large): 77 stitches
- XL (extra large): 84 stitches
- XXL (super large): 91 stitches
 2 Work 6 rows of garter stitch on size 8 needles. After dialing the first row with the required number of loops, start with garter stitch. Work the next 6 rows in garter stitch. They form the bottom placket of the sweater.
 - For garter stitch, knit all stitches in each row.
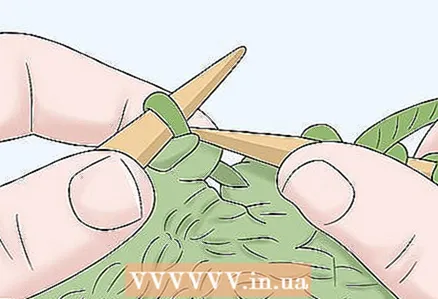 3 Change to size 10 (6mm) needles and continue knitting with the front stitch. After 6 rows, start the next row with size 10 needles. Then start knitting with the front stitch. Continue until you knit a 38 cm piece.
 - For the front surface, alternate rows with front and back loops. For example, knit the first row with knit loops, then knit the second row, then knit again, etc.
 4 Close the first four loops on the next two rows. After you have knitted a 38 cm piece, you need to form an armhole for the sleeve. To do this, you need to close the first four loops at the beginning of the next two rows. You should have a back with 4 closed loops on each side.
 - To close the loops, knit the first two, then pull the first loop through the second. Then knit another one with a front loop and pull the previous one through it. Continue knitting one at a time and pulling the previous loop through it until you have closed all the loops of the row.
 5 Continue knit stitch until you have finished part of the desired length. After closing the loops for the armhole of the sleeve, continue to knit with the front satin stitch. Continue until you get the size you want:
 - XS (very small): 53cm
- S (small): 54.5cm
- M (medium): 56cm
- L (large): 57.5cm
- XL (extra large): 59cm
- XXL (super large): 60.5cm
 6 Close the stitches of the last row. When you have knitted the desired length, you need to close the loops. Use the same standard method for closing the buttonholes that you used for the armhole of the sleeve. Now you need to close the whole row.
 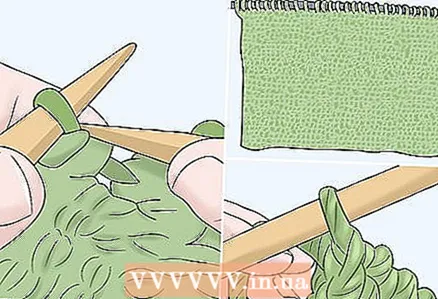 7 Repeat for the second part. Remember that the front and back of this model are the same, so you just need to knit two halves. When the first half is ready, repeat the whole process and knit the other half.
Part 3 of 4: Knit the sleeves
 1 Cast on a size 8 needle. For each sleeve, you need to dial the number of loops that matches your size. Find your size to determine the number of stitches.
 - XS (very small): 31 loops
- S (small): 32 loops
- M (medium): 34 stitches
- L (large): 35 stitches
- XL (extra large): 37 stitches
- XXL (super large): 38 stitches
 2 Knit 6 rows with needles (size 8.5mm) to form the hem of the sleeve. Knit the first 6 rows of the sleeve with 5 mm garter stitch. This will style the hem of the sleeve.
  3 Change the knitting needles to 6mm and continue knitting with the front stitch. After row 6, change the needles to size 10 (6 mm). Start knitting the rows with the front stitch.
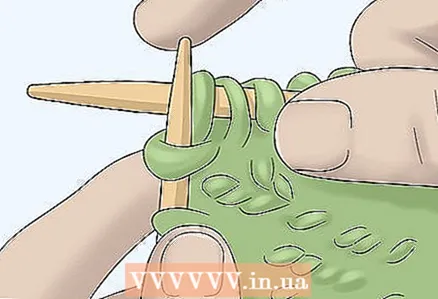
  4 Add loops. When knitting the sleeves, you will need to add loops. This will allow the sleeve to expand as you knit it to the shoulder connection. Start adding stitches after about 30 rows. Then add 1 loop at the end loop every fourth row.
 - To add a stitch, knit a knit stitch as usual, but do not fold it over the second knitting needle. Knit another through this loop again, introducing a knitting needle not in front, but behind the loop. Then remove the loop: instead of 1, 2 new ones have just appeared.
 5 Continue knitting the rows of the sleeves. Continue until you knit the sleeve you want. The sleeve dimensions will be as follows:
 - XS (very small): 47cm
- S (small): 48cm
- M (medium): 49.5cm
- L (large): 51cm
- XL (extra large): 52cm
- XXL (super large): 53cm
 6 Close the stitches of the last row. When the sleeve is of the required length, you need to close the loops of the last row. This will secure the hem of the sleeve to sew to the back and front of the sweater.
  7 Tie the second sleeve in the same way. After the first sleeve is ready, knit the second. Make the second sleeve exactly the same as the first.
Part 4 of 4: Sewing a sweater
 1 Thread the yarn into the yarn needle. Thread a hand-length piece of yarn into the needle from fingers to elbow (about 45 cm). This will ensure that the thread does not get tangled while you are sewing the pieces. Make sure you are using the same color and type of yarn that you used to knit the sweater pieces.
 - Remember that you will have to thread the needle to sew on every piece of the sweater, so stock up on yarn.
 2 Sew the sleeve. Fold the sleeve so that the right sides are inward and facing each other, and the long edges are aligned. Sew sleeve from bottom hem with garter stitch (6 rows) to end of hem near shoulder. Then secure the end of the thread with a knot and cut off the excess. Leave the sleeves inside out.
 - Repeat the process for the second sleeve.
 3 Sew the front and back of the sweater together. Fold the two pieces so that the faces are facing each other and the edges are aligned. Remember that the front and back are the same, so alignment shouldn't be a problem.Start sewing from the bottom corner of the garter stitch sweater (6 rows) to the top. Stop at the armhole of the sleeve.
 - Repeat for the other side of the sweater.
- Do not turn the product onto the right side.
 4 Sew on the sleeves. Once you have sewn sleeves and sweater details, you can sew the sleeves into the armhole. Take the sleeve and line it up so the seam is facing down. Start sewing from where the sleeve seam and the front-back seam meet. This is the armpit area. Sew along the hem of the sleeve to attach and close the armhole.
 - Repeat the process for the second sleeve.
 5 Sew the shoulders to form the neckline. To complete the sweater, sew along the shoulder line to shape the shoulder and create the neckline. Sew the edges of the front and back over the shoulder.
 - Remember to keep the sweater inside out.
- Be careful not to make the neckline too small, otherwise you will not be able to wear the sweater over your head.
- When you are finished sewing the shoulders and trim the neckline, knot the end of the thread and cut off the excess. Then turn the sweater right side out with the seams inside. Your sweater is ready!
Tips
- Try knitting the mittens to your sweater, or separately for a simpler knit.
What do you need
- Yarn
- Needles size 10 (6 mm)
- Size 8 Needles (5mm)
- Yarn needle
- Scissors


