Author:
Janice Evans
Date Of Creation:
1 July 2021
Update Date:
1 July 2024

Content
- Steps
- Method 1 of 3: Removing ink with household chemicals
- Method 2 of 3: Removing the ink mechanically
- Method 3 of 3: Masking the ink
- Tips
- Warnings
- Additional articles
Perhaps you want to remove a bad grade from the first page of a math test, or erase notes from the margins of a book you read. If you are an artist and use pen and ink to paint, then you may need to correct the drawing. You can remove ink from paper using simple household tools. While erasing the ink completely can be tricky, using a combination of different methods can help clean the paper and bring it back to its original white color.
Steps
Method 1 of 3: Removing ink with household chemicals
 1 Remove ink with acetone. Acetone is the main ingredient in most nail polish removers and can also be used to remove ink from paper. Put some acetone on a cotton swab and rub the ink with it.
 - This method is best for removing ballpoint pen marks.
- Blue ink wears off more easily than black ink.
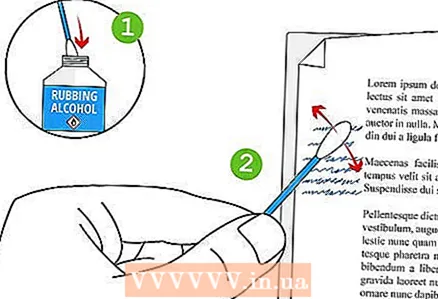 2 Try rubbing off the ink with rubbing alcohol. The ink can also be removed with isopropanol (rubbing alcohol). If you need to wipe off a small amount of ink, use a cotton swab. If you want to remove ink from a larger area of the paper, soak it for 5 minutes in the small tray.
 - Any brand of isopropyl alcohol will work. Do not use alcohol that contains flavors or colors.
- Be sure to cover any areas of the paper where you do not want to remove ink.
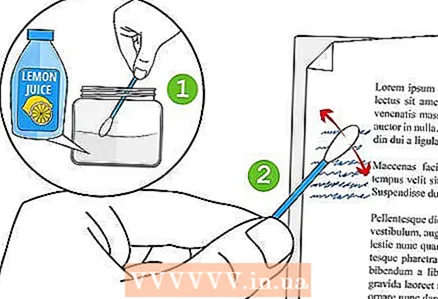 3 Remove ink with lemon juice. Pour some lemon juice into a glass or cup. Dip a cotton swab into the juice. Then, gently wipe the ink off the paper with this stick.
 - The acid in lemon juice dissolves not only ink but also paper. Be careful, especially when dealing with thin paper.
- Thick paper is easier to remove ink than thin paper.
 4 Mix baking soda and water into a paste. Mix the baking soda and water in a small glass bowl. Use a cotton swab to dab some baking soda on the paper. Gently rub the paste over the area where you want to remove the ink.
 - You can also try rubbing off the ink with an old toothbrush. It is best to use a bristle brush that is stiff rather than completely abraded.
- Dry the paper well. There is no need to rinse the soda off the paper. The moisture will evaporate, after which the soda will fall off by itself.
Method 2 of 3: Removing the ink mechanically
 1 Wipe off the ink with a blade. This method is best for removing ink from the printer when only a few letters need to be erased. Rub the paper gently with the blade (hold it perpendicular to the sheet of paper). Do not press down on the blade too hard to avoid ripping off the paper.
  2 Use a special ink eraser. Erasable ink can be removed with a special eraser. Typically, this ink is indicated as can be erased and is blue rather than black. Often, pens with this type of ink have an eraser at the back end.
 - If you are unsure if your ink is rubbing off, try rubbing it with an ink eraser.
- Rubber erasers are better at erasing pencil and graphite marks, but are poor at removing ink.
- The ink can be erased with a vinyl eraser, but be careful. Vinyl erasers are very tough and can damage paper easily.
 3 Erase the ink with sandpaper. To do this, use the finest possible sandpaper and a small block. If you need to remove ink from a small area, and the block (or your fingers) is too large for this, cut out a small piece of sandpaper and glue it to the back of the pencil. Rub the paper gently in small strokes.
 - Be careful not to press too hard on the sandpaper.
- Blow lightly on a piece of paper to remove dirt and debris and see the results of your work.
 4 Use a fine-grained whetstone to remove ink. With it, you will be able to process the surface of the paper more evenly than with sandpaper. A miniature Dremel sharpener with rounded edges works well.
 - Grinding stone is good for removing ink marks from the margins of a book.
- If the paper is not very thick, the sanding stone may be too rough for the paper.
Method 3 of 3: Masking the ink
 1 Use correction fluid. Although this liquid does not rub off the ink, it covers it up and makes it invisible.A corrector (for example, such common brands as "Liquid Paper" and "Wite-Out") is a thick white liquid that is designed to cover up unwanted blots and errors. As a rule, the corrector is applied with a fine brush with a sponge at the end.
 - After application, the correction fluid dries and covers the paper with a solid crust or flakes. Before applying the liquid, make sure it has a suitable consistency.
- The correction fluid will be wet immediately after application. Be careful not to touch other surfaces with the brush.
 2 Cover the ink with correction tape. If you need to remove errors along a vertical or horizontal line, it is convenient to use the correction tape. One side of the tape resembles the surface of the paper, and the other, the adhesive side, adheres to the paper. Typically, correction tape is white, although there are other shades for different types of paper.
 - If you look closely at the sealed paper, you can make out the correction tape.
- If you scan or copy a sheet of paper with correction tape, the tape will not be visible on the copy.
 3 Cover the blots and mistakes with paper. If you need to change an unfortunate part of a drawing, you can cover it with a small piece of paper. Take blank paper of the appropriate color and cut a piece out of it that can be used to cover the area of interest. Paste this piece onto paper and draw or write over it.
 - Make sure that the edges of the scrap are snug against the surrounding paper and do not curl upward.
- On closer inspection, you will notice the pasted paper and the corrections made.
- If you scan or copy the original, the corrections will be less noticeable on the copy.
 4 Disguise the blots. If you make a mistake or spill ink on the paper, try erasing it first. If the above methods do not work, you can try to mask the error by adding additional elements to the picture, such as shading or a background.
 - A dark background will hide the error.
- If you accidentally drew unnecessary lines, consider adding additional embellishments or ornament to your drawing. This will give the impression that this was your original intention!
 5 Copy the drawing. This method does not imply the removal of blots and errors from the old sheet. If the above methods do not work, place a blank sheet of paper on the used paper and copy the drawing without the part you would like to get rid of. After that, complete your drawing on a new sheet of paper.
 - This is a rather laborious method, but it avoids noticeable corrections and blots.
- As a result, you will get a new drawing, as if you did not make mistakes and blots.
Tips
- If you are worried that someone will erase ink from a receipt or other important document, use a gel pen. The above methods are poorly suited for gel inks.
- Cover other areas of the paper that you want to leave intact when removing ink. Cover them with masking tape or paper to avoid accidentally rubbing off the ink where you don't want it.
Warnings
- If you are trying to remove ink from a book page, be aware that doing so can damage the book itself. Try your method first on a small and inconspicuous area of the book before applying it to a larger area.
- Remember that erasing information on receipts and other documents is prohibited by law.
Additional articles
 How to remove a permanent marker from a smooth surface How to wipe a permanent marker from a whiteboard How to remove ink stains from clothing
  How to read the readings of the ruler How to get rid of double-sided tape How to make a ball from pharmacy gum How to make a pencil case
  How to use the ruler
  How to find planets in the night sky
  How to calculate the volume in liters
  How to set up a barometer
  How to pack a school bag (for teenage girls)
  How to fill the stapler
  How to behave as a beginner at school


