Author:
William Ramirez
Date Of Creation:
18 September 2021
Update Date:
1 July 2024

Content
- Method 2 of 4: Drying the book in the freezer
- Method 3 of 4: Drying a book with a fan heater
- Method 4 of 4: Drying Your Book with a Hair Dryer
- Tips
- Warnings
 2 Remove dirt or debris. Carefully remove any debris that may remain on the pages or cover of the book. It could be wet leaves or candy wrappers if you dropped the book into a puddle. Remove debris and dirt from the book to avoid further damage as you dry the book.
 - Use your fingers or tweezers to remove dirt and debris from a wet book.
- If you need to remove dirt from a book that has fallen into a muddy puddle or body of water, fill the tub with clean, fresh water and gently lower the book into it. You can remove debris without ruining wet pages.
3 Blot each page with a clean white towel. Using a clean white tissue or paper towel, blot each page of the book. Do not rub the pages as they may tear. After gently blotting one page, move on to the next. - If the pages are slightly damp, you can blot each page with a tissue. However, if the book is completely wet, blot the glued pages with a napkin without separating them.
4 Wipe and dry the cover of the book with a tissue. You can dab the book cover without worry, as it is dense and you will not tear it. However, do it very carefully. Since book covers tend to be stronger than pages, you don't need to rush. - Be sure to dry your book cover. After you're done with the pages, go into the cover art. Otherwise, the liquid on the cover may damage the cover and cause mold.
Method 2 of 4: Drying the book in the freezer
- 1 Remove excess liquid. If the book is completely wet, place it on a absorbent towel or napkin to dry it. Wait for the water to drain. Change your napkin when it gets wet. If the book is wet but not wet, you can shake it from side to side.
- 2 Assess the condition of the book. Notice if there is still liquid on the pages of the book. If there is still a lot of water on the pages of the book, it means that it does not glass well from them. In this case, insert highly absorbent paper between the last pages and the back and front of the book cover. This will help speed up the drying process and maintain the integrity of the binding.
- Do not use absorbent paper (paper towels, newspapers, etc.) with writing or graphics, as prints may remain on the book.
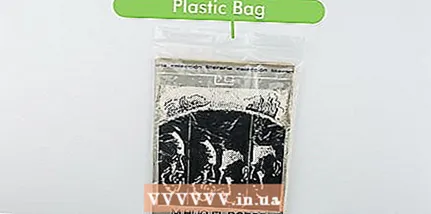 3 Place the book in a zippered plastic bag. Take a book, place it in a ziplock bag and close it. Please note that there must be air in the bag, do not create a vacuum environment; in addition, the bag should not be too small, there should be sufficient space between it and the book. You can use a regular plastic bag.
 - 4 Place the book bag in the freezer. Take the book bag and place it in the freezer. If possible, move food away from the book to ensure adequate airflow. Place the book on a separate shelf in your freezer.
- 5 Assess the condition of the book in 1-2 weeks. It will take you a couple of weeks to get the desired result.The drying process may take one to two weeks, depending on the size of the book. A large book will take longer, while a smaller book will take 4–5 days. If the pages of the book are not completely flat and are still damp, leave the book in the freezer for a few more days.
- Done correctly, the pages and ink on them can be kept intact.
Method 3 of 4: Drying a book with a fan heater
- 1 Remove excess liquid from the book. This method is most effective when the pages of the book are damp but not wet. A wet book will be difficult to dry with a fan heater. Remove excess water by shaking or blotting the book and its pages.
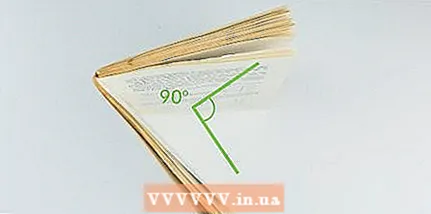 2 Open the book by placing it at a 90 degree angle. Position the book at a 90-degree angle to allow airflow to blow over the pages. Try to position the book in such a way that its pages are separated from each other as much as possible. This allows the airflow from the fan heater to dry out wet pages faster.
 - Be careful not to try to separate wet pages from each other. Otherwise, you may tear them or the ink will be printed on another page.
- 3 Place the book next to the fan heater. Set the fan to medium mode. You can use a desktop or ceiling fan. Medium mode will blow the pages at a moderate intensity. Low airflow will not dry out the pages properly, while high airflow can cause wrinkles on the page. If you cannot select a mode on your fan, turn it on at the lowest speed.
- 4 Place a heavy object on top of a closed book to straighten out the crumpled pages. Use a paperweight, large book, or stone to spread the pages of the book. Leave a heavy object on a closed book for 24 to 48 hours. This will make any crumpled pages straight again.
- Align the binding and cover before placing a heavy object on top of the book. Otherwise, you can cause irreparable damage to the book.
- Drying the book with a fan heater will dry the pages of the book, while a heavy object will help align the pages.
Method 4 of 4: Drying Your Book with a Hair Dryer
- 1 Remove any remaining liquid from the pages of the book. This method is best used when you need to dry the wet pages of a book. However, it also works well if the book is completely wet. Before moving on to drying, remove the liquid from the pages of the book. Otherwise, the binding of the book may be damaged and mold may develop.
 2 Place the book on an absorbent cloth. Your book should be on top of it when you dry it. Hold the hair dryer with one hand and hold the book in place with the other.
 - 3 Keep the hair dryer 15–20 cm away from the book. Just as you dry your hair, keep the hair dryer at a sufficient distance from the book to avoid damaging it. You can use cold or hot air mode. Dry each page until it is dry to the touch.
- Do not let the air get too hot, as this could damage the pages. As you dry the pages, touch them from time to time to determine if they are too hot. If the pages are hot to the touch, skip to the next. Then you can return to the old ones when they cool down.
- 4 Dry several pages at a time. Divide the pages into several sections. After drying a few pages, move on to the next section. Turn the pages gently over the bottom edge. When the pages are dry, proceed to drying the next.
- Do not dry the pages by blowing air from the side, as the pages may become brittle and wavy and you may miss wet areas.
- Drying a book quickly can negatively affect its quality. Pages can wrinkle and stretch. While this is a quick way to dry a book, it is not safe.
Tips
- If you have borrowed a book from the library or asked for it from someone you know, contact the owner of the book as soon as possible to find out what you should do in the event of a situation. In some cases, you may be given clear guidelines for saving the book.
- If your book is slightly damp, there is probably no need for the above tips; instead, place the book face down, securing the cover between two tables, books, or other surfaces, allowing the wet pages to dry for several hours.
Warnings
- While the aforementioned methods will help make the book dry again, don't expect it to look like new.
- Do not dry the book in the microwave, as the glue may melt and the book will disintegrate.
- Each drying method can lead to yellowing, wrinkling and discoloration.
- If a book falls into a gutter, dispose of it. Such a book should not be restored.


