Author:
William Ramirez
Date Of Creation:
16 September 2021
Update Date:
1 July 2024

Content
- Steps
- Part 1 of 3: Create a Question Category Slide
- Part 2 of 3: Prepare Questions
- Part 3 of 3: Create Extra Rounds
- Tips
- Warnings
This article will show you how to use Microsoft PowerPoint to create your own Custom Game style game. It can be prepared both on a Windows computer and on a Mac OS.
Steps
Part 1 of 3: Create a Question Category Slide
 1 Start PowerPoint. The icon for this application is represented by a white "P" in an orange field.
  2 Click on the tile Blank presentation. It is located in the upper left corner of the PowerPoint application window. This will create a new presentation.
  3 Enter the name of the game. Click on the "Slide Title" field and enter a name for the game (for example, "Custom Game"). You can also provide additional information about the game in the text box below the title, if you wish.
 - For example, if you are creating a game for a school lesson, you can specify the name of the subject and the topic (this could be "History (5th grade), Topic 5").
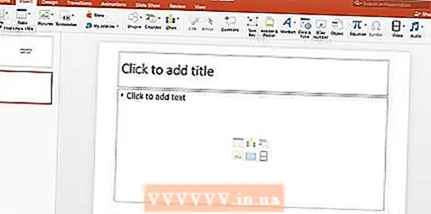
 4 Create a new slide. Click on the “Insert"At the top of the PowerPoint application window, then click the square button"Create slide”Located directly in the upper left corner of the toolbar of this tab. The app will automatically create a new slide and open it for you.
 - On Mac, you can also click the “Insert"At the top of the screen and select from the drop-down list the item"Create slide”.
 5 Open the tab Insert. It's located at the top of the PowerPoint window.
 - Just don't click on the gray menu button “Insert”At the top of the screen on Mac OS.
 6 Click on the button table. You will find this button on the left side of the toolbar “Insert”. The table creation menu will open.
  7 Create a six-by-six table. In the menu that opens, move the mouse to the sixth cell in the sixth column, and then click on it.
  8 Adjust the size of the table. Click on the gray circle at the top of the table and drag it to the top of the slide, then move the gray circle at the bottom of the table to the bottom of the slide. The table will now take up the entire slide.
  9 Enter the question categories. For each cell in the top row, enter the name of the question category.
 - For example, in the first cell you can specify "Dog breeds", in the next "Types of vegetables" and so on.
- After entering one category, press the key Tab ↹to move to the next cell.
 10 Enter points for answering questions. For each question category, fill in the appropriate score for answering the questions:
 - First question - 200;
- Second question - 400;
- Third question - 600;
- Fourth question - 800;
- Fifth question - 1000.
 11 Center the contents of all cells in the table. Click on the table, press the key combination Ctrl+A (on Windows) or ⌘ Command+A (on Mac) to select the entire table, then press Ctrl+E (on Windows) or ⌘ Command+E (on Mac) to center align all cells in the table. Now the slide with the categories of questions is ready, and you can proceed to preparing the assignments for each of the cells indicated here.
Part 2 of 3: Prepare Questions
 1 Create 30 new slides. Just press the button 30 timesCreate slide”.
 - You can also use the keyboard shortcut Ctrl+M (on Windows) or ⌘ Command+M (on Mac).
 2 Complete all question slides. Select a slide in the preview pane on the left, and then click on the text box in the center of the slide itself and enter a question for one of the category cells.
 - You can align the position of the text in the center by selecting the text field and pressing the key combination Ctrl+E (on Windows) or ⌘ Command+E (on Mac).
- It is best to consistently fill out the slides with questions (that is, enter the text of the first question of the first category in the first blank slide after the category slide, and so on) so that you don't get confused later.
 3 Go to the question category slide. You will find it in the slide preview pane on the left, you may have to scroll through all of them to find the slide you want. Clicking on a category slide in the preview pane will open it.
  4 Highlight points in the table for the first question of the first category. Click on the corresponding cell and select with the mouse the number "200" in the leftmost column of the table.
  5 Open the tab Insert. It's located at the top of the PowerPoint window.
 - If you are using Mac OS, be sure to click the “Insert", And not on the button"Insert”On the toolbar.
 6 Click on the button Link. It is located on the toolbar “Insert”. A pop-up window will appear in front of you.
 - On a Mac, click the “Hyperlink”.
 7 Select an option to link to Place in the document. It is located on the left pane of the pop-up window.
 - On Mac, click on the “Place in the document”At the top of the pop-up window.
 8 Select the slide with the text of the relevant question. Click on the slide with the text that belongs to the first question of the first category.
  9 Click the button OK. It is located in the lower right corner of the pop-up window. So from the number "200" you will create a link to a slide with a question for this cell. By clicking on the inscription "200", you will go to the slide with the text of the question.
  10 Go to the question slide. Hold the key Ctrl (or ⌘ Command on Mac) and click on the “200”.
 - Alternatively, you can simply find this slide in the preview pane on the left and click on it.
 11 On the question slide, link to the category slide. To do this, select the text of the question, click on the button “Link" or "Hyperlink”And select the category slide.
  12 Create links to the rest of the questions. Once you've created all the question links and backlinks on the question category slide, you're game is complete! However, if you want to fully enjoy the game, you can add two additional rounds with slides.
 - If you want to supplement any of the questions with the possibility of doubling the rate for answering it, create a new slide with the text "DOUBLE BET" and link to it from the corresponding cell with points on the page with question categories. Then create a link from the DOUBLE BID slide to the slide with the relevant question.
Part 3 of 3: Create Extra Rounds
 1 Create a new slide for question categories with a six-by-seven table. The seventh row of the table is for the FINAL ROUND button.
 - When you fill in the table with points awarded for answering the corresponding questions of the second round, do not forget to double them (for example, assign 400 points for the first question, but not 200, but for the last 2000, and not 1000, and so on.
 2 Select the bottom row of the table. Click the mouse and fully select the last row of the table.
  3 Go to the tab Layout. It's located at the top of the PowerPoint window. The corresponding toolbar will open.
  4 Click on the button Merge cells. It is located on the toolbar of the “Layout”. As a result, you will end up with one large cell in the bottom row of the table.
  5 Create a FINAL ROUND button. Enter text in the bottom cell FINAL ROUND.
  6 Align the table cells to the center. Press the key combination Ctrl+A (on Windows) or ⌘ Command+A (on Mac) and then the buttons Ctrl+E or ⌘ Command+E.
  7 Create and link 30 additional question slides. To do this, follow the instructions in the previous part of the article.
 - Remember that the tasks for this round should be significantly more difficult than for the previous one.
 8 Create an assignment slide for the final round. Create a final additional slide, enter the final round question in it and link to the text "FINAL ROUND" in the bottom cell of the question category slide.
 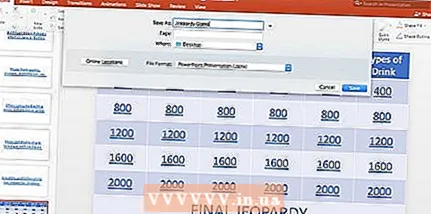 9 Save the project. To do this, follow the steps below.
 - On Windows click “File”, “Save as”, “This computer”And double-click the location to save the file on the left side of the window, then enter the document name (for example," Custom Game ") in the" File Name "text box and click the“Save”.
- On Mac click “File”, “Save as...”, Enter the name of the document (for example,“ Your Game ”) in the“ Save As ”field, then select the save location by clicking on the“ Where ”field and selecting the appropriate folder, then click the“Save”.
Tips
- To start the game, simply double-click on the PowerPoint presentation file and start the slideshow by the corresponding button in the toolbar, or press the key F5.
- Full screen presentation mode does not require holding down the button Ctrl or ⌘ Commandto follow the links.
Warnings
- Be sure to test your prepared game before presenting it to the public so that you have the opportunity to correct any mistakes in it.


