Author:
Virginia Floyd
Date Of Creation:
9 August 2021
Update Date:
1 July 2024

Content
- Steps
- Part 1 of 4: Creating a New Menu / Ribbon
- Part 2 of 4: Adding Groups to Your New Tab (Word 2010/2013)
- Part 3 of 4: Adding Items to a New Menu / Tab
- Part 4 of 4: Removing Items from New Menu / Tabs
- Tips
How often do you notice that you have to use various unrelated commands while creating and editing documents in Microsoft Word? If so, then you are most likely wearing out your mouse by clicking on various menus and ribbons. Give your mouse a break and increase efficiency by creating menus for your specific needs. This guide will show you how.
Steps
Part 1 of 4: Creating a New Menu / Ribbon
 1 Enter the ribbon settings.
- In Word 2013, click on the File tab, then find and click “Options” at the very bottom. Click “Customize Ribbon” on the left side of the dialog box. You can also right-click on the ribbon and select “Customize the Ribbon” in the window that appears.
- In Word 2010, click on the File tab, and then choose Options from the File menu. Click “Customize Ribbon” on the left side of the dialog box. You can also right-click on the ribbon and select “Customize the Ribbon” in the window that appears.
- In World 2003, select “Customize” from the “Toolbar”, then click on the Commands tab.
 2 Add a new ribbon / tab.
- In Word 2010 and 2013, click “New Tab” which is located below the Ribbon Settings list.
- In Word 2003, select New Menu from the Category list, then select New Menu again from the Commands list.
 3 Arrange the new menu / tab in the list.
- In Word 2010 and 2013, click on the arrows on the right side of the window to move the new menu up and down the list until it is in a place convenient for you.
- In Word 2003, hold down the left mouse button on the “New Menu” and drag it from the Commands list to the menu bar. When you see a vertical bar indicating the location of the new menu exactly where it suits you, release the left mouse button.
 4 Give your new menu / tab a meaningful name.
- In Word 2010 and 2013, click the Rename button below the ribbon customization list to bring up the Rename dialog box. Enter a new name in the Display Name field and click OK.
- In Word 2003, right-click on “New Menu” in the menu bar for the Name Box to appear. Write a New name for your menu and press the Enter key.
Part 2 of 4: Adding Groups to Your New Tab (Word 2010/2013)
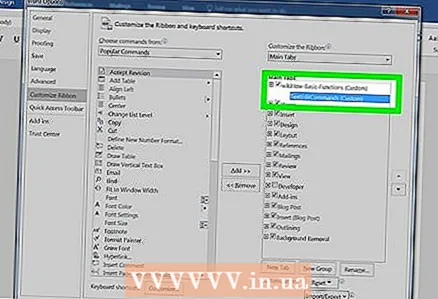
 1 In the ribbon customization list, select the name of the tab you just created. You must create a group for new teams before adding them.
 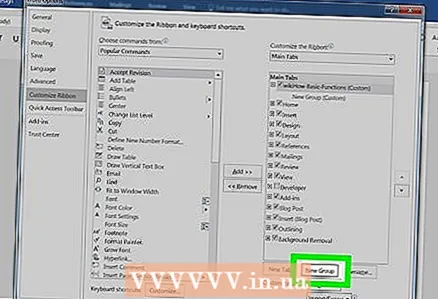 2 At the bottom above the ribbon customization list, click Create Group. This will add an item called "New Group", which will be located directly below the name of the new tab in the list.
 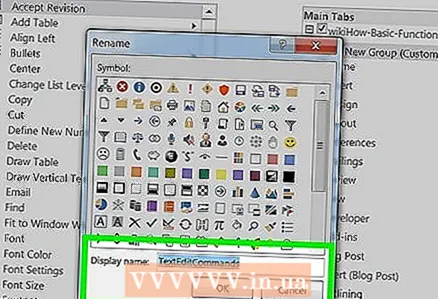 3 Give the new group a meaningful name. Click the “Rename” button to bring up the “Rename” dialog box, enter a new name in the field and click OK. Then you can add commands to this group.
 - You can add a custom group to one of the default tabs as well as to a custom tab. The idea behind this feature is to create custom groups that only include the commands in the default tab group that you use most often, and then delete the original group.
Part 3 of 4: Adding Items to a New Menu / Tab
 1 Select the menu / group to which you want to add new items.
- In Word 2010 and 2013, select the group to which you want to add items from the list of ribbon customizations. You can only add menu items to groups that you have created that have “(Custom)” written after the group name.
- In Word 2003, select the menu you want to customize from the Category List.
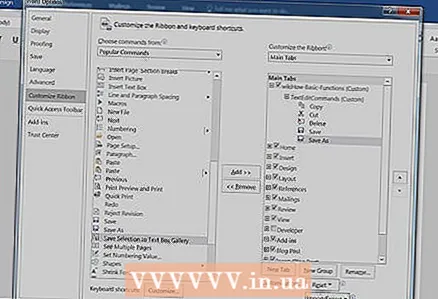
 2 Select the command you want to add to the menu / group.
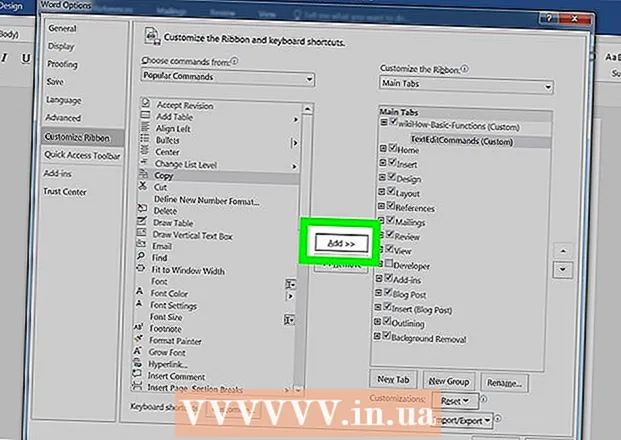
- In Word 2010 and 2013, from the drop-down list, select one of the options from “Select Commands”, then select Commands from the scroll list.
- In Word 2003, select a command from the Commands list.
 3 Add commands to menu / group
 - In Word 2010 and 2013, click the Add button to the right of the scroll list. Use the buttons to the right of the ribbon preferences list to place new commands within the group as you see fit.
- In Word 2003, hold down the left mouse button on the command of your choice to move it to the menu you want. When a vertical line appears, indicating the location of the new command, and this will be exactly the position that you need, release the left mouse button.
 4 Exit the ribbon customization when done.
- In Word 2010 and 2013, click OK.
- In Word 2003, click Close.
Part 4 of 4: Removing Items from New Menu / Tabs
 1 Go into the ribbon preferences if you haven't already. Go back to the first step in this tutorial to learn how to do this for your version of Word.
  2 Select the command you want to remove.
 3 Remove a command from a menu or group.
- In Word 2010 and 2013, click the Delete button to return the command to the Select Commands list.
- In Word 2003, drag an unneeded command from the menu to the document window.
 4 Exit the ribbon customization when done.
- In Word 2010 and 2013, click OK.
- In Word 2003, click Close.
Tips
- Before adding custom menus or groups, think carefully about which commands and menus you use most often, and also learn the usefulness of using the Toolbar / Quick Access Toolbar and keyboard shortcuts. You might find them more useful than adding custom menus.
- You can customize the Ribbon in the same way in Word 2007, but you need XML for programming to do this, and existing tabs cannot be modified in any way. The ribbon customization interface was not complete until Word 2010 was released.


