Author:
Clyde Lopez
Date Of Creation:
21 June 2021
Update Date:
24 June 2024
Content
- Method 2 of 5: Background Document
- Method 3 of 5: "By eye"
- Method 4 of 5: Origami
- Method 5 of 5: Mathematical method
- Tips
- Warnings
- Another plus is that you don't need any additional tools for this method.
- Note that there is no need to fold a standard sheet of paper perfectly straight if you will be using it as an envelope.
 2 Roll a sheet of paper into a cylinder. You should have a free cylinder; do it the way you normally fold a newspaper. Don't make any creases yet. 3 Align the edges, then gently smooth the middle. Look at your cylinder from the side; gently smooth out the folds so that the resulting three pieces are about the same size.
 - You should end up with three layers of the same size. To do this, one edge of the paper should fit snugly against the inside of the fold of the cylinder, and the other edge should be on top of the cylinder.
4 Press down on the folds of the cylinder. When you have three pieces that are the same size, use your fingers to smooth the fold lines. Congratulations! You were able to fold a piece of paper into three pieces. - At this point, you can make the final adjustments. However, do not add additional creases, as this will negatively affect the result of your work.
Method 2 of 5: Background Document
- 1 Fold the sheet into three sections. For this method, you will need two sheets of paper; you will use one sheet as an aid, the second sheet will perform the main function. The two sheets must be the same size.
- Fold your sheet into three approximately equal parts; you can use the "intuitive" method. You can also use any other method mentioned in this article. You can even go through trial and error to find the one that's right for you.
- 2 At this point, you will be able to make adjustments to your draft and fold the sheet exactly.
- Don't worry about extra folds that can be created during work. This sheet is a draft.
- 3 Use a rough draft to fold a good piece of paper. When you have succeeded in folding the draft sheet into three pieces using this template, you can now fold the final draft. Use the rough draft as a base for the folds you will make on a blank sheet of paper.
- You can mark the fold lines with a pencil or do it by eye.
- 4 Use a ruler if necessary. If you want, you can use a ruler or similar tool to make all the folds smoother. If you use a ruler, you can fold your sheet into three parts more accurately.
- When you're done, you can discard the rough draft and use the finish as intended.
Method 3 of 5: "By eye"
- 1 Fold one half of the sheet so that the top covers half of the remaining sheet. The human eye is better at recognizing half than a third. The measuring principle "by eye" in this case turns out to be quite effective. By repeating the entire process several times, you can easily fold the sheet by eye.
- First, take one edge of the paper and fold it so that the top covers half of the rest. Don't make any folds; the edges that you will be folding should be neatly rounded.
- 2 As mentioned, you should fold the sheet so that the top only takes up half of the sheet. Try to "by eye" determine where the center of the sheet is. It is much easier to fold the sheet in two than in three, so start the process by folding the sheet in two.
- When you have determined "by eye" the location of the top of the sheet, you can gently fold along this line.
- 3 Fold in the remaining edge and fold in half. Most of the work has already been done. Now you need to fold the second piece. To do this, take the second edge of the sheet and fold it under the top edge so that it fits snugly against the inside of the fold. Make a second fold.
- If you've precisely folded the edges and folded in the right places, you'll end up with a sheet with even folds and matching edges. If not, you can trim the folds a little as needed.
Method 4 of 5: Origami
- 1 Fold the sheet in half. By following this method, you will be able to fold the sheet into three pieces using the Japan-born origami papercraft technique. Although origami is usually done using a square piece of paper, you can use this method for a standard piece of paper that you have on your office desk. Fold the bottom edge of the sheet up to about the point you think is half the length of the sheet.
- Note: If you don't want extra creases on your sheet, you can find the center of the sheet and carefully draw a line with a pencil. If you decide to use this option, keep in mind that you must draw a straight line that will divide the sheet into two equal parts.
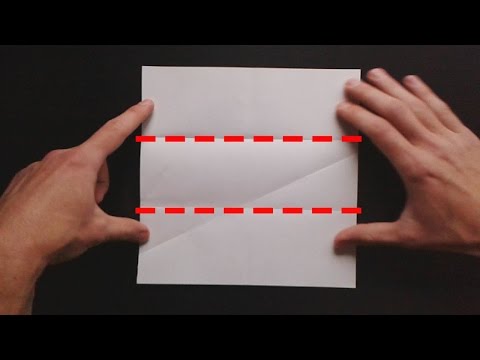
- 2 Draw a line diagonally. Position the sheet so that the fold you just made is from left to right. Using a ruler, carefully draw a diagonal line as shown in the image.
- You can also draw a line from the bottom right corner. This article suggests drawing a line from the bottom left corner.
- 3 Draw a line from the top left corner to the bottom right. Using a ruler, draw a straight, straight line. This line should cross the center fold and your first line on the right side of the sheet.
- 4 Make a fold at the intersection of the two lines. Use the point where the two lines intersect to make the first fold. Use a ruler to draw a 90-degree line that goes through this point and connects two opposite edges of the sheet.
- Gently flatten the sheet at the fold. The folded portion of the sheet should split the remainder of the sheet in half. If not, make small adjustments if possible.
- 5 Fold over the second side. Take the opposite edge of the sheet and place it under the folded edge. Make a second fold. By following this method, you will be able to divide the sheet into three sections.
Method 5 of 5: Mathematical method
- 1 Measure the length of one side of the sheet. Thanks to this method, you can accurately divide the sheet into three parts. Try the steps in this section and you should be able to get a sheet that has perfectly straight folds. You will need a ruler and calculator, as well as a draft. Start by measuring the length of one side of your sheet.
- 2 Divide the resulting length by three. The resulting number will be the length of each part.
- Suppose you have a standard sheet of paper 21.6 cm x 27.9 cm. To get equal three parts, simply divide 27.9 by 3 (27.9 / 3 = 9.3).
- 3 Measure the distance from the edge of the sheet of paper on both sides. Using a ruler, mark the distance you got using the calculations in the previous step. Make a mark on the side you want to fold.
- In the above example with a standard sheet, measure 9.3 cm on the side that is 27.9 cm and mark this distance.
- 4 Make a crease at this point, then fold the rest of the paper over the top. Make a fold where you made a dot. It should be perpendicular to the sides of the sheet. You now have the first fold. The second fold is quite simple to make; fold the second edge of the sheet under the top so that it fits snugly against the inside of the first fold (just like in the previous sections).
Tips
- Try to fold quickly so as not to strain your mind. You don't have to be perfect. If you constantly think about the crease, then you will most likely ruin everything. Just relax and do.
- If you are having trouble folding straight, before folding, hold the folded corners on top of the rest of the paper, simulating a fold, but without flattening the paper at the folds. Make sure both corners are equal to opposite sides of the sheet.
- If using the "intuitive" method, try to shape the free cylinder in such a way as to minimize the amount of unevenness, and if it is slightly misaligned, you can make the necessary adjustments.
Warnings
- Ink is worth a fortune! Practice on the rough sheet before folding the final cut.


