Author:
Carl Weaver
Date Of Creation:
26 February 2021
Update Date:
1 July 2024

Content
- Steps
- Method 1 of 2: Method One: Western Cowboy Saddle
- Method 2 of 2: English Saddle
- Tips
- What do you need
Saddle your horse is very important for safe riding, but it can seem tedious and confusing at first. Even though at first it is better for an experienced groom to help you equip the horse, this article will describe the entire procedure step by step.
Steps
- 1 Tie your horse. Double harness is preferred, but not required. If you are tying a horse on the rein, it is best to use a quick-release (slip) knot for safety.
- Consider passing the end of the rope through a quick-knot loop if your horse is famous for knotting.
- 2 Brush your horse. Horses can get very irritated and get calluses when saddled and ridden without proper brushing. For your own safety and that of your horse, do not skip this step.
- Brush the horse's body. Use a scrubber to remove stubborn dirt and then a stiff brush to remove dust and hair pulled out with the scraper. Finish cleaning with a soft brush.
- Pay particular attention to the horse's back, belly, and girth area. Dirt and bumps under the harness can irritate the horse to the point that it stops responding and starts kicking.
- Comb the mane and tail with a mane and tail comb. Be careful when brushing the tail, the horse may kick.
- Clean the horse's hooves and check for any stuck stones. Be careful, the horse may kick. If you are inexperienced, you should not perform this procedure yourself.
- Check the horse for bumps, lumps, lumps, blisters, and fever, which may indicate that the horse is unwell and not ready to ride.
- Brush the horse's body. Use a scrubber to remove stubborn dirt and then a stiff brush to remove dust and hair pulled out with the scraper. Finish cleaning with a soft brush.
Method 1 of 2: Method One: Western Cowboy Saddle
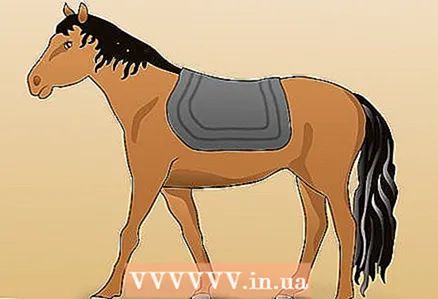 1 Place the saddlecloth on the horse's back with the edge slightly in front of the withers and then pulling it back into place. So the hair under the saddlecloth will lie flat. Check the symmetry of the saddlecloth on both sides.
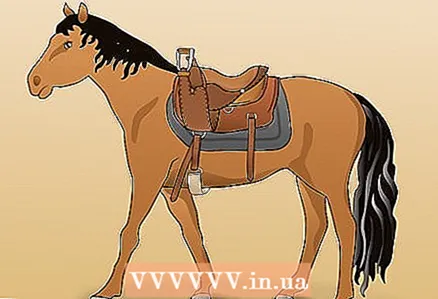
  2 Place the girth and stirrup on the right side of the saddle seat and slide the saddle over the horse. Move the saddle into the correct position and lower the girth and stirrup.
 - Do not do this if you are working with a young or unfamiliar horse. If the horse rears up, you can get hurt on the head with the stirrup.
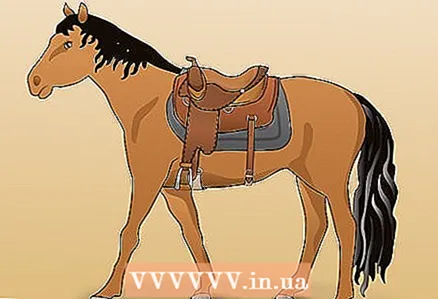
 3 Check that the seat is seated correctly. You should be able to slide two fingers under the saddle fork without difficulty. There should be a distance of 3-4 toes between the horse's forelegs and the girth.
 - Do not use an unsuitable saddle. A badly fitting saddle can cause the horse to carry or throw off the rider, it can also chafe and cause bad habits in the horse.
- 4 Clip on the front (main) girth. This is a key step. You cannot ride without a girth. Be sure to remember that you should tighten the girth gradually; you don't want to hurt the horse.
- Pull the girth under the horse's belly towards you and slide the girth down through the girth buckle. Tighten and check that neither the girth nor the straps are twisted.

- Raise the strap and slide it through the D-ring of the saddle from outside to inside, leaving the ring tilted to the left. Make sure the girth is snug, but not too tight.
- Repeat the process 1-2 times if you still have a long strap.
- Spread each turn so that the top is flush with the bottom.
- With an even girth, gradually tighten the end of the girth (way down) to tighten the girth. Do not tighten it all the way, this will be done later.
- Slide the tail of the strand horizontally around the fixed part and pull it up through the D-ring of the saddle, but this time to the right. Now slide the strap down through the loop you just created and tighten the knot. This can be difficult, so it is best to have an experienced person help you.

- Walk your horse at a walk for 1 to 2 minutes. This will allow her to relax from the saddle procedure and stop expanding her chest (a trick many horses use).
- Finish pulling up the girth. Do this by pulling up the top layer of the strand (not the tip). Pull it up gradually, take your time.
- Tighten the knot again. Ready!
- Pull the girth under the horse's belly towards you and slide the girth down through the girth buckle. Tighten and check that neither the girth nor the straps are twisted.
 5 Fasten the back girth loosely. There should be 2 toes wide space between the horse's belly and the lower edge of the girth.
 - The process is similar to tightening the front girth, but instead of tying the knot, you will have to fasten the buckle.
- 6 Lead your horse forward 5 steps. This will prevent the skin under the girth from wrinkling. You can also slowly pull each front leg forward for a few seconds, this works in a similar way.
- 7 Attach a bib if using one. Do this by attaching it to the girth and front D-rings of the saddle. This will keep the saddle from sliding back, which is especially useful in horse racing.
- 8Ready!
Method 2 of 2: English Saddle
 1 Throw the stirrups up. This way they will not get in the way.
  2 Detach the girth and set aside. Alternatively, you can simply slide it over the saddle, leaving it attached to the right side.
  3 Check that the saddle pad is correctly positioned around the edges of the saddle. With a contoured sweatshirt, it should stick out about 2.5 cm along the entire perimeter of the saddle. With a square saddle pad in front, leave at least 2.5 cm sticking out. The saddle should not be located far in front, so as not to impede the movement of the shoulder girdle.
  4 Stand to the left of the horse, place the saddlecloth and saddle on his back, placing the front bow of the saddle slightly in front of the withers.
 5 Pull the saddle back (in the direction of hair growth) until it is in the correct position. The arch of the forward bow of the saddle should be just above the highest point of the horse's withers. The saddle will be located behind the shoulder blades.
  6 Attach the girth to the strap on the right, then pull it to the left. It should pass from the bottom of the horse behind the forelegs. If you can see a gap between the elbow and the girth, the saddle is too far back.
 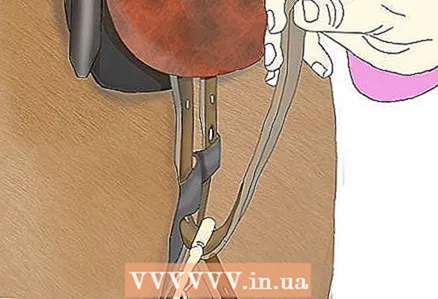 7 Buckle the girth securely. You should be able to get your hand between the girth and the horse's body, but it should be tight.
  8 Lower the stirrups before getting into the saddle.
 9 Sit in the saddle and check the girth to see if it needs a lift. Ready!
Tips
- Examine the horse after each riding session. Pay attention to areas of friction and make adjustments to your equipment. Let your wounds heal before getting back into the saddle.
What do you need
- Horse cleaning equipment
- Saddle
- Sweat cloth


