Author:
Eric Farmer
Date Of Creation:
11 March 2021
Update Date:
1 July 2024

Content
- Steps
- Method 1 of 3: Paper Plate Snake
- Method 2 of 3: Colored Cardboard Snake
- Method 3 of 3: Toilet Paper Roll Snake
- Tips
- Warnings
- What do you need
- Paper plate snake
- Snake made of colored cardboard
- Toilet roll snake
Making kites is fun and easy. As you work, you can learn more about snakes. These crafts will be a great accessory for Halloween or for nature lovers. This article provides some simple and fun ways to make a paper snake.
Steps
Method 1 of 3: Paper Plate Snake
 1 Gather the required materials. The simplest snake can be made from a paper plate. It remains flat on a horizontal surface and is stretched vertically by a spring! You will need the following materials:
 - paper plate;
- acrylic paint or tempera;
- brushes or sponges;
- pencil or pen;
- scissors;
- felt-tip pens, markers, or plastic eyes for toys;
- red tape or paper;
- stationery glue;
- lace, button, hole punch (optional);
- rhinestones, sequins (optional).
 2 Cut off the raised edge of the paper plate. Cut off only the edge without the center part so that the snake is not very small.
 - If you don't have a paper plate on hand, you can take an ordinary small-diameter plate and trace it around on a large sheet of paper. Take scissors and cut out the resulting circle.
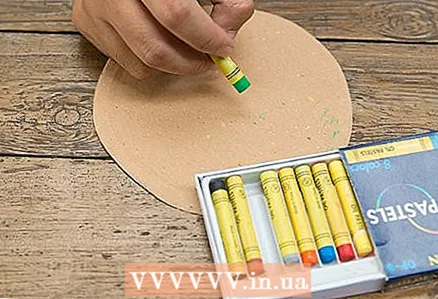 3 Color or paint on the paper plate. Apply paint as you wish. You can use a brush, sponge, and even paint with your fingers. Snake scales can have different colors or patterns. Consider a few ideas:
 - Paint the plate with a solid color and wait for the paint to dry. Dip a sponge in a different color of paint and scoop up excess paint with a paper towel. Next, brush the entire plate with light strokes. If you want to add another color, wait for the first coat of paint to dry. The result is a scale effect.
- Wrap the rolling pin with bubble wrap (bubbles outward) and secure with tape. Apply two colors of paint to the palette and gently roll out with a rolling pin. After that, roll the rolling pin on the plate for a scale effect.
- You can also paint the back of the plate to create a belly. Most snakes have a solid, light colored belly. Paint your belly after the top of the plate is dry.
 4 Draw a spiral on the underside of the plate. The distance between the lines should be about 12 millimeters. The spiral doesn't have to be perfect, but try to draw fairly straight circles.The center of the spiral will become the head of the snake, so draw the center rounded.
 - Draw on the underside so that no pencil outlines remain on top.
 5 Cut the plate along the contours of the spiral. Start at the outside and work your way towards the center. Do not deviate from the contour line so that there are no traces of a pencil or marker on the finished product.
  6 Add other decorative elements. Now you can draw additional patterns or details to make the snake unusual. Consider these ideas:
 - Paint thick stripes across the spiral so that the snake is striped.
- Draw cross or diamond patterns across the spiral to decorate the snake.
- Glue the colored rhinestones with a stationery or other glue. Don't add too much decoration, or the snake will become too heavy.
- Apply curls and patterns with white glue and sprinkle glitter on the stripes. After that, shake off excess glitter and wait for the glue to dry.
 7 Add eyes to the front of the head. Draw the eyes with a marker or felt-tip pens. You can also paint them with paint. If you have plastic toy eyes, attach them to the snake with glue.
 - The head should be the rounded part in the center of the spiral.
 8 Add language. Cut a 2.5 by 5 centimeters rectangle out of red paper. You can also use a narrow red ribbon. Make a wedge cut at one end of the rectangle as snakes have a forked tongue. Lift the snake's head and glue the tongue to the underside of the cardboard.
 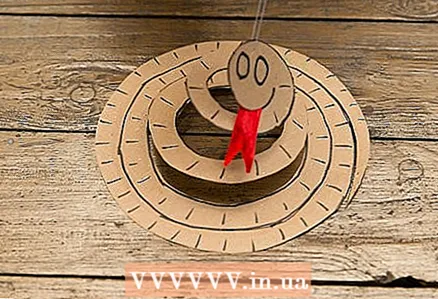 9 Make a hole in the snake to hang the item. The hole can be made at the end of the tail, between the eyes, or right in the tongue. Thread the string through the hole and tie it into a knot. The snake can now be tied to a door handle, cane, or button in the wall.
Method 2 of 3: Colored Cardboard Snake
 1 Gather the required materials. A snake can be made from cardboard rings. The length depends on the number of rings. You will need the following materials:
 - several sheets of cardboard;
- red paper;
- scissors;
- glue stick, tape or stapler;
- stationery glue;
- markers, felt-tip pens or plastic eyes for toys.
 2 Take colored cardboard. You will need at least three sheets. Use sheets of the same color to make a solid color snake, or multi-colored cardboard to make a striped snake (alternate rings).
  3 Cut the cardboard into strips 4-5 centimeters wide. You will need at least 16 stripes. The length of the snake depends on the number of stripes and rings.
 - You can stack the paper and cut multiple sheets at the same time to speed up the process.
 4 Make a ring out of the strip and glue the edges. Take a strip of cardboard and line up the two edges. They should be slightly overlapped (2.5 centimeters). Use a glue stick to secure the ends. You can also use tape or a stapler.
 - Do not use office glue, as it dries for a long time and during this time the snake will disintegrate.
- If you decide to use a stapler, ask an adult to help you.
 5 Thread the next strip of cardboard through the ring and glue the ends into the ring. Repeat until all strips are used up. The snake can be one-color and multi-colored according to your desire, with a constant or chaotic order of colors.
  6 Add language. Cut a thin rectangle of red paper and make a tapered cut at one end of the tongue (snakes have a forked tongue). On the other side, make a fold up to 12 millimeters long and glue to the last ring.
  7 Add eyes above the tongue. You can draw eyes with a marker or felt-tip pen, or glue on small plastic toy eyes.
Method 3 of 3: Toilet Paper Roll Snake
 1 Gather the required materials. If you have some toilet paper rolls left over, you can make a fun wiggling snake out of them. What you need:
 - 3-4 rolls from toilet paper;
- acrylic paint or tempera;
- brushes;
- scissors;
- yarn;
- red tape or paper;
- stationery glue;
- markers, felt-tip pens or plastic eyes for toys;
- hole puncher.
 2 Take three or four sleeves. If you don't have that many toilet paper rolls, use paper towel rolls.
 - 3 Take a pair of scissors and cut each sleeve in half. Cut the paper towel rolls into three pieces.
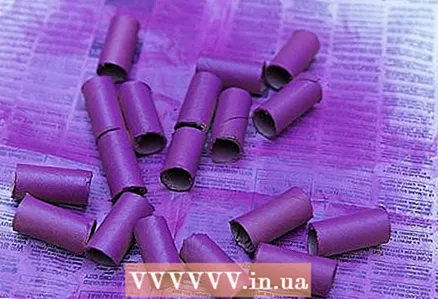 4 Paint the bushings and leave to dry. Use one or more paint colors. You can add patterns and details, but wait for the paint to dry first.
  5 Select two details that will be the head and the tip of the tail. Set them aside to avoid confusion with the snake's torso details.
  6 Make four holes in each part of the torso. You need two holes on the top and two holes on the bottom of the bushing. The holes should be aligned exactly opposite each other. The top and bottom holes must match as well.
  7 Make two holes in the head and the tip of the tail. The holes should be aligned exactly opposite each other.
  8 Cut off several pieces of thread, each 12 centimeters long. A sufficient number of threads will be required to tie all the details of the snake together.
  9 Connect the pieces with yarn. Do not bind too tight for the snake to wriggle. There should be a small gap between each part. Try to hide the knots inside the bushings.
  10 Add language. Cut a long, narrow rectangle of red paper and make a wedge cut at one end. You can also use red tape. Glue the flat end to the inside of the snake's head. The tongue should be centered on the part.
 - If you want the snake's mouth to be closed, ask an adult to close the ends of the sleeve and secure it with a stapler right over the tongue.
 11 Add eyes. Draw the eyes with a marker or felt-tip pens. You can also paint them with paint. If you have plastic toy eyes, attach them to the snake with glue.
Tips
- See pictures of real snakes for inspiration.
- Read the snake book as you work to learn more about them.
Warnings
- The kite cannot be wetted.
- Be careful as kite snakes are fragile and can break.
- Use sharp tools under adult supervision.
What do you need
Paper plate snake
- Paper plate
- Acrylic paint or tempera
- Brushes or sponges
- Pencil or pen
- Scissors
- Felt pens, markers or plastic eyes for toys
- Red ribbon or paper
- Stationery glue
- Lace, button, hole punch (optional)
- Rhinestones, sequins (optional)
Snake made of colored cardboard
- Several sheets of cardboard
- Red paper
- Scissors
- Glue stick, tape or stapler
- Stationery glue
- Markers, felt-tip pens or plastic eyes for toys
Toilet roll snake
- 3-4 toilet paper rolls
- Acrylic paint or tempera
- Brushes
- Scissors
- Yarn
- Red ribbon or paper
- Stationery glue
- Markers, felt-tip pens or plastic eyes for toys
- Hole puncher


