Author:
Bobbie Johnson
Date Of Creation:
2 April 2021
Update Date:
1 July 2024

Content
- Steps
- Part 1 of 3: Prepare the base of your guitar strap
- Part 2 of 3: Decorate the belt and add a shoulder pad
- Part 3 of 3: Make adjusting holes on the belt
- Tips
- Warnings
- What do you need
A guitar strap is very important when playing live at a concert or just for friends. At the same time, there is no need to spend money on a purchased belt if what is sold in stores does not suit you at all. You can always make your own guitar strap. Get yourself a chic handmade belt or lean towards a simpler version to save your own money.
Steps
Part 1 of 3: Prepare the base of your guitar strap
 1 Take a regular belt. A regular trouser strap can be a good base for a guitar strap. Find an old belt that you no longer use. You will have to remove the buckle, which will make it impossible to continue using this belt in clothes. In general, it is usually necessary to remove all extraneous parts from the belt and leave only the main part.
 - Use scissors or a sharp knife to cut the buckle off the belt.
- Place the strap over your shoulder as if it were holding a guitar. In most cases, the strap will need to be shortened to fit better with your guitar. Also, the guitar strap can be made adjustable by providing an adjustment for it.
 2 Use a thick cord or string. Use a sturdy rope material like paracord to make your guitar strap. Do not take too thin strings, otherwise the belt may break at some point. If you have a lot of rope at your disposal, you can reinforce the guitar strap by twisting or gluing several ropes together.Measure the length of the rope you need by throwing it over your shoulder and picking up the guitar.
 - It's a good idea to take a length of rope that allows you to adjust your guitar strap later on.
- You may need the help of a friend to determine the appropriate length for your future belt.
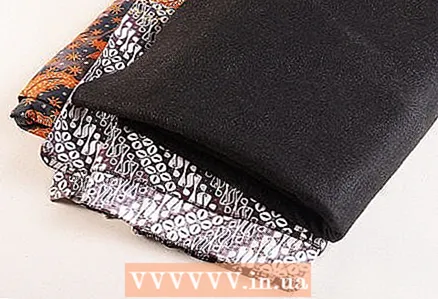 3 Take the fabric. Instead of a trouser belt or rope, you can also use fabric as the basis for a guitar strap. In this case, it is very important to use several layers of fabric at once so that the base of the guitar strap is strong and durable. Fold the fabric in three or four layers, and then cut out a strip of the desired size. When doing this, try to take into account the width of the shoulder, which will then hang the guitar strap.
 - A sturdy fabric like denim will work best for you.
- First sketch out the outlines of the belt on the fabric before proceeding to cut. Try to cut the fabric as evenly as possible.
- Connect the layers of fabric together by sewing or gluing them.
- Many synthetic fabrics like acrylic are actually stronger than natural ones.
Part 2 of 3: Decorate the belt and add a shoulder pad
 1 Find decorative fabric in the store that will add more color to your guitar strap. Head to a fabric store and look for a suitable heavyweight fabric. This is the best way to find a uniquely designed fabric to match your guitar strap. You can decorate your guitar strap with a wide variety of fabric patterns. Choose a fabric with a design that best suits your style and the style of your music.
 - For example, multi-colored fabrics were popular in the late 1960s.
 2 Take the fabric you have in stock. Take a look in your closet or on a shelf of bedding and see if there are any items that you no longer use. This is a great way to personalize your guitar strap. If you have a favorite T-shirt or sheet that is no longer in use, it can be great for decorating the outside of your guitar strap. Doing so will adorn the belt with elements of the past, which may in some way inspire you to play music.
 - Use materials that are comfortable for you to perform with. Do not take anything to decorate the belt that can put you in an awkward position.
- Coloring the belt in transition colors looks especially good and can be used if you like this style.
 3 Cover the base of the guitar strap with the fabric of your choice. The fabric you choose will serve as a kind of cover for the base of the belt. Spread the base of the guitar strap on a flat surface and wrap the cloth over it. Make sure that the fabric is tightly wrapped around the base. When the fabric is tight enough to fit the fabric around the base, trim off any excess. Secure the fabric with a goat stitch. The base of the strap should remain in place inside the case without much movement.
 - It may be more convenient to glue the fabric to the base of the strap first before sewing it on to ensure everything stays in place.
- Remember to sew up the fabric at the ends of the guitar strap.
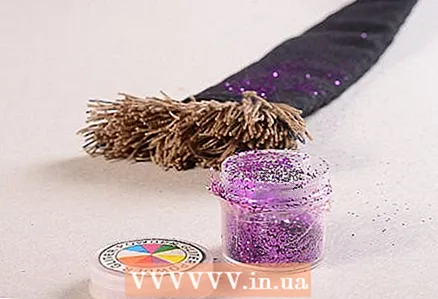 4 Decorate the belt with additional details. Depending on your personal style, the belt can be decorated with various additional details and patterns. Some musicians prefer a minimum of design, while others like to make their guitar strap shine with their own personality. If you are into hard rock and metal, you can decorate the belt with rivets. You can also get creative by adding patches and other appliqués to your belt.
 - For an eccentric cowboy style, add fringe to your guitar strap.
- Glitter can also be glued to your guitar strap. This style is well suited for glam rock.
 5 Make a shoulder pad. The second most important part of the guitar strap is the shoulder pad, which will carry the entire main load.This is where comfort is of no small importance, as it is simply necessary when you have to stand with the guitar for a long time.
 - The wider the shoulder pad is, the more the weight of the guitar will be distributed over the area and the less your shoulder will hurt! In this case, it would be nice to provide the shoulder pad with a soft layer.
- Foamiran or a similar material can be easily attached to the inside of the belt using glue or a needle and thread. You can also do a little more creative and have the shoulder pad removable and held on to the belt using a Velcro fastener.
- If your guitar strap is made of two layers of material, the padded shoulder pad can be placed inward between the layers of material.
Part 3 of 3: Make adjusting holes on the belt
 1 Use a cord to secure the top end of the strap to your guitar. You can provide for attaching the strap to straplocks or guitar strappins using a cord. The cord you choose should be strong and durable enough like a paracord. You can also try taking a not very thick string for fastening. Punch a hole at the end of the strap with an awl or leather hole punch. The hole should be just enough to allow the cord you have chosen to pass through.
 - Tie the cord to the top end of the strap and secure it to the top attachment of the guitar itself (straplock or strappin).
- Alternatively, you can take a knife or scissors, but it will be much easier to work with an awl or a hole punch for leather.
- Think immediately about the strap length that suits you, as it will be difficult to adjust the length of the rope attachment later if you suddenly decide to redo something.
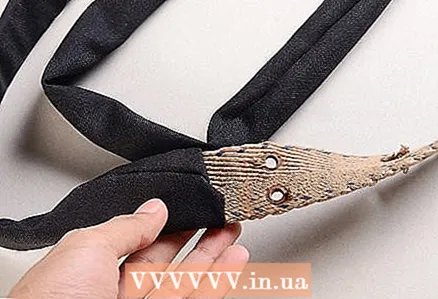
 2 Attach the finished lugs to the belt. For a homemade guitar strap, you can purchase special ready-made tips. This is a fairly good option for ensuring that the strap is securely attached to the guitar while playing. In this case, the handpieces can either be ordered through the online store, or you can make them yourself. In the latter case, you will need a strip of leather from which you will need to make the tips for the belt.
 - Measure the width of the belt and mark the same measurement on a piece of leather. Cut out two belt ends from the leather for the desired width.
- As a guide, look at the ends of finished guitar straps to gauge how much round your homemade lugs should be. Note that the tips tend to taper closer to the mounting hole.
 3 Make adjusting holes at the bottom end of the belt. One end of the guitar strap should allow easy adjustment of its length. It is best to make a series of holes at the bottom end of the strap that will easily re-buckle on the guitar's fastener. The easiest way to make adjustments is from the bottom end of the guitar. Smooth adjustment holes are easiest to make with a leather hole punch.
 - Use the cutting end of the tool to make a series of holes at the end of the strap, about 2.5 cm apart.
- Do not make the holes too large for guitar-mounted straplocks or strappins. The idea is to keep the strap firmly on the guitar.
Tips
- A denim guitar strap can be embroidered, dyed, painted, decorated with rivets or even sequins.
- A guitar rope strap can be decorated in the same way as a denim strap.
Warnings
- Make the adjustment holes (or loops) on the belt secure! They should never let you down, because you don't want to drop your guitar!
- Make sure that any dyes, adhesives, etc., do not rub on either you or the guitar!
- Be careful with the sharp tools you will need to complete this project, such as knives.
What do you need
- Material of your choice (leather, rope, jeans, woven tape, sealing tape, etc.)
- Punch for leather
- Knife
- Scissors
- Tape measure
")


