Author:
William Ramirez
Date Of Creation:
24 September 2021
Update Date:
21 June 2024

Content
- Method 2 of 3: Making a tote bag from a T-shirt
- Method 3 of 3: Sewing a tote bag with handles or shoulder strap
- Tips
- What do you need
- Sewing a bag-bag on the drawstring
- Making a bag from a T-shirt
- Sewing a bag-bag with handles or shoulder strap
- The fabric can be plain or patterned.
- The specified rectangle dimensions already include seam allowances, so you do not need to add them.
- If desired, you can sew a bag-bag larger or smaller, just keep the same proportions. The length of the fabric rectangle should be twice the width.
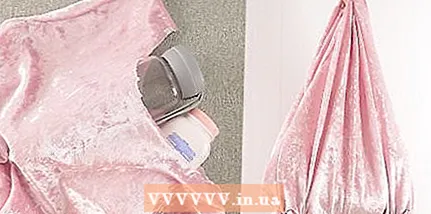
 2 Fold over one of the longitudinal sides of the rectangle by 10 cm and iron the fold. Lay the fabric with the wrong side up. Tuck one of the long sides (50 cm long) 10 cm. Secure the fabric with tailor's pins, then iron the fold. This fold will become the top edge of the drawstring pouch bag.
 - Use a temperature setting that is safe for your fabric. For example, if you are sewing from linen, turn the thermostat on your iron to the Linen position.
3 Sew 2 stitches over the hem to create a drawstring. The first line should be 6.5 cm from the fold, and the second should be 9 cm from it. When you sew the stitches, the distance between them will be 2.5 cm. The inner space between the stitches will be the drawstring for threading the tie ribbon. - Threads can be taken to match the fabric or in a contrasting color. For example, if you are sewing a white tote bag, try using red thread to create a simple yet interesting design.
- Use a straight stitch for woven fabric. But if you are working with knitwear, adjust an elastic stitch such as a zigzag stitch.
- Be sure to bartack at the very beginning and at the end of the stitches to keep them from unraveling. To do this, reverse the stitching 2-3 stitches.
4 Fold the fabric crosswise in half, wrong side out. Lay the bag blank so that the right side of the fabric is facing up. Then line up the short sides of the workpiece and fold it in half. Pin the bottom and side of the fabric with pins. - Do not stick pins into the top edge of the bag and the fold you just created.
- The number of pins you use doesn't really matter. The main thing is that they securely fix the fabric in the desired position.
5 Sew the matched edges and bottom of the bag with a 1cm allowance. When sewing the side seam, leave an unstitched hole between the two stitches of the drawstring, otherwise you will not be able to thread the tape into the drawstring. Remove any pins from the fabric after sewing. - Use a straight stitch for woven fabrics and zigzag stitch for knits.
- Remember to bartack at the very beginning and end of the stitching.
- You only need to sew the sections that you previously cleaved with the tailor's pins. Do not stitch the top of the bag and the side fold.
6 Turn the pouch bag right side up. To make the bag look neater, first cut off the corners of the allowances at the bottom of the bag (diagonally) close to the line, and then turn it out onto the front side. You can also overcast seam allowances with a zigzag stitch, but this is not strictly necessary. - Some fabrics fall off harder than others. If you are working with loose fabric, overcast seam allowances with a zigzag stitch.
 7 Take a piece of tape or twine 50 cm long. The width of the tape should not exceed 1.5 cm. Measure exactly 50 cm and cut the tape. It will become a tie with which the bag-bag can be closed and opened.
 - Use tape to match the bag or in a contrasting color. For example, for a blue burlap bag, you can use a thin white string that goes well with it.
- If the tape or string you are using is made of polyester, burn the ends with a flame to keep them from falling off.
- If the tape or string is not polyester but is made from a different material, secure the ends with textile glue. Let the glue dry before moving on to the next step.
8 Use a safety pin to thread the tape into the drawstring. Stick a pin to one end of the tape. Locate the 2.5 cm wide drawstring hole inside the bag, then insert a safety pin with tape into it. Pull the pin through the drawstring to the second hole. When you're done, remove the pin from the tape. 9 Close the bucket bag by tying the drawstring with the tape. Once the bag is closed, tie the ends of the ribbon with a bow. If you wish, you can string on a cute bead at both ends of the ribbon, only then tie at the ends along a knot so that the beads do not fall off. Method 2 of 3: Making a tote bag from a T-shirt
 1 Pick a T-shirt you don't mind cutting and turn it over to the wrong side. T-shirt size doesn't matter. You can use a small T-shirt for a small bag, or a large T-shirt for a larger bag. Your best bet is to find a regular T-shirt that is straight, rather than a slim fit.
 - You can use an old T-shirt, only it must be clean and free of any holes or stains.
Think about using a T-shirt with an interesting print or design in front. It will remain visible on the outside of the bag when it's ready. If you have taken a white T-shirt, you can dye it in different colors. If you have a black T-shirt, you can reverse the process - desaturate the fabric to various shades of gray using chlorine bleach!
- 2 Cut the sleeves at the seams. If you need to make longer handles on your bag, first fold the shirt in half lengthwise, and then cut off the sleeves, starting below the armpits. By folding the shirt in half lengthwise, you are guaranteed to get symmetrical handles.
- Try to get the job done with quality fabric scissors. Regular scissors can do the job too, but the cuts will be less tidy.
- 3 Cut off the neck of the shirt. How much to cut the neckline is up to you, just be sure to make this cut the same both on the front and on the back of the T-shirt. Also leave on the shoulders (between the cuts of the sleeves and the neck) 5-7.5 cm of fabric. This will make the handles of the bag more durable.
- To keep the neckline smooth, first try to outline its rounded contours using a marker and a bowl or plate.
- 4 Determine the depth of the bag, then draw a corresponding horizontal line on the T-shirt. Choose the depth of the bag as you like, but remember that the bag will stretch slightly under load. If you want to match the length of the bag to the length of the T-shirt, simply mark a line 2.5–5 cm from the bottom hem.
- Use a ruler to keep the line as straight as possible.
- You will need this line as you will be cutting the fringe along the bottom edge of the shirt.
- 5 Create notches along the bottom edge of the T-shirt, 2–2.5 cm apart, all the way down to the marked line. The width of each fringe piece should be 2–2.5 cm. Start creating the fringe on the left side and finish on the right. Be sure to cut through two layers of fabric right away with scissors, and don't forget to cut the side seams. When finished, you will have a T-shirt with a fringed hem.
- If necessary, mark the cut lines first before creating the fringe.
- 6 Turn the shirt over to the right side and tie the fringe together in pairs. Take the first strip of fringe in the front and tie it in a single knot with the first strip of fringe in the back. Repeat this process with the rest of the fringe strips until you reach the other side of the shirt.
- Don't worry about unreliable single knots. The next step will fix this issue.
- Knots and fringes will be part of the final design of your bag. If you do not want to make them visible, then before tying the knots, do not turn the shirt over to the front side.
- 7 Tie adjacent strips of fringe together to pull off the remaining holes in the bottom. After the previous step, there will likely be small holes in the bottom of the bag between the knots. You will need to get rid of them, otherwise you will not be able to carry small items in your bag. To do this, tie together the first and second strips of fringe, the third and fourth, and so on.
- Follow this procedure at both sides bags. Start at the front and end at the back.
 8 Shorten the fringe if desired. Depending on how deep you have made the bag, the fringe can be very long or very short. If you want to make the fringe shorter, trim it to the desired length. However, don't make it shorter than 2.5 cm!
 - If you decide to make knots from the inside of the bag, you will also need to shorten the fringe so that it does not get confused.
- If you decide to keep the fringe long, consider decorating it with large beads. Tie a knot under each bead as needed to secure them in place.
Method 3 of 3: Sewing a tote bag with handles or shoulder strap
 1 Cut out a rectangle of fabric that is twice the length of the bag you want. The width of the fabric rectangle should match the width of the bag plus an additional 2 cm for seam allowances. You also need to add 2 cm to the length of the rectangle to take into account the hemming seam allowance at the top of the bag.
 - For example, if you want to sew a 15 cm x 30 cm bag, then the fabric rectangle should be 17 cm x 62 cm.
- Use a sturdy fabric such as burlap, cotton, or linen for your work.
- 2 Fold over the narrow sides of the fabric rectangle 1cm to hem the top of the bag. Place the fabric with the wrong side up. Fold over the narrow sides of the rectangle by 1cm and secure in this position with tailor's pins. Iron the folds to keep them clean and tidy.
- Use the correct temperature setting on the iron for the fabric of your choice.
- 3 Sew the folds closer to the raw fabric. A distance of 3-5 mm from the cut of the fabric will be sufficient. Use a straight stitch for woven fabrics and zigzag stitches for knits. Be sure to bartack at the very beginning and end of the stitching, and be sure to remove the pins when finished.
- If you do not know how to sew, you can use a glue web and use it to glue the fold of the fabric, or take a special glue for textiles for this.
- Choose threads to match the fabric or vice versa in a contrasting color for a more interesting effect.
- 4 Fold a rectangle of fabric across in half, right side in. Lay the fabric in front of you with the right side facing up. Align the hemmed sides of the rectangle together, and then pin the fabric together with tailor's pins. But do not pin the hemmed top edges of the bag together.
- 5 Stitch the side seams of the bag with a 1 cm seam allowance. Use a straight stitch for woven fabrics or a zigzag stitch for knits. Be sure to bartack at the very beginning and end of the stitching, and remember to remove the pins as you sew.
- If you don't know how to sew, you can use a spider web or textile glue to secure the seams.
- For a cleaner result, overcast seam allowances or use the zigzag stitch on your sewing machine.
- Cut the seam allowances diagonally at the corners at the bottom as close to the stitching as possible so that they do not get in the way when you turn the fabric to the right side.
 6 Cut out a long strip of fabric to create the handles or shoulder strap for your bag. The strip can be of any length, and its width should be twice the desired width of the handle / strap plus 2 cm of allowances. You can prepare one long strip to make a shoulder strap or two short strips to make handles.
 - The strap or handles do not have to match the bag itself. To make the bag more interesting, you can choose a contrasting color of the fabric.
- Use a durable woven fabric such as cotton, linen or burlap for the handles / straps.
- 7 Fold a strip of fabric in half lengthwise and sew the longitudinal sections of the fabric with a 1 cm seam allowance. Fold the fabric in half lengthways with the right side inward. Pin along the lengths of the folded fabric, then sew with a 1 cm seam allowance using a straight stitch. Remove the pins as you sew and remember to bartack at the very beginning and end of the stitching.
- Do not iron the strip yet - you will need to turn it right out first.
- 8 Turn the strip of fabric right over and iron with an iron. Pin a safety pin to one end of the strip and pull through the formed drawstring to the other end. Straighten the strip to the right side, remove the pin and iron it with an iron.
- For neatness, fold the raw cuts at the ends to the inside of the strip 1 cm, and then sew them with a seam with an indentation of 3-5 mm from the edge.
- 9 Turn the bag right out and attach a shoulder strap or handles to it. If you made a shoulder strap, attach the ends to the top of the bag's side seams. If you've made handles, attach the first to the front of the bag and the second to the back.
- The handles / strap can be sewn on or glued with textile glue. The result will look cleaner if the ends of the handles or straps are secured from the inside of the bag.
- If you choose to secure the ends of the handles / straps to the outside of the bag, consider sewing on top with pretty buttons, flowers, or other decor to decorate or hide those ends.
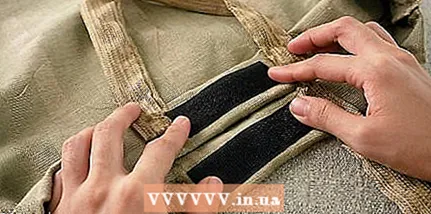 10 Add a Velcro strap if you want to open and close the bag. Cut a 2.5 cm long piece of Velcro tape (about 2.5 cm wide). Find the center points of the hem on the front and back of the bag. Glue each half of the closure to its point from the inside of the bag, aligning with the top edge of the hem. Wait for the glue to dry and then join the halves of the fastener to close the bag.
 - It is not recommended to use self-adhesive Velcro tape (Velcro tape). The glue used in it gradually breaks down and the tape comes off.
- For best results, use a textile adhesive. However, it can be replaced with hot glue.
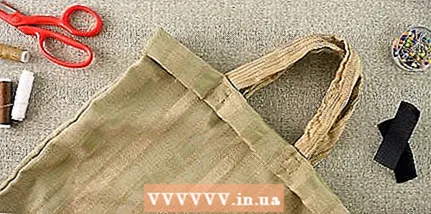 11 The bag is ready!
Tips
- When creating a bag from a T-shirt, you can sew up the bottom instead of fringing and knitting.
- Make several bags at once and give them away as gifts.
- Alternatively, the parts of the bag can be stapled together, but then it will not be very strong.
- Decorate the bag with embroidery, paint patterns using stencils or embroider your product with beads.
What do you need
Sewing a bag-bag on the drawstring
- Textile
- Ribbon or twine
- Scissors
- Ruler
- Sewing machine
- Safety pin
Making a bag from a T-shirt
- T-shirt
- Scissors
- Ruler
- River
Sewing a bag-bag with handles or shoulder strap
- Textile
- Scissors
- Tailor's pins
- Safety pin
- Iron
- Sewing machine or needle and thread
- Velcro fastener (optional)


