Author:
Joan Hall
Date Of Creation:
2 July 2021
Update Date:
1 July 2024
Content
- Steps
- Method 1 of 3: Tissue dressing
- Method 2 of 3: Making an Impromptu Clothes Sling
- Method 3 of 3: Severe Cases
- Tips
- Warnings
- What do you need
The purpose of the arm bandage is to immobilize and protect the injured arm so that it can heal properly. Although fracture is a common reason for wearing a bandage, you don't need to have a broken bone to wear it - bruises, sprains, and sprains may also need to be bandaged. Regardless of the exact nature of your hand injury, a bandage can be vital to proper healing, as in addition to helping your hand heal, it also signals that others should handle your hand with care. Knowing how to properly bandage your arm is a useful first aid skill that will help you provide adequate protection for your arm prior to professional medical attention.
Steps
Method 1 of 3: Tissue dressing
 1 Find a square piece of fabric that matches your size. This method requires a square piece of fabric to reproduce the functionality of a real sling. The exact size of the fabric you need may vary depending on your height and size. For most people, a square piece of fabric that is about 1 meter long will work. It is best to use a material that does not stretch - if the fabric is elastic and the hand can be flexed and moved, the injury can worsen
 - The easiest way to get such a square piece of fabric, about 1 meter long, is to cut an old pillowcase or sheet with a pair of scissors or a fabric knife. As a last resort, you can cut these things to size by hand.
- When it comes to the size of the dressing fabric, remember - in this case it is better more, how less... An oversized sling can be tightened by adjusting the knot behind the head while wearing it, but the sling cannot be loosened more than the size of the fabric allows.
 2 Fold the fabric in half diagonally to make a triangle. Then you will need to fold the fabric diagonally to form a triangle. When worn as a sling, the "wide" side of the triangle will support your arm, and the narrow sides will form a comfortable collar behind your head.
 - If for some reason you find that the sling is uncomfortable when the fabric is folded, then you can cut the square diagonally to create the same shape.
 3 Treat and bandage all wounds before putting on the sling. While wearing the bandage, the hand will be in constant contact with the tissue - if you do the bandage at home, it may turn out that the tissue is not sterile. Moreover, if there are open wounds on the injured arm, it is extremely important to treat them, dry them and carefully bandage them before putting on the sling. Below is a general technique for cleaning small wounds - read the article on how to treat minor abrasions and scrapes for details. If you have a serious injury or bone is visible in the wound, do not try to bandage yourself - go to the hospital immediately.
- First, flush any open wounds with clean running water.
- Remove dirt and any debris from the wound with clean tweezers if the water cannot be washed off.
- Gently (but thoroughly) clean the wound with antibacterial soap.
- Apply an antiseptic ointment.
- Bandage the wound. Use a dressing that will close the wound completely, without any sticky material touching the wound itself. If necessary, place a clean gauze between the dressing and the wound.
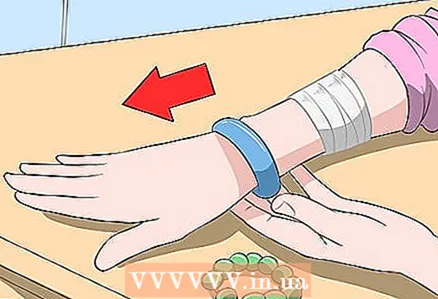 4 Remove all jewelry from the injured hand. You should remove any rings, bracelets, and / or armbands that you are wearing on your injured arm. If the injured arm swells as it heals, jewelry (especially jewelry that fits tightly) can cause insufficient blood flow to the arm, which can cause pain, irritation, and even blockage of blood vessels.
  5 Pass one end of the fabric under your hand and the other end over your shoulder. Place your injured arm at a 90-degree angle to your chest (horizontal to the floor). With your other hand, slide the folded, triangular end of the fabric over the shoulder of your injured arm. Let the rest of the tissue hang so that it is behind the injured arm, positioned approximately at mid-thigh level like the "tip" of an umbrella, on the same side as the injured arm.
  6 Place the other end of the sling over your shoulder. With an intact hand, hold the end of the triangle that "looks" straight at the floor, and lift it along your body, over the opposite shoulder, like the other end of the fabric, and throw it over your neck. Do this gently as the tissue is now touching the injured arm - do not make sudden movements so as not to injure the arm further. The length of the sling material should be such that the injured arm can hang comfortably at an approximately 90 degree angle.
 - Your fingers should protrude enough away from the "cuff" of the sling so that they can be used for simple tasks like writing while your arm is in the sling. If not, adjust the fit of the sling.
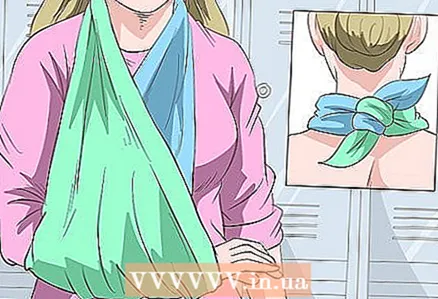 7 Tie the edges of the sling behind your neck. When you find a comfortable length for the sling, tie both ends of the sling material with a simple knot to secure it behind your neck.If you need to adjust the height of the sling, loosen the knot and tie a new one a little further "up" or "down" along the length of the fabric. Congratulations! Your new sling is ready.
 - If the knot snaps into your neck uncomfortably, slip a small pillow or towel underneath it.
- Make sure that the hair on the back of your head does not get caught in a knot when you tie it. If you accidentally tie your hair in a knot, it can be painful to tug while walking or moving your hand.
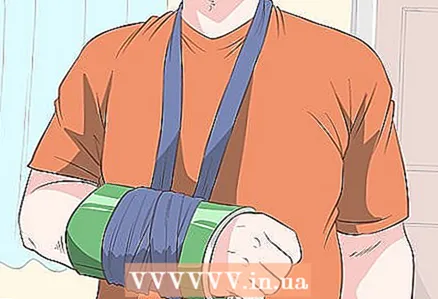
 8 Secure the edge of the sling with a safety pin (optional). If you have a safety pin on hand, pin the two edges of the sling material together near the elbow. This will create a "fulcrum" to support your elbow. Without this fulcrum, chances are your arm will slip from the back of the sling as you move, and the material in the sling around your wrist gathers.
 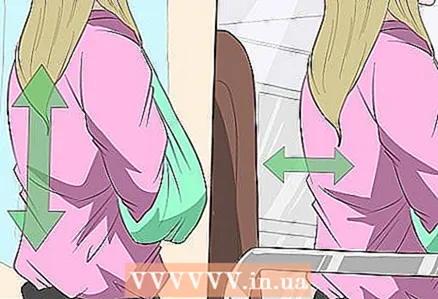 9 Maintain correct posture while wearing the sling. The bandaging transfers the weight of the injured arm to the upper back and neck. This extra weight can stretch your back and neck - even if you're not seriously stretching, after a while, you may find that your sling is causing the area between your shoulder blades to fatigue. To reduce this effect, straighten your shoulders and keep your back straight. Here are quick instructions:
 - When you are standing with your arm in a sling, keep your back straight and shoulders straight, but relaxed. Keep your chin raised and do not slouch.
- When you are sitting with your arm in a sling, lean against the back of a chair, if there is one. Keep your back straight and upright. Keep your head and chin up to keep your neck straight. Feet should be on the floor. Do not sink or hunch over. If there are armrests, place your hands on them.
- If you feel severe back or neck pain at any time while wearing the sling, see your doctor. Do not wear a sling if you have something wrong with your neck or back.
Method 2 of 3: Making an Impromptu Clothes Sling
 1 Impromptu headbands are not as good as those made by professionals. Ready-made modern sling is much more comfortable, ergonomic and better protects the injured hand than homemade ones. However, injuries happen unexpectedly and sometimes you have to improvise. For example, if it happened on a hike, you will not always be able to get the fabric to make a sling, as described above. In such cases, an impromptu dress sling is better than nothing at all.
 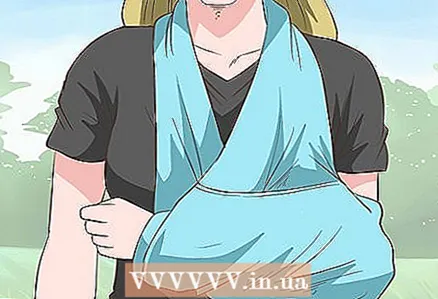 2 Use long sleeves as a sling. Take a sweater, buttoned shirt, or other long-sleeved piece of clothing. Tie the sleeves of the garment behind your head and gently thread your injured arm through the resulting loop. Allow the fabric to support the weight of your hand somewhere on your forearm or wrist — where it’s comfortable.
 - Try adjusting the length of the sleeves of the garment so that the knot allows your arm to hang at an angle of approximately 90 degrees (horizontal to the ground).
- If you have safety pins on hand, you can try to “secure” the fabric of the garment with the sleeves around your elbow as a temporary fulcrum for the sling, as described in the method above.
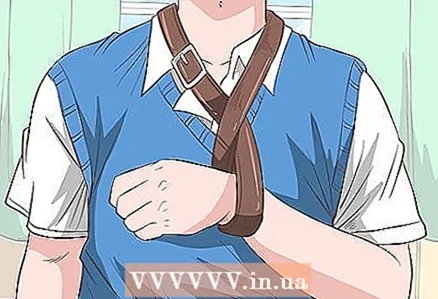 3 Use the belt as a sling. Probably the most suitable piece of clothing for an impromptu sling is a belt, as it allows you to form an adjustable buttonhole. Fasten the buckle behind your neck and place your hand through the loop that will come out of the rest of the strap. The weight of your hand should be supported by a strap along your forearm or palm. Tie or fasten the strap at the back of your neck so that your arm is held at a 90-degree angle.
 - Wearing the belt buckle around your neck is likely to be uncomfortable, so you'd better move the belt so that the buckle is on the belt, somewhere between your arm and your neck. You can also place a padded pad between the strap and your neck to make it more comfortable.
 4 Use a tie as a sling. If you are injured in the office or while wearing formal attire, a tie can serve as a temporary sling until your doctor puts it on. Just as in the methods described above, simply tie the back of the tie in a simple knot and thread your hand through the resulting loop. Adjust the position and length of the temporary sling so that the arm hangs at a 90 degree angle.
 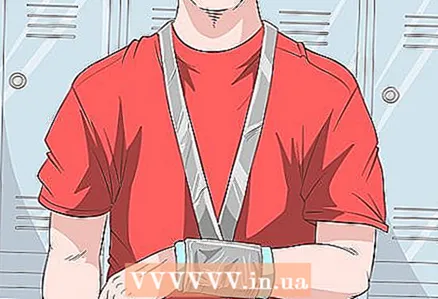 5 Make a bandage with duct tape. Duct tape (such as scotch tape) is great for bandaging - it is strong, flexible, and similar in properties to fabric.
 - A loop of duct tape can be used to support an injured hand in lieu of a belt or tie.
- Duct tape can be used to secure the arm to the torso to keep it still.
- Make sure that the tape does not stick to your skin. The bandage should be applied on the side that has no glue on it.
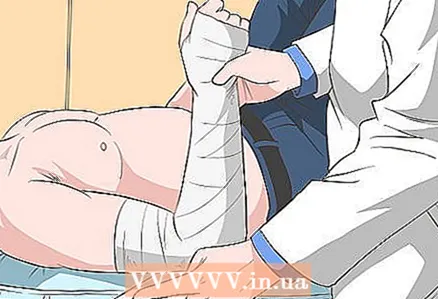
 6 Seek medical attention (and / or a real dressing) immediately. You may need to make a sling yourself when, for one reason or another, medical care is not available. If your injury is severe enough or does not heal for a long time, seek the help and advice of an experienced healthcare professional as soon as possible. Improvised sling is usually better than nothing, but it cannot replace a real sling (let alone other treatments for an injured arm that the hospital can provide). Better safe than sorry - don't risk your hand injury worsening by neglecting to show it to your doctor.
Method 3 of 3: Severe Cases
 1 For sprains or fractures, see your doctor. While a homemade sling may be a good choice for minor hand injuries, it will not be enough to provide adequate treatment for major fractures or dislocations. In these cases, even if the final stage of medical treatment maybe include the use of a sling, it is very important to let the doctor examine the injury, take x-rays, and discuss treatment with you. If a cast or surgery is needed and you use a homemade sling instead, your arm may heal so that it feels uncomfortable or requires further medical treatment. So if you have a broken arm or a dislocated arm, visit a traumatologist immediately.
 - Common symptoms of a broken arm include:
- severe pain;
- painful sensitivity;
- edema;
- loss of sensitivity;
- difference in appearance compared to a healthy hand.
- Common symptoms of a dislocated arm (most commonly seen with a dislocated shoulder) include:
- pain in the arm, shoulder, and / or collarbone;
- deformation (a bump on or near the shoulder);
- edema;
- bruises.
- Common symptoms of a broken arm include:
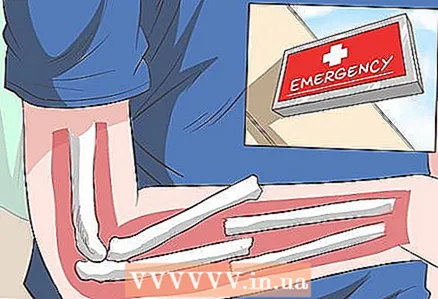 2 If bone is visible from the wound, seek immediate medical attention. When a broken bone pierces the skin or a wound such that the broken bone is visible, the fracture is called an open or compound fracture. These types of fractures are extremely painful, dangerous, and difficult to treat. Often, the types of injuries that cause compound fractures can also cause other serious injuries. To ensure that the patient is receiving prompt, effective treatment, they must be rushed to the hospital immediately.
 - Except in special circumstances, it is generally recommended not to attempt to repair complex fractures without the help of a trained healthcare professional.
 3 Only try to straighten a broken bone when signs of insufficient blood circulation appear. As noted above, a physician should be involved in fracture recovery. An exception is when the fracture appears to be interfering with blood flow to the limb. If the area of the limb at the site of the fracture looks pale or blue, there is no pulse, there is no sensitivity, or it becomes cold, it may be that there is no blood flowing there. In these cases, the potential loss of a limb outweighs the danger of self-repositioning of the bone.
 - For details, refer to the literature on repairing a fractured bone.
Tips
- If an arm or shoulder does not heal for a long time, despite the fact that you protect it (using a sling), do not forget to see a doctor.
- To hold the sling in place, you can tie a long bandage around the sling around your injured arm, but under the arm intact, and secure it with a safety pin. This will prevent any movement of the hand as the person moves or walks.
- Do your best to reduce the swelling by applying an ice pack or a bag of frozen peas to the affected area to keep things from getting worse. Do not place them directly on the injured area to avoid aggravating the situation - use a paper towel.
- If it is impossible or undesirable to make a “full size” sling, make a collar-cuff sling.
- Another idea: take a strip of fabric, sheet, pants, tights (whatever you have) and wrap it under your wrist and around your neck in a full-size sling fashion.
- A sweatshirt with a hood can also serve as a sling. Tie the non-hood end, pin the ends together, and roll the hood up to support your hand.
Warnings
- Some shoulder problems, such as frozen shoulder syndrome, can only be aggravated by a bandage. If the pain persists within a couple of days, see your doctor as soon as possible.
- If you actually think you have a broken arm or shoulder, see your doctor.
- In case of problems with the neck, especially in old age, the problems with a bandage can only be aggravated.
What do you need
- 1 meter square piece of fabric or sheets / pillowcases
- Safety pin
- Padded lining (optional)


