Author:
Clyde Lopez
Date Of Creation:
18 June 2021
Update Date:
1 July 2024

Content
- Steps
- Method 1 of 3: Preparation
- Method 2 of 3: Piercing the navel
- Method 3 of 3: Further Care
- Tips
- Warnings
- What do you need
Belly button piercings are becoming more and more popular. Some people decide to do it on their own at home for many reasons. If you also decide to pierce your navel yourself, keep reading. However, remember that it is always safer to go to a professional.
Steps
Method 1 of 3: Preparation
 1 Collect the required tool. Using the correct instruments is very important when piercing your belly button. Otherwise, something can go wrong, or even end up with infection. To safely pierce your belly button, you will need:
 - Sterile needle (size 14G), sterile navel jewelry (size 14) made of steel, titanium or bioplast, rubbing alcohol or alcohol wipes, body marker, piercing clip and cotton balls.
- Do not try to pierce your belly button with a sewing needle, safety pin, or piercing gun, it can be dangerous and will not give good results.
 2 Provide a clean space. All precautions must be taken to avoid contamination before proceeding with the piercing. Spray disinfectant on all surfaces, countertops (it is a disinfectant, not an antiseptic).
 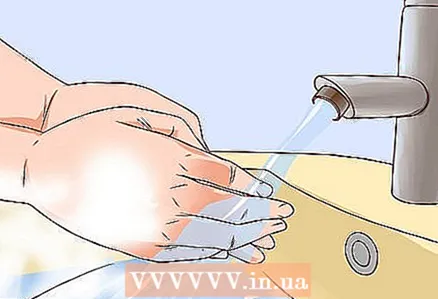 3 Wash your hands. Remember to wash your hands up to your elbows in warm water! Everything must be absolutely sterile. It is even safer to wear latex gloves (if they are sterile and have not been used before). Dry your hands with a paper towel, not a cloth, as bacteria can live in the cloth.
  4 Sterilize the piercing clip, needle, and jewelry. If you bought new instruments (which you should have done), they should come in sterile packaging. However, if this is not the case, or you have opened the packaging, you will need to sterilize them again.
 - To sterilize instruments, you can immerse them in alcohol or hydrogen peroxide for one to two minutes.
- Remove the instruments from the sterilizing liquid (preferably with latex gloves) and place them on a clean paper towel until dry.
 5 Clean the area around your navel. Before making a puncture, you must thoroughly clean the navel and the skin around it to remove any bacteria. It is best to use a special piercing disinfectant gel or rubbing alcohol.
 - Apply a generous amount of gels or rubbing alcohol to a cotton ball and rub thoroughly over the area to be pierced. Wait for the skin to dry before making the puncture.
- If you are using isopropyl alcohol, the concentration must be at least 70% to achieve the required level of disinfection.
- If necessary, use cotton swabs to clean the inside of the navel. Clean the skin above and below the puncture site.
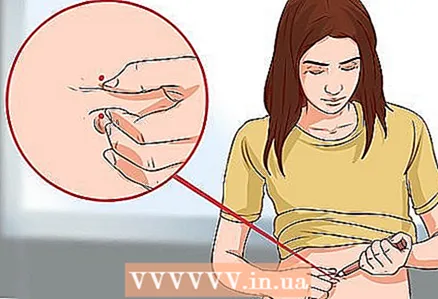 6 Make a mark where you will pierce. Before piercing, mark the point where the needle will pass with a body marker, mark the needle entry point and exit point. The distance between the navel and the second puncture should be approximately 1 cm.
 - Usually the top of the belly button is pierced, but the choice is yours.
- Use a pocket mirror to make sure the marks are aligned vertically and horizontally. Check while standing, if you are sitting, the folds on your stomach will prevent you from doing it right.
 7 Decide on local anesthesia. If you are afraid of pain, you can treat the site of the future puncture with an ice cube wrapped in a paper towel, this will help the skin to numb in this place.
 - But this will make the skin stiffer and make the needle harder to push through the skin.
- You can apply some anesthetic gel using cotton swabs.
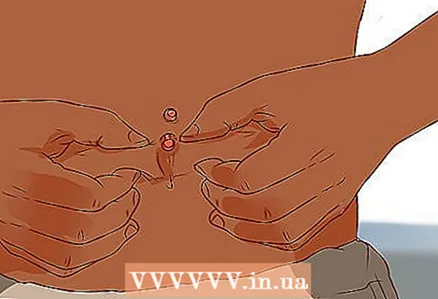
 8 Clamp the prepared area. You are now ready to pierce! Take a piercing clip, pinch the skin of your navel, and pull it out a little.
Method 2 of 3: Piercing the navel
 1 The entry point should be in the middle of the lower clamp and the exit point should be in the middle of the upper clamp.
- Grasp with your non-dominant hand as you need a stronger and stronger hand to pierce.
- Prepare your needle. Take a sterile piercing needle (size 14G). These needles are hollow inside, which makes it easier to insert the jewelry after piercing.
 2 At this step, it is better to unscrew the ball with top parts of the decoration (leaving the bottom bead intact). It will be more difficult to do this later by trying to hold the clamp and needle in place while unscrewing the ball.
  3 Pierce from bottom to top. Align the sharp end of the needle and the mark on the skin through the lower clamp.Inhale deeply and push the needle through the skin in one smooth motion, making sure the needle exits through the mark in the upper clamp. Depending on the skin, the needle may need to be shaken a little to pierce the skin.
 - Never pierce from top to bottom. It is necessary to see how the needle goes; piercing from top to bottom, you cannot do this.
- It is best to pierce while standing so you can stay mobile and see what you are doing. However, if you are worried about possible fainting, pierce while lying down (never sitting!).
- Don't worry if a little blood comes out - this is normal. Simply wipe off the blood with a cotton swab dipped in rubbing alcohol or antibacterial gel.
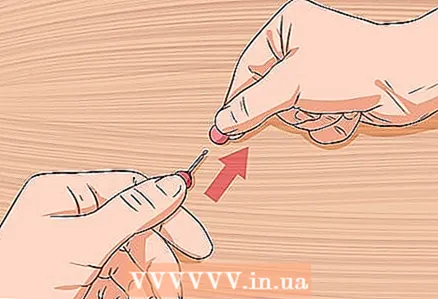
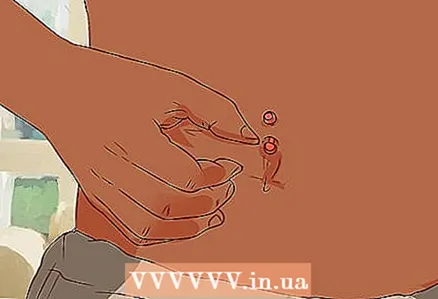
 4 Insert decoration. Without removing the needle from the puncture, insert the jewelry into the hollow part of the needle. Pull the needle and embellishment upwards.
 - Make sure the jewelry is fully inserted before removing the needle!
- Screw the ball tightly onto the end of the decoration. Hooray! You just pierced your belly button!
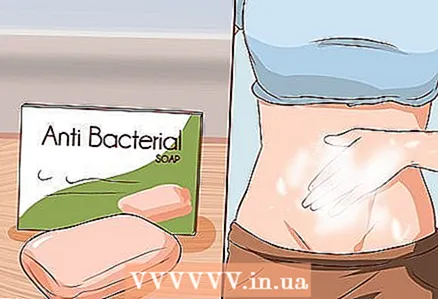
 5 Clean your hands and puncture site. When finished, wash your hands with antibacterial soap. Then take a cotton ball dipped in rubbing alcohol or antibacterial gel and very tender treat the area around the puncture.
 - This is your first day of grooming and possibly your most important. Take a few minutes to get it right.
- Do not pull on the earring. Rinse it off and let it heal. If you bother the puncture site by touching or playing, you can get an infection.
Method 3 of 3: Further Care
 1 Take care of your piercing. Your job is not over yet! Remember that a new piercing is akin to an open wound, so it is very important to keep the piercing clean for the next several months to prevent infection and irritation.
 - Wash your piercing with antibacterial soap once a day. Avoid alcohol, peroxides, and ointments as they dry out the skin and can cause irritation if used daily.
 2 Flush with saline. This is a good way to keep your piercing clean. You can buy the solution at the pharmacy, or simply dissolve some salt (no iodine) in warm water.
 - Soak a cotton swab in the solution and use it to clean both ends of the piercing.
- Gently move the piercing from side to side to clean it completely.
 3 Avoid swimming. For the first few months, it is not recommended to swim in the pool, river, or jacuzzi, as bacteria can live in the water, so you can get an infection.
  4 Let the piercing heal. If you see clear or white fluid, the healing is normal. Anything that has a color or smell is contamination, you should see a doctor.
 - Some experts insist that the piercing care period should be 4-6 months. Evaluate what your puncture looks like after two months.
- Don't touch the decoration! The puncture must heal before you can change jewelry. You can change balls, but not the barbell. This is not only painful, but will also slow down the healing process.
 5 Make sure there is no infection. Even after your piercing has healed, there is a chance of infection. If you suspect that the puncture is infected (swelling, swelling, tenderness, bleeding, and suppuration may be a sign), apply a warm compress for 3-4 hours, then cleanse the area with an antiseptic and apply an antibacterial cream.
 - If the situation does not improve within 24 hours, see your doctor.
- If you don't want to see a doctor, see a professional piercer. He will give you advice on care and help you find the right products.
- Do not remove the jewelry while trying to deal with the infection, as this will only increase the likelihood that the infection will remain inside the puncture.
Tips
- Learn more about belly button piercings. Make sure you really want this and are confident in your decision.
- Do not touch fresh piercing! You can only do this when you wash the puncture with antibacterial soap.
- Be alert for contamination. If you have questions, see your doctor.
- If you are intimidated by the idea of piercing your navel yourself, see a professional.
Warnings
- Do not use improvised means for puncture. This is unsafe and can cause infection.
- Self-piercing is dangerous. If you really want to get your belly button pierced, it's always best to go to a professional.
- A puncture can leave a lifetime scar if you choose not to wear jewelry.
- You shouldn't do this if you are under 18.
What do you need
- Sterile needle (size 14G)
- Body marker
- Alcohol or other skin disinfection
- Piercing clip
- Sterile jewelry (size 14G and length 18 mm, in case of possible swelling. It is best to use bioplastic jewelry as they bend with your body. You can also shorten the length when the swelling subsides).
- Sterile latex gloves (optional)


