Author:
Mark Sanchez
Date Of Creation:
2 January 2021
Update Date:
1 July 2024

Content
- Steps
- Part 1 of 3: Preparation
- Part 2 of 3: Piercing the nose
- Part 3 of 3: Caring for your piercing
- Tips
- Warnings
- What do you need
Since a professional nose piercing is expensive, you may decide to do it yourself at home. To do this, it is enough to find out how the piercing is done and follow the rules of hygiene. If you are not afraid of pain and are willing to take the risk, then try piercing your nose yourself. However, keep in mind that a professional will most likely do it faster, better, and without undesirable consequences.
Steps
Part 1 of 3: Preparation
 1 Imagine what your piercing should look like. There are different types of nose piercings. Choose which one you want to make. If you are doing your first piercing yourself, then it is better to choose the option with a ring or a regular "stud". Imagine how you will look with this piercing so that you will not regret it later.
 - It's still better if the piercing is done by a professional.First, he will do it carefully; secondly, it doesn't hurt; thirdly, it will not infect you. If, nevertheless, you decide to do piercing at home, then be prepared that bleeding, inflammation may begin, or something just goes wrong. On the other hand, hand-made things are always more appreciated.
 2 Buy a piece of jewelry. You can choose a stud, ring or barbell. Look for something suitable in jewelry stores, tattoo parlors, or gift shops. If you know exactly what you want, then search the Internet. It is important to choose the right size, length and thickness of the product. For a start, it is better to choose a small ring or earring. The decoration must be new and sterile. It is unacceptable to insert previously used jewelry.
 - Remember that certain metals can be allergic. The most common allergy is to nickel, but it can also be to gold, chromium, or any other metal. Allergy manifests itself in the form of a rash. If, after piercing, you notice that the skin is cracked or bubbles have appeared on it, you should immediately pull out the jewelry and consult a doctor.
- It is best to use jewelry made of titanium or stainless steel, as they are practically non-corrosive. You can choose metals that do not contain nickel: yellow gold (585–999 standard), silver, copper or platinum. Polycarbonate products are also considered safe.
 3 The skin on the nose should be clean. If you get a piercing near the inflammation, you can bring an infection to the piercing site. Therefore, if you have this or that rash on your nose, wait a few days or weeks until it disappears. During this time, wash your face using a pore cleanser or scrub.
  4 Prepare your needle. The needle must be new and in a whole package. You must be sure that no one has used it before you. It is most effective to use a small diameter hollow needle: 20G (0.9mm) or 18G (1.0mm). The diameter of the hole in the nose must match the diameter of the jewelry you choose. After making all the preparations, remove the needle from the package. Make sure the skin is sterile before poking it through.
 - Basically, the piercing can be done with a safety pin, pushpin, earring, or sewing needle. But keep in mind that you yourself may not sterilize the selected instrument well enough. Accordingly, the risk of infection is much higher. If the instrument is not sharp enough, you can damage the tissue, and the process itself will be much more difficult and painful.
- After taking the needle out of the package, do not put it anywhere. If you do need to put it down, use a clean cloth or sterilized container.
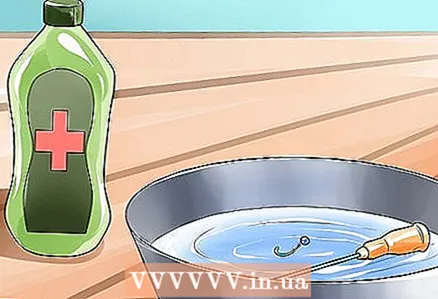 5 Sterilize everything. Namely: a needle, jewelry, as well as any other tools that you need for piercing. First, soak the needle in rubbing alcohol and then boil it. Wash your hands thoroughly. Best with antibacterial soap. Then put on your latex gloves. Do not touch items that have not been sterilized.
 - If you touch your nose, change your gloves. Put on a new pair of gloves just before you start piercing.
 6 Make a mark on the nose. With a marker, draw a small dot on the skin where you want the stud to be. Look in the mirror and make sure everything is right. If the mark is too low or too high, erase it and draw a new one. Do not be lazy to redraw until you achieve the perfect result.
Part 2 of 3: Piercing the nose
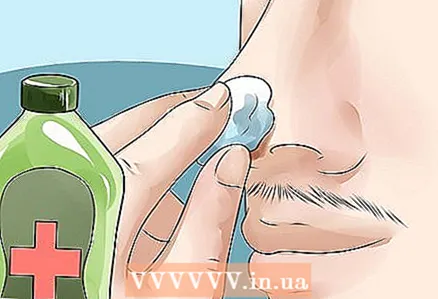 1 Treat the puncture site. Dampen a cotton swab with rubbing alcohol and wipe the area where you will puncture. Be careful not to get alcohol in your eyes.
 - Ice can be used to numb the puncture site. Apply ice to your nostril. Keep holding until you no longer feel the tissue, but no more than three minutes.However, keep in mind that the cold will make the skin tighter and more difficult to pierce.
 2 Use a piercing clip. It is needed in order not to prick the finger or the inner septum of the nose. If you don't have a clip, it's worth buying one. Squeeze the clamp so that it covers the area you will be piercing.
  3 Take it easy. Take a deep breath before starting. If your hands are shaking, try to calm down and relax. Consider that nose piercing is relatively simple and painless compared to other types of piercing. In fact, piercing the nose is not difficult, as there is a little skin and fat in it that will have to be pierced.
 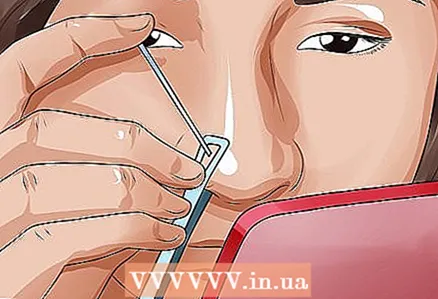 4 Pierce your nose. While looking in the mirror, place the needle against the mark you drew. Take a deep breath and quickly pierce your nose. You will feel pain for a moment, but it will not last long. The needle should be inserted perpendicular to the surface of the skin so that it slides through the tissues of the nose.
 - Remember, the sooner you puncture, the sooner it will end.
- It is important not to push the needle too deep into the nostril. If you pierce the side of your nostril, try not to insert the needle too deeply - this is very unpleasant and painful.
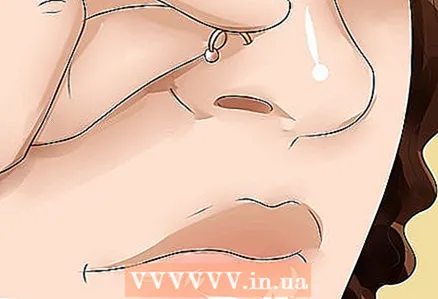 5 Insert the ring or stud as soon as possible. The hole made will begin to close as soon as you remove the needle, as the wound will already be healed. In order for the jewelry to sit perfectly in the hole, the wound must heal already around it. If you delay with this, the piercing will be ruined!
Part 3 of 3: Caring for your piercing
 1 Treat piercings twice a day. You can use sterile saline, hydrogen peroxide, or mix water and soap in a 1: 1 ratio. Treat the puncture site twice a day. To do this, soak a cotton swab or cotton swab in the solution and apply to the piercing for a few minutes. The puncture needs to be handled outside and inside the nose. If you inserted a ring into the nose, then, while processing, slightly scroll it.
 - If you are worried that you might have gotten an infection with the piercing, treat the piercing every few hours. In this case, do not use strong disinfectant solutions - they should not be used too often.
- Until the puncture site is healed, do the treatment every day. For the first few days after piercing, your nose will be swollen and painful. Everything should be back to normal in a week. However, keep in mind that the wound will finally "heal" only after 3-4 months.
- Hydrogen peroxide is often recommended as a disinfectant. However, if you treat a wound with it, scars may remain. Therefore, decide for yourself whether to use this tool or not.
 2 Be careful not to infect! Treat your piercing regularly. Be sure to wash your hands before piercing and do this before each treatment. If you have sterilized all the tools you use before getting your piercing and carefully clean the puncture site, you have nothing to worry about. However, if after a week the puncture site is still red and painful, then you may still have an infection. In this case, consult a doctor immediately.
 - Perhaps, in order to prevent infection, it is worth treating the wound with antibacterial soap and an ointment like Neomycin. This will help prevent inflammation. Keep in mind that if you do not regularly process your piercing, you may have to take strong antibiotics that are expensive and of little use to the body.
 3 Do not take out the jewelry for a long time. If you take it out for more than a few hours, the puncture may heal. The skin of the nostrils heals very quickly and may need to be pierced again if the nail cannot be inserted. Don't change your cloves for at least three months.
  4 Consult with professionals. Visit a piercing parlor and find out everything that interests you.Politely ask the master for advice on how best to get the piercing done yourself. Even though you are not going to get pierced in their salon, chances are they will give you some good advice. If you have any medical complications, be sure to see your doctor.
Tips
- If it seems to you that you have brought an infection, then do not remove the "carnation" so that the inflammation does not spread under the skin! If the condition does not improve, see your doctor.
- If tears come to your eyes, this is normal. Just blink more often and continue what you started.
- Your nose will be red and sore for a few days after you get pierced. This is a completely normal reaction. If the redness and soreness persist after one to two weeks, then you need to see a doctor. An infection could have entered the nose.
- Do not treat your piercing with tea tree oil, rubbing alcohol, hydrogen peroxide, or any other harsh antiseptic. Use only saline or a quality, fragrance-free antibacterial soap.
- Do not use alcohol on the piercing, as it will dry out and crust over the piercing.
- If ice is applied to the nose before piercing, the area will numb and the sensitivity will decrease. However, keep in mind that the skin will harden and be more difficult to pierce.
- If you do not have a special clamp, you can replace it with a handle with a small indentation at one end. The pen will help you not to prick the finger inserted into the nose. It's better to get a clip though.
- Focus on hand movements, not pain. This will distract the mind and subconsciousness.
- Don't play with the decoration. Although it is believed that if you scroll the jewelry, the puncture will heal faster, this is not the case. In reality, you will only tear apart the wound, delaying the healing process.
- To distract yourself from the pain, suck on a lollipop or some candy.
Warnings
- If you do not understand something or are in doubt, then it is better to go to a professional piercing salon. It may be better not to save money and use the services of a specialist who will make your piercing professionally.
- Don't share needles. A used piercing needle, even after sterilization, can transmit AIDS and other infections. Never share a used needle - not even with your best friend!
- Think carefully before getting pierced so you don't regret it later.
- Be extremely careful! Only pierce the nose with an autoclavable hollow needle. If you pierce your nose with a safety pin, pushpin, earring, or sewing needle, there is a good chance that you will infect an infection as you are unlikely to be able to sterilize them correctly. In addition, they may not be sharp enough. When punctured, you will have to make more force, because of which there may be breaks and it will be much more painful.
What do you need
- Hollow needle, sterilized in an autoclave, slightly larger than the insertable jewelry
- Needle holder
- Piercing clip
- Nose ring or round "stud" (sterilized in advance!)
- Sea salt / ear care solution
- Rubbing alcohol
- Latex gloves


