
Content
- Steps
- Part 1 of 3: Oven body
- Part 2 of 3: Insulating the Cover
- Part 3 of 3: Heating Element
- Warnings
- What do you need
If you want to melt metal and shape it in different shapes, you will need a furnace that can be hot enough to melt the metal. You can buy a ready-made oven or make your own from an airtight garbage bin. First, cut the bucket to a suitable size and line the inside with heat-resistant insulating material. Then cover the lid with thermal insulation and fit it tightly to trap heat and excess pressure. Finally, install the heating element and you can melt the metal!
Steps
Part 1 of 3: Oven body
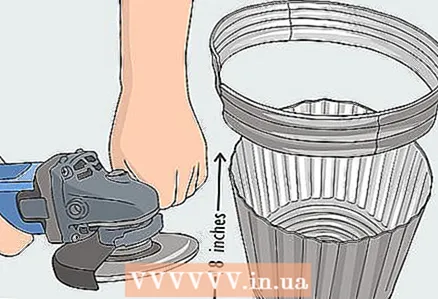 1 Use an angle grinder to trim the steel bin to a height of 45 centimeters. Find a steel bin that is at least 45 centimeters high and at least 40 centimeters in diameter. If the bucket is taller than 45 centimeters, place the cutting wheel on the angle grinder and turn it on. Carefully trim the top edge of the bucket to the desired height.
 - When working with an angle grinder, wear safety glasses to protect your eyes from metal shavings.
- Be careful not to cut yourself on the sharp cut edges of the bin.
- If you don't have an angle grinder or want to make a smaller oven, you can use a 10 liter steel bucket with a height of about 30 centimeters.
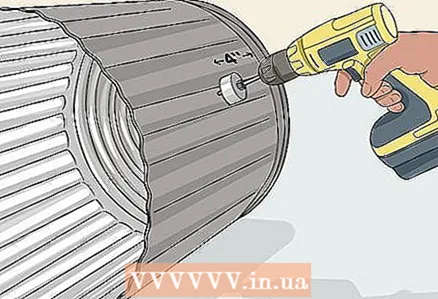 2 Drill a hole in the side wall of the bin 10 centimeters from the bottom. Attach a 2.5 cm hole saw to the drill and clamp it firmly. Mark the hole on the side of the bucket about 10 centimeters above the bottom. Drill through the side of the bucket.
 - Air or other gas will enter the oven through the side opening.
- Do not make a hole near the bottom, otherwise it may clog if liquid spills in the oven.
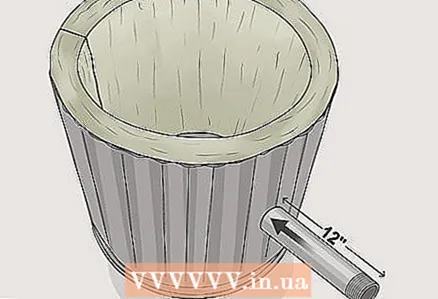
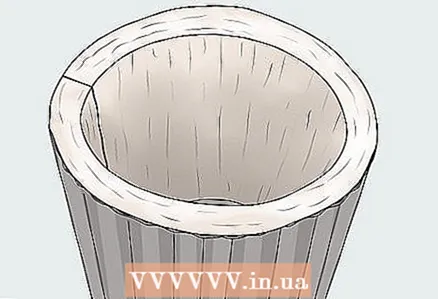 3 Line the inside of the bucket with a 5 cm layer of ceramic fiber cotton wool. Ceramic fiber wool has thermal insulation and refractory properties and is well suited for homemade stoves. Using a utility knife, cut out a round piece of ceramic fiber cotton that is the same diameter as the bottom of the bin. Push this piece into the bucket and press it firmly to the bottom. After that, wrap cotton wool tightly around the inside of the sidewalls of the bin.
 - Ceramic fiber cotton wool can be purchased at a hardware store or ordered online.
- Ceramic cotton wool may cause irritation on contact with skin. To avoid this, wear long sleeves and work gloves.
A warning: Cutting ceramic fiber wool produces dust that can be harmful if it gets into your lungs, so be sure to wear a respirator.
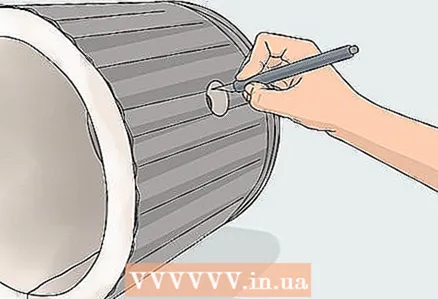 4 Cut the cotton wool where it covers the hole in the bin. Find the hole you made in the side of the bin and cut out the cotton wool with a utility knife. To do this, walk with a knife along the edge of the hole. After you have cut the cotton wool around the entire circumference, pull it out of the hole.
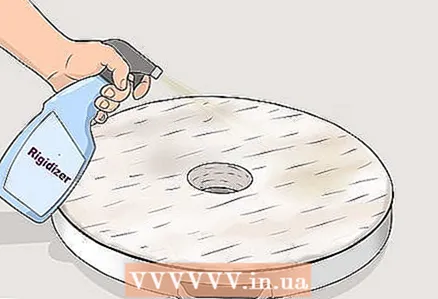
 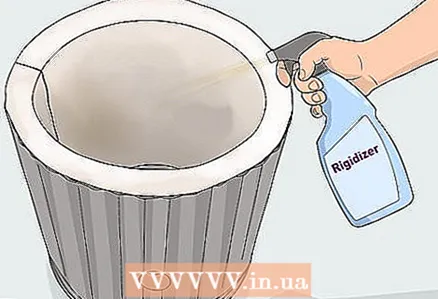 5 Spray the cotton with hardener and wait 24 hours. A hardener is a chemical compound that activates ceramic wool particles, making it harder and retain its shape. Pour the hardener into a spray bottle and apply it all over the cotton wool. Wait at least 24 hours for the hardener to air dry and harden the cotton wool layer.
 - The hardener can be ordered online.
- Mark the bottle you used for the hardener to avoid confusion with other bottles.
- Some types of ceramic wool are already treated with a hardener and begin to harden in air. Check if there is any indication on the cotton wool packaging about this.
 6 Apply oven cement to the surface of the cotton wool and allow it to fully cure. Stir the kiln cement with a stick to get a homogeneous mixture. Then apply the cement to the surface of the cotton wool using a paint brush with 5cm bristles. It is necessary to cover the entire surface so that heat does not escape from the oven. Wait at least 24 hours for the cement to harden before using the oven.
 - Kiln cement that has already been diluted can be purchased at a hardware store or ordered online.
- Kiln cement can be dispensed with, but it will help extend the life of the kiln and get a smooth, clean surface.
Part 2 of 3: Insulating the Cover
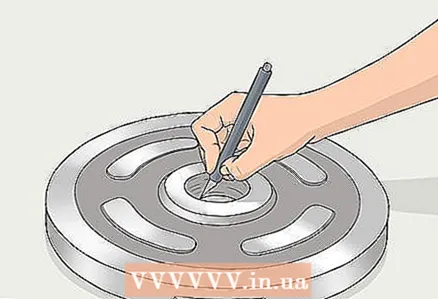
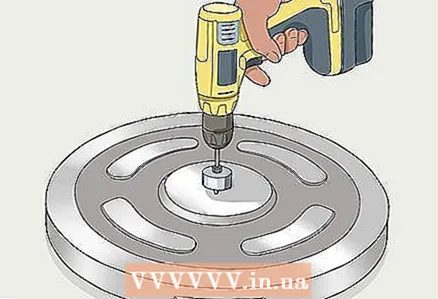 1 Drill a 5cm vent in the bin lid. Take the lid to the bucket you used for the oven body. Attach a 5cm hole saw to the drill and clamp it firmly. Drill an air vent in the lid 7.5-10 centimeters away from the handle.
 - Use a hole saw designed for metal drilling to avoid damaging the tool.
- Never use a cover that does not have a ventilation hole, otherwise the increased pressure inside the oven may lead to its explosion and destruction.
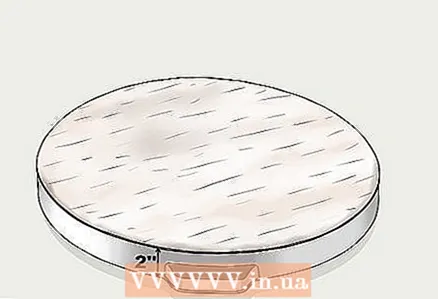 2 Fill the bottom of the lid with a 5 cm layer of ceramic wool. Cut a round piece of ceramic fiber cotton with a diameter of 2.5 to 5 centimeters larger than the underside of the lid. Press the cotton wool into the bottom of the lid until it snuggles against the sides and holds firmly in place. Continue adding layers of ceramic wool until it is 5 centimeters thick to ensure maximum heat resistance.
 - When handling ceramic wadding, wear long sleeves and an N95 or better respirator to prevent irritation and itching.
- Be sure to read the ceramic wool label and follow all recommended precautions.
- If the ceramic wool does not stick to the bottom of the lid, you can spray it with heat-resistant glue first. Heat-resistant glue can be purchased at a hardware store or ordered online.
 3 Cut out the cotton wool where it covers the hole in the lid. Turn the lid upside down and find the hole you drilled in it. Slide a utility knife along the edge of the hole and pierce the cotton wool with it. Cut the cotton wool along the edge of the hole and remove the cut piece.
 - The hole in the lid must not be covered with cotton wool, otherwise the oven will not have adequate ventilation.
Advice: If you find it difficult to cut the cotton in a hole with a utility knife, try using a serrated bread knife - they may find it easier to cut the cotton.
 4 Apply hardener to the cotton wool and leave to cure for 24 hours. Pour the hardener into a spray bottle and apply it directly to the ceramic wool at the bottom of the cap. Coat the entire surface of the cotton with hardener so that it hardens properly. After applying the curing agent to the cotton wool, leave the lid for at least 24 hours in a well-ventilated place to harden.
 - If you don't have a spray bottle on hand, you can apply the hardener with a paint brush.
 5 Apply kiln cement all over the cotton wool for better thermal insulation. Stir the kiln cement with a stick to create a homogeneous mixture. Using a 5 cm brush, apply the cement to the outside of the cotton wool. Smooth out the cement with a brush and let it cure for at least 24 hours.
 - Before applying the cement, place a piece of cardboard or tissue under the lid to avoid staining the work surface.
Part 3 of 3: Heating Element
 1 Pass a steel pipe or nozzle through the hole in the oven wall. The type of pipe depends on what you intend to use as your heat source.If you want to heat the stove with charcoal, pass a steel pipe 30 centimeters long and 2.5 centimeters in diameter through the hole. In this case, the pipe should protrude from the inner wall of the furnace by at least 3 centimeters. If you are going to use propane gas, place the burner inside the oven and thread the end of the valve through the side opening. Position the end of the burner inside the oven so that it points out from the center.
 - A propane burner for ovens can be ordered online.
- Do not use a regular steel pipe for propane, as this will make it difficult to control the flame.
 2 Attach the blower to the end of the pipe with a connecting piece if you are going to use charcoal. The branch pipe allows you to connect pipes without welding. Slide one end of the nipple over the end of the steel pipe outside the oven. Place the other end of the nozzle over the end of the blower to increase the air flow through the oven and thereby improve heating.
 - Couplings are available at a hardware store.
- If you don't have a blower, you can use your old hair dryer at maximum speed.
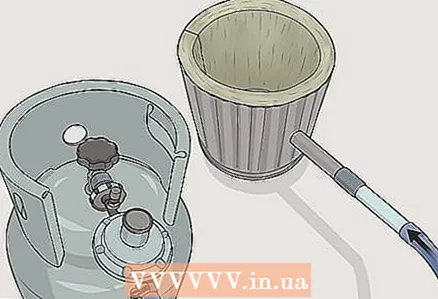 3 Connect a propane tank to the other end of the burner if you are going to use gas. Connect the gas supply hose from the valve on the propane cylinder to the inlet at the end of the burner. Make sure the valves are completely closed when you are not using the stove to avoid wasting fuel and to prevent possible fire.
 - Any propane cylinder can be connected to the stove, but keep in mind that small cylinders will run out of gas faster.
 4 Preheat the oven. If you are using charcoal, fill the stove bottom 5–8 centimeters with briquettes and light them with a lighter. Turn on the blower at minimum power to warm up the oven. If using propane, open the valves on the cylinder and burner. Put a lighter in the middle of the stove and light the propane gas. Place a lid on the oven to keep the heat from escaping.
 - Adjust the intensity of the flame using the valves on the propane cylinder and burner.
- Flames may come out of the vent in the lid, so be careful.
- Typically coal fired ovens can reach temperatures of about 650 ° C, while propane can reach temperatures as high as 1250 ° C.
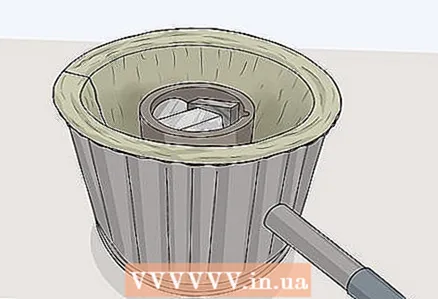 5 Melt metal in a crucible. A crucible is a metal container inside a furnace that contains molten metal. Place the metal you want to melt into the crucible and place it in the center of the furnace using heat resistant tongs. Wait for the furnace to heat the crucible and melt the metal, then remove it with tongs to pour it into the mold.
 - A furnace like this can be used to melt low-melting metals such as aluminum or brass.
Warnings
- Ceramic wool dust can cause irritation if it comes into contact with the skin or lungs. Be sure to wear an N95 or better respirator, long sleeves, and gloves when cutting ceramic wool.
- Always keep the valves on the propane cylinder closed when you are not using the stove, as escaping gas can cause a fire.
- Metal melting furnaces can reach temperatures in excess of 1100 ° C, so be very careful when handling them.
- Keep a fire extinguisher near the stove in case of an emergency.
What do you need
- Protective glasses
- Respirator N95
- Work gloves
- Steel dustbin with lid
- angle grinder
- Hole saw drill
- Ceramic wool
- Utility knife
- Carving knife
- Hardener
- Kiln cement
- Paint brush
- Steel pipe or propane burner
- Connecting pipe
- Blower
- Charcoal
- Propane tank
- Air hose
- Lighter
- Crucible
- Heat Resistant Tongs
- Fire extinguisher


