Author:
Alice Brown
Date Of Creation:
28 May 2021
Update Date:
1 July 2024

Content
- Steps
- Part 1 of 3: Measurements and material preparation
- Part 2 of 3: Make Wood and Attach Plates
- Part 3 of 3: Assembling the Battery Screen
- Tips
- What do you need
Batteries are a great source of heat during the winter months, but their appearance can ruin the interior for the rest of the year. One solution to this problem is to make a screen on the battery. The screen will hide the battery from the eyes and help it blend in with the interior. Making a screen on a battery is not difficult, even if you do not have the skills of a carpenter.
Steps
Part 1 of 3: Measurements and material preparation
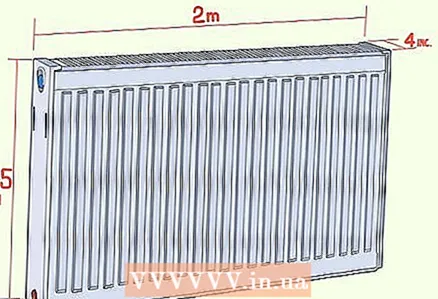 1 Measure the dimensions of your battery. Measure the width, height, and depth of the battery and add a couple of centimeters to those numbers. The idea is to make the screen big enough to fit easily on the battery.
 - For example, if the battery is 25cm deep, 50cm high, and 76cm wide, then the screen dimensions will be 30cm deep, 55cm high and 81cm wide. With these dimensions, the screen will fit snugly and easily take off / put on.
- For example, if the battery is 25cm deep, 50cm high, and 76cm wide, then the screen dimensions will be 30cm deep, 55cm high and 81cm wide. With these dimensions, the screen will fit snugly and easily take off / put on.
 2 The material for the future screen can be bought at a construction supermarket. A widespread choice is natural wood battery screens that add warmth to your décor, but this is not the only option. Here are some alternatives:
 - Fiberboard. Fiberboard or MDF (Medium Density Fiberboard) is a material consisting of compressed wood dust and resins. It is cheap, easy to paint and does not require 45 degree connections. But on the other hand, this material cannot be covered with stains and tints.
- Veneered plywood. Plywood is very durable and beautiful even without coating, it perfectly absorbs wood stains. But on the other hand, it is more expensive than MDF and requires 45-degree joints to hide the core from the eyes.
- Fiberboard. Fiberboard or MDF (Medium Density Fiberboard) is a material consisting of compressed wood dust and resins. It is cheap, easy to paint and does not require 45 degree connections. But on the other hand, this material cannot be covered with stains and tints.
 3 Select the trellis to use in combination with wood. Warm air from the battery must leave the volume of the wooden box, which is why many battery screens use perforated metal sheets. You can choose the right material from a variety of sheet metal to match your screen design as well as your interior design. Extruded aluminum is an interesting option.
  4 Select trims for your lattice. Platbands are inexpensive, but by closing the joints, they will give your product a finished and effective look. If you don't have a miter saw or hand saw and miter saw to make a 45-degree angle at home, ask your home builder to do so.
  5 Get a sheet of metal that will reflect heat into the room. For these purposes, you can use galvanized steel. This sheet needs to be placed on the wall behind the battery so that it reflects heat back into the room, increasing the battery's efficiency.
Part 2 of 3: Make Wood and Attach Plates
 1 You can cut out the parts you need at a construction supermarket. If you do not have a circular saw, jigsaw and a suitable place, or you do not have the appropriate skills, the easiest way is to ask to cut the materials at the place where you buy them. Most sellers of wood, plywood, metal can help you with cutting either for free or for little money, if you know the dimensions you need.
  2 Make two side panels. Check your measurements, secure the workpiece to a workbench, and mark the top and bottom of the workpiece with parallel straight lines. Place a mold or guide along the line to make a straight cut. Secure the guide and make a cut in a smooth motion.
 - If you need to make two identical pieces from small pieces, fasten them together and you will have two identical side panel pieces by doing everything once.
- If you need to make two identical pieces from small pieces, fasten them together and you will have two identical side panel pieces by doing everything once.
 3 Make the front panel. Don't forget to add 5-7cm of headroom to the battery dimensions. Secure the workpiece to a workbench, mark the top and bottom edges of the part with straight lines and secure the guides. Advance the saw very slowly as you cut to make a clean, neat edge.
  4 Cut out the top piece. Mark the top piece so that it is 1cm wider than the side pieces and 2.5cm wider than the front panel. This will accentuate the top of the battery screen.
 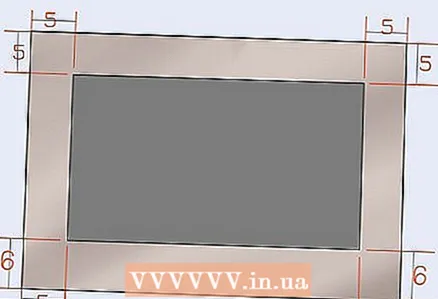 5 Make a portal for the lattice. Depending on how large you want the trellis to be, mark out cutting lines 7.5 to 12.5 cm from the right and top edges and 20-25 cm from the bottom edge. This will effectively accentuate the grille.
 - If you want to make grates on the sides, repeat the procedure for the side panels.
- If you want to make grates on the sides, repeat the procedure for the side panels.
 6 Cut a rectangle in the front piece using the plunge saw. Since the area that needs to be cut is in the center of the workpiece, you need to use this tool. Use a guide to keep the saw in a straight line. Press the saw into the rail with the saw blade raised. Turn on the saw and, pressing it against the guide, smoothly immerse the saw blade into the material, make sure to leave 2-3 cm of stock at the corners of the future portal. Drive the saw smoothly and stop 2-3cm before the perpendicular line.
 - Repeat the procedure for the side panels if you decide to make grates in them too.
- Repeat the procedure for the side panels if you decide to make grates in them too.
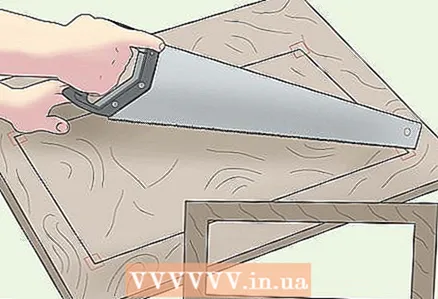 7 Finish cutting the corners with your handsaw. Use your handsaw to cut the corners neatly. Delete the cut out center piece.
  8 Measure the resulting portal and cut the platbands to the required length. Cut the trims under 45 so they form a rectangular frame that surrounds the portal on the center panel.
Part 3 of 3: Assembling the Battery Screen
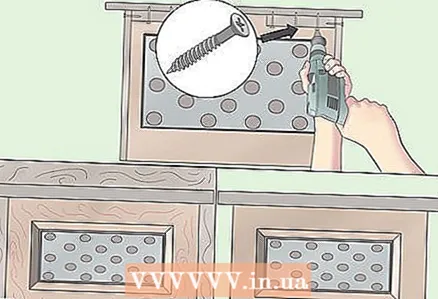
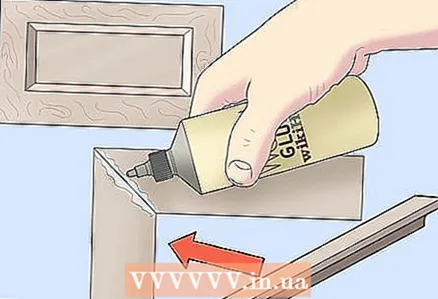 1 Glue the trims to the front piece with yellow wood glue. Fix the platbands with small nails.
  2 Mark, cut and screw the grate. The metal grill should be located on the back of the front panel. Cut out the grate to the desired size using a level and square, leaving a 5cm overlap on each side. When you place the grille evenly on the inside of the front panel, secure it with the brackets.
  3 Attach the front panel to the side panels using wood glue and small nails. Then, cover the holes and fasten the parts with self-tapping screws. For MDF, only self-tapping screws with rare threads are suitable.
  4 Complete the assembly by attaching the top piece. Use nails or screws to secure the last piece to help complete the job and make your battery shield durable.
 - To more reliably connect the top and side parts, use small blocks and self-tapping screws.
- To more reliably connect the top and side parts, use small blocks and self-tapping screws.
 5 Work on the aesthetics. One of the easiest ways to blend your screen into an interior is to cover the screen details with wood stain or paint. When choosing a color, you can focus on the color of the walls, in this case the battery screen will dissolve in the interior, or you can choose a color that will overlap with something - this will emphasize the screen as a decorative element.
 - To make the screen stand out more, you can decorate it by drawing geometric shapes or patterns on it that will overlap with curtains, pillows, or other objects in the room.
- To make the screen stand out more, you can decorate it by drawing geometric shapes or patterns on it that will overlap with curtains, pillows, or other objects in the room.
 6 Cover the screen with protective varnish. Once the paint or stain is dry, apply a coat of varnish on top of it. Let the varnish dry before placing the tap on the battery. A protective varnish will help protect your screen from scratches and other damage, and prevent paint fading.
Tips
- If you intend to leave the screens on batteries during the heating season, cut out a large portal on the front panel with a plunge saw and tighten it with fine wire mesh. Cover the inside of the screen with foil to protect the wooden cabinet from overheating.
- To make the battery screen a practical part of the interior, make the edges of the top part protrude above the battery case.This will create the effect of an impromptu table or shelf. Jagged edges can be hidden with decorative plywood strips and then painted over.
What do you need
- Roulette
- Plywood or MDF
- Plunge saw
- Hand saw
- Hammer and finishing nails
- Paint or stain
- Brushes
- Sealant and varnish.


