Author:
Florence Bailey
Date Of Creation:
23 March 2021
Update Date:
1 July 2024
Content
A cement foundation can be built from building blocks, rods and cement, without the use of lime mortar. The advantage of dry masonry is its simplicity and breadth of possibilities. The block essentially forms the basis for the wall, and the voids will then be filled with mortar - in such small quantities that it can be mixed by hand.This way the foundation can be completely "modeled" and when everything is in place it can be anchored in place with cement. This is a very simple and reliable way to build a T-shaped foundation.
Steps
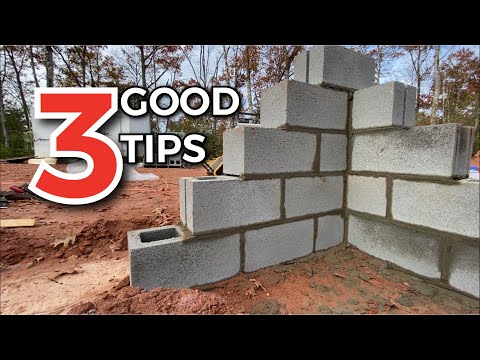
 1 Get involved with the construction site. Place the rags in the corners and make rock support between them along the perimeter of the proposed foundation. Racks are two racks with a beam between them. Any wood waste can be used. Attach the string to the beam, and when you reach where you want it, hammer in a nail and wrap the string around it, holding it in place. These are pointers that will show if you put the block in the wrong place. Connect the string with a square and measure the diagonals (they should be equal) and / or use 3, 4, 5 triangles to make sure each corner is 90 degrees.
 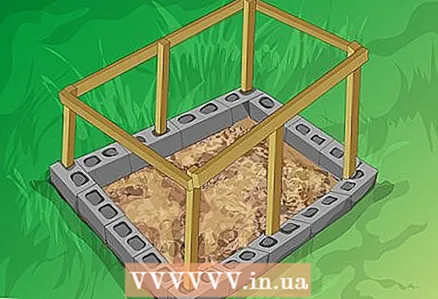 2 Lay down the bottom row of blocks. Start making the foundation from the lowest point and level the surface until you are sure it meets the requirements. If the base consists of a mixture of stones and gravel, make sure it is well tamped down before placing blocks on it - to make it easier, you can wet it. Use a rubber mallet to set each block in its place - relative to the level and plumb line, as well as your string.
 - The bottom row is the most difficult to lay because it is time consuming work. But with each subsequent row it will be easier - you will simply install the blocks using a bonded brickwork. It will be better if your foundation is at least two blocks high so that the blocks can be held together.

- The bottom row is the most difficult to lay because it is time consuming work. But with each subsequent row it will be easier - you will simply install the blocks using a bonded brickwork. It will be better if your foundation is at least two blocks high so that the blocks can be held together.
 3 Cover the bottom row with gravel on the inside and outside of the wall. This will help to keep the wall firmly in place, keep it dry and prevent plants and roots from growing through it. br>
  4 Cut the rods for your wall. The rods can be up to 6 meters long and you can purchase them together with cement and building blocks in one place, or order them all at once. Choose 9.53mm rods and you can cut them by hand with a bolt cutter. Depending on the type of steel, you can even cut a 9.53mm rod like a branch. Some are tougher and you need to put in some effort - you can put the rod on the ground along with the bolt cutter and push it down with all your weight. Cut the rods 20 cm longer than the wall so that you can fold the edge into the foundation. Measure and cut rods for each void in the blocks. This will give a lot of stability to the wall.
  5 Mix the solution. If you are starting from scratch - with sand, crushed stone and cement, find out what proportions you need (usually you need to take 1 part of cement to 2.5 parts of sand and 3.5 parts of crushed stone) and mix everything well in a wheelbarrow. Try to measure the proportions with buckets: take 10 kg of cement, 25 kg of sand and a sufficient amount of crushed stone - 30-35 kg. Mix sand, gravel and cement together with some water. Pour in one or two liters of water at a time and stir until the solution reaches the desired consistency. Stir everything with a chopper - a garden tool will do too. This is pretty hard work, so do it in the shade.
 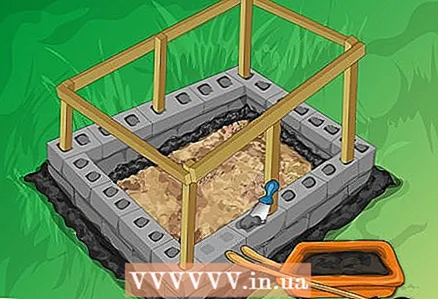 6
6
Pour cement into the voids in the walls. The mortar should be thin enough to fill all the empty spaces between the blocks, but not too watery. If some of it gets on the dry side, scrape off the rest with your spatula. When the voids are completely filled, smooth the top with a trowel. 7 Insert the hook bolts. Use the longest bolts you can find and make sure they protrude at least 6, if not 8, centimeters above the foundation to leave room for the threshold and anything else you build higher. If you do the math, you probably think that five centimeters is enough for you, but if you set the threshold there, you will regret not taking more.Make sure you tamp the mortar around the bolt after installing it and smooth it out with a trowel. If some mortar gets on the bolt, it can be removed with a wire brush.
  8
8
Hose the foundation at least once a daywhen the weather is hot and dry. This will allow the mortar to harden better. The longer it takes, the stronger it will be. You can also cover the fresh mortar with wide sheets of plastic or cardboard to retain moisture.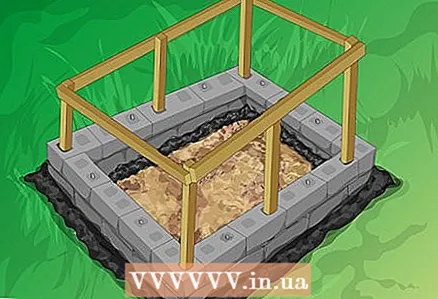 9 Continue to work around the perimeter of the foundationuntil you get to the end. It is better to move in two directions from one point and meet at the opposite corner, rather than start and end at one point. This way you will not be able to overestimate or underestimate the height of the wall.
Tips
- To make the foundation stronger, stronger and much more attractive, cover it with a layer of plaster. This will provide shear strength like the plastic layer with or without sheathing. There is even a material called "structural plaster", which contains fiberglass and this material is considered seven times stronger than simple lime mortar.
- Building blocks, so that they are of the appropriate size, can be cut with a circular saw or a reinforced blade (500 UAH). If necessary, water the area where you will be cutting blocks - this will reduce the amount of dust.
What do you need
- Wheelbarrow
- Manual rammer
- Hammer (sledgehammer)
- Hoe
- 10 kg bucket
- Shovel
- Master OK
- Levels - 120 cm and 180 cm.
- Twine
- Bolt cutter
- Work gloves
- Slab level
- Rubber hammer


