Author:
Sara Rhodes
Date Of Creation:
12 February 2021
Update Date:
2 July 2024

Content
- Method 2 of 3: Create a Snowflake Lantern
- Method 3 of 3: Making a paper lantern with tissue paper
- Tips
- Warnings
- What do you need
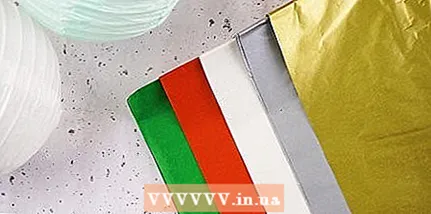
- You can use plain paper or decorative sheet to give the lantern a more festive look.
 2 Cut the paper. Cut along the folded edge, but not completely. The types of cuts applied will depend only on your desire. The longer they are, the more light the lantern will show through, and the more flexible it will be in the end.
 - You can also change the width of the resulting stripes. This will completely change the appearance of the lantern. Most often, the width of the stripes is about 2.5 cm.
3 Roll up the tube. Take the ends of the paper and join them together to form a tube. Use a piece of tape or glue to hold the ends together. Make sure to do this along the entire length of the lantern! Glue from the inside so that the seam is not visible. - You can also use a stapler to connect the two edges of the lantern.
4 Make a handle. Cut another strip of paper to make a pen. If you are using printer paper, your pen should be about 15 cm long and 2.5 cm wide. It is not necessary to make a handle if you are going to hang it, but you can just thread the tape or braid. - When hanging the lantern, the handle is not required - you can hang it by the top, on a ribbon or braid.
5 Attach the handle. Using glue or tape, attach the handle to the inside of the top of the lantern. - Flatten the lantern a little if it has too straight edges. Gradually, you will give it the desired shape. The thicker the paper, the more effort it will take to create the shape.
6 Enjoy the finished product. You can install the candle inside, hang it from the ceiling, or use it as a centerpiece. - Since the lantern is made of paper, place only a pill candle inside or a candle in a glass. Place the candle in a glass and place it inside the lantern. It is best to take a deep glass so that the flame does not touch the lantern and a fire does not start.
- Only place the candle inward if you are placing the lantern on a flat surface and not hanging it up.
Method 2 of 3: Create a Snowflake Lantern
- 1 Cut two circles out of paper. Use any round object by tracing it around on two sheets of paper and cutting it out with scissors. The circles should be approximately the same size.
- Any size circle can be used. Remember that the larger the circle, the larger the lantern will end up. You can use a plate, ice cream can lid, bucket bottom, or any other round object.
- You can also use any paper here: plain printer paper, colored cardboard, decorative paper, etc.
- 2 Fold the first circle. Take a circle and fold it in half. Then do the same twice more. You end up with a piece that looks like a slice of pizza (a long triangle with a rounded top).
- 3 Draw lines on paper. Following the curve at the top of the piece (the edge of the pizza), draw dashed lines on the piece of paper that cross the entire length of the piece, but do not go to the opposite side. Start at the left edge and draw a curved line that breaks shortly before (approximately 1.5-2.5 cm) of the right edge. Now, under the line you just drew, start drawing another one that starts from the right side and breaks off before reaching the left.
- Continue alternating the lines until you reach the bottom of the paper (the starting point of the triangle).
- 4 Make a hole. Cut a piece of paper at the bottom of the triangle and make a hole in the center of the paper.
- 5 Make cuts along the lines. Use scissors to cut the paper along the lines you draw. Try to stay as close to the line as possible, but don't try to do it perfectly. Just make sure not to cross one line while cutting another.
- 6 Uncover the paper. Be careful not to tear the thin strips; just cut along the lines and then unfold the paper until you have fully expanded the original circle.
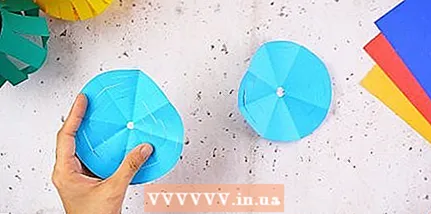 7 Finish the second round. Repeat steps 2-6 with the second circle, and you should end up with two equally cut circles.
 - 8 Glue the circles together. Using glue, connect the two circles only at the edges. Don't glue the inner parts of the circles together. The glue should dry.
- 9 Pull the pieces of the lantern in opposite directions. Gently pull each side of the flashlight until the halves open to reveal the beautiful pattern you made with the scissors.
- Tie a ribbon at the top (through the hole and outer ring), then hang the lantern and enjoy the view.
Method 3 of 3: Making a paper lantern with tissue paper
 1 Choose a color. For this idea, you need very little paper in silence. The thin paper will cover the entire ball of the paper lantern in the end. To do this, you need paper that is fairly thin.
 - You can use plain paper or make your lantern a multi-colored one. Choose any color combination you want or a suitable color for the occasion for which you are preparing the lantern.
- 2 Cut the circles out of tissue paper with tissue paper. Use any round object (lid, small salad bowl, etc.) as a template to trace the circles on the paper in tissue paper. Depending on the size of the circles, you will need about 100 tissue paper circles. Transfer your template to paper, placing the circles as close together as possible so you don't waste extra paper.
- Don't cut too large or too small circles. If they turn out to be too large, then the lantern will not be mobile enough, and if they are too small, then you will add yourself extra work. Take something like a coffee can lid as a reference.
- 3 Cut the circles out of the paper. Do this with scissors. Handle the tissue paper very carefully because it is very thin and tears easily.
- 4 Start gluing the bottom of your round lantern. Take one of your tissue paper mugs and glue it to the bottom of your paper lantern. Make sure you glue it directly to the center on the bottom to preserve the pattern as you work your way up to the top of the ball.
- 5 Make the bottom row of paper circles. Starting at the bottom of the lantern, make a circle of the rings in silence, gluing only the top edge of each circle in silence to the ball.
- Make sure the bottom row of tissue paper is affixed lower than the base of the paper lantern to give it a whimsical look.
- 6 Fill the entire paper lantern with rows of circles with tissue. Repeat step 5 for the entire ball until the lantern is completely covered with tissue paper circles. When gluing the rows of paper, make sure that at least 2.5 cm of each previous one is visible. This will give the lantern a layered, patterned look.
Tips
- Do not use a candle (if not in a glass) or any other flammable object to avoid fire.
- Use multi-colored cardboard or paper. The patterns will hide any asymmetrical lines.
- Make lanterns out of white paper adding a few different colors for rich contrast, but if you're making them for decoration, add as many colors or patterns as you like.
Warnings
- Never leave candles unattended!
What do you need
- Paper or cardboard
- Scissors
- Glue, tape, stapler
- Tissue paper
- Paper ball
- Ribbon (optional)


