Author:
Florence Bailey
Date Of Creation:
27 March 2021
Update Date:
1 July 2024

Content
- Steps
- Method 1 of 3: Making beads from patterned paper
- Method 2 of 3: Making Your Own Beads
- Method 3 of 3: Decorating Beads
- Tips
- Warnings
- What do you need
Paper beads are a great way to recycle unwanted advertisements, newspapers and magazines. These beads are inexpensive, attractive, and can be used for a wide variety of purposes. By following these instructions, you can make beads from finished paper or create your own designs using felt-tip pens.
Steps
Method 1 of 3: Making beads from patterned paper
 1 Cut the paper. Cut long triangles from magazines, colored paper, wallpaper, etc. The base of the bead will be the width of the triangle, and the longer the triangle, the thicker the bead will be. The thin, long beads (2.5 cm) in this example are made from 2.5 cm by 10 cm triangles, and 1.27 cm by 20 cm triangles will be thick and short. Cut the triangles accordingly ..
  2 Add glue. Lay the triangle with the pattern down and apply some glue to the pointed end. Paper glue or just a little liquid glue works great.
  3 Roll up the bead. Starting at the wide end, roll the triangle around you using a toothpick or bamboo skewer as a base. To make the bead symmetrical, focus on the tip of the triangle as the center; if you want to make the bead looser, move the center slightly.
 - Roll tightly, especially if you want the beads to last a long time. Try not to leave space between layers.
 4 Finish folding. Glue the tip of the triangle to the folded paper. If the bead is not firm enough, add a little glue and press down to harden the glue.
  5 Apply varnish. Use a clear nail polish or one part clear glue solution with two parts water. Let the bead dry completely so it doesn't stick to anything. You can stick a toothpick into the pincushion or a piece of styrofoam while the bead dries. Add a few more layers to make the finish glossier and more durable.
  6 Remove the bead. Wait a few hours for the clear coat to harden. Remove the bead from the base. If it is well folded and glued, then it will remain intact. If it unfolds, place it back on the base and add more glue and coatings where needed.
  7 Make more beads. Use the instructions above and make as many beads as you need. You can make a decoration or decoration for your home out of them.
Method 2 of 3: Making Your Own Beads
 1 Cut the paper. Cut long triangles from magazines, colored paper, wallpaper, etc. The base of the bead will be the width of the triangle, and the longer the triangle, the thicker the bead will be. The thin, long beads (2.5 cm) in this example are made from 2.5 cm by 10 cm triangles, and 1.27 cm by 20 cm triangles will be thick and short. Cut out the triangles accordingly.
  2 Create your design. Draw out each triangle with felt-tip pens, pencils, or pens. Since you will be folding the triangle, only the outer edges and the last couple of centimeters of the tip of the triangle will be visible. This is where you focus your drawing. Try different colors and patterns and find what you like best.
 - Color the tip of the triangle with red and the edges with orange and red stripes. You will have an orange-red stripe bead with a red center.
- Paint the tip of the triangle black, and paint the edges with a black stripe. You will end up with a zebra-colored bead with a black center.
- Do not use washable markers, especially if you are going to cover the beads; as the drawing will spread.
 3 Add glue. Lay the triangle with the pattern down and apply some glue to the pointed end. Paper glue or just a little liquid glue works great.
  4 Roll up the bead. Starting at the wide end, fold the triangle around you using the base. A toothpick or bamboo skewer is perfect for this. Focus on the center, otherwise your design will not be very accurate.Roll tightly, especially if you want the beads to last a long time. Try not to leave space between layers.
  5 Finish the bead. Glue the tip of the triangle to the folded paper. If the bead is not firmly attached, add some glue.
  6 Apply varnish. Use clear nail polish. Let the bead dry completely so it doesn't stick to anything. You can stick a toothpick into a pincushion or a piece of styrofoam to keep the bead from touching anything.
  7 Remove the bead. Wait a few hours for the clear coat to harden. Remove the bead from the base. If it is well folded and glued, then it will remain intact.
 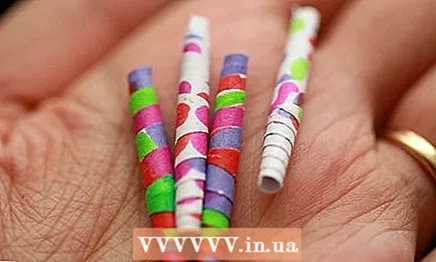 8 Make more beads. Roll a few more beads for earrings or bracelets. For a necklace or other purpose, you may need a much larger amount.
Method 3 of 3: Decorating Beads
 1 Add colors. Color the outside of the bead before applying the varnish. Use voluminous paints to create additional texture.
  2 Add some sparkles. You can use glitter glue or simply sprinkle glitter on the beads. To prevent the glitter from falling off, add it before applying a coat of varnish. Try using multicolored sparkles for a rainbow effect.
  3 Wrap the string around the beads. Do not string them on a thread, but use the thread to create a decorative pattern. Cut the colored threads into small pieces and use glue to secure the beads on the outside. Use a few pieces of thread to add color and texture.
  4 Use wire. Using the colored wire that florists use, create a spiral or geometric patterns on the outside of the bead. Thread the wire through the bead and bend to secure.
  5 Add frosting. Use translucent nail polish or thinned paint for extra color. This will create a light, colored cast. You can use watercolors for this.
  6finished>
Tips
- Don't forget about gift wrappers and colorful paper.
- If you have an old calendar, you can cut out photos and roll them into beads. You will have colorful, glossy beads.
- After they are dry, you can trim them to a more suitable size. You need to wait until the beads are completely dry, otherwise they will unfold into strips of paper.
- Do not use thick paper, thinner paper is easier to roll.
- Lay down paper to avoid staining anything. Use a board or piece of cardboard if you are cutting the triangles with a paper knife.
Warnings
- Even if they are covered with a lot of glue or paint, they are still made of paper, so don't let them get wet.
- Take precautions when working with scissors, glue and a knife.
What do you need
- Colored paper or plain, white paper and permanent markers
- Scissors or paper knife
- Glue or glue stick
- Thin base about 3 mm in diameter


