Author:
Marcus Baldwin
Date Of Creation:
14 June 2021
Update Date:
1 July 2024

Content
- Steps
- Method 1 of 4: Constructing the base
- Method 2 of 4: Assembling the walls
- Method 3 of 4: Attaching the Roof
- Method 4 of 4: Completing the Dog House
- Tips
- What do you need
- Sources
Do you love your puppy but don’t like that overnight he covers your bed with a layer of fur? Build your dog an outdoor kennel where he can live clean and warm at night and your bed is protected from his fur. Follow the steps below to make your own dog kennel that suits his personality.
Steps
Method 1 of 4: Constructing the base
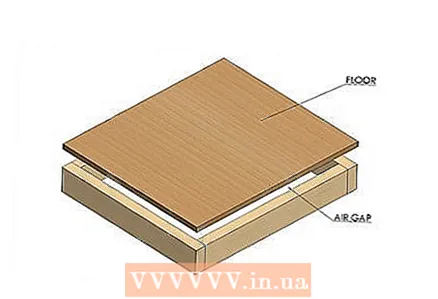 1 Think about what the base of the kennel will be used for. Different dogs have different needs, but almost every dog needs the following: a secluded, clean space that he can call home, regardless of whether it is hot or warm outside. Consider the following factors when building a kennel:
 - Think about isolation. Remember that the base forms the foundation of the building and creates a layer of air between the ground and the floor, which serves as thermal insulation for the kennel. A booth without a base is colder in colder months and warmer in hot months.
- Consider the specifics that may affect the base of the booth. If it rains frequently, use a non-toxic, waterproof material and make the base high enough to keep the kennel from flooding.
 2 Use a corner and pencil to transfer your idea to the tree. Cut four pieces from a 5x10 cm bar: two 57 cm long and two 58 cm long (for a medium-sized dog).
 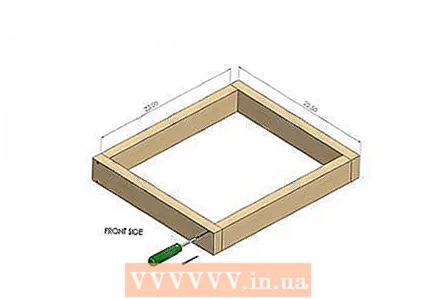 3 Place 58 cm lines between 57 cm lines to create a rectangle of bars resting on the ground with a 5 cm wide side. Pre-drill holes for self-tapping screws in the wood. Then secure the base with 7.5cm galvanized wood screws at each corner.
  4 With a pencil and a corner, transfer the outlines of the base to a sheet of thick plywood. For the aforementioned base sizes, a 66 x 57 cm rectangle is suitable.
  5 Using 3 cm galvanized self-tapping screws, attach the floor to the base by screwing a self-tapping screw into each corner.
Method 2 of 4: Assembling the walls
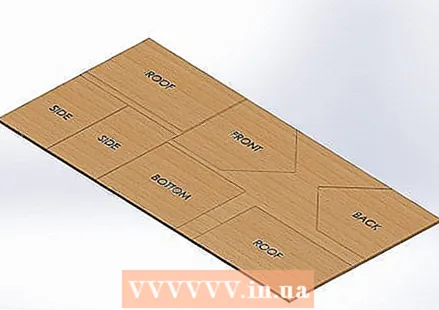 1 Again, use wood for better insulation and stability. Using wood for the booth will make it thermally insulated, even if the wood is relatively thin. In the front of the booth, make the opening for the dog as small as possible (but still of a comfortable size) to keep the house warm.
 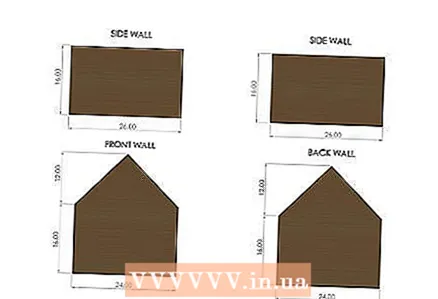 2 Transfer the outlines of the walls to the same plywood sheet from which the floor was cut. Each side should be 66 x 40 cm, while the front and back should be 60 x 40 cm at the bottom, and have a triangle at the top with a base of 60 cm. Cut this shape in one piece for the front and rear of the booth.
  3 Leave a hole in the front of the booth 25 cm wide and 33 cm high. Leave the bottom under the hole 8 cm to cover the base of the booth. To cut an arch at the top of the hole, use any round object at hand to shape the outline of the arch.
  4 Cut 8 pieces of the frame. Use a 5 x 5 cm spruce or pine log and cut 8 frame pieces to support the walls and roof.You will need 4 corner pieces 38 cm long and 4 roof frame pieces 33 cm long.
 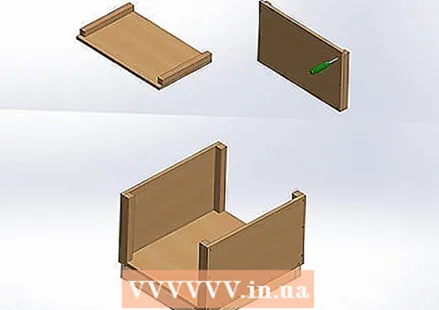 5 Attach 38 cm pieces of timber to the corners of the booth using 3 cm galvanized self-tapping screws. Then place the sides on the base and screw with galvanized self-tapping screws every 10-13 cm around the perimeter.
  6 Attach the front and back panels. Place the front and back panels on the base and fasten with galvanized self-tapping screws around the perimeter every 10-13 cm.
Method 3 of 4: Attaching the Roof
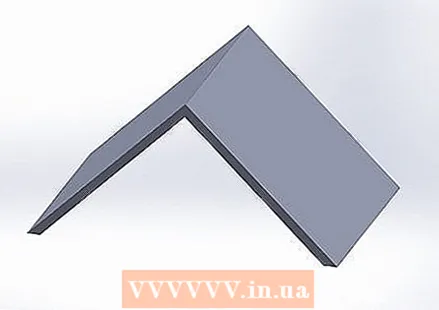 1 Try to make a triangular pitched roof. This not only allows water to drain off the roof and snow to slide, but it also gives the dog more room to stretch inside his humble house.
  2 Draw the outlines of the roof panels 80 cm long and 50 cm wide. These panels will be located on top, forming a triangular pitched roof.
  3 Attach a 33 cm piece of 5 x 5 cm timber roof frame to the inner sides of the front and rear panels midway between the top and bottom of the sloped sides of the triangles. Secure each piece with three 3 cm galvanized wood screws.
  4 Place the roof panels on top, making sure the top is pressed firmly and the edges hang over the sides of the booth. Fasten the roof panels with 3 cm self-tapping screws to the beams every 10 cm.
Method 4 of 4: Completing the Dog House
 1 Personalize your dog's kennel by painting it with paint. Use only non-toxic paint that will not harm the animal. You can paint the outer walls of the booth as you like, for example, depicting underwater scenes. If you have children, you can let them decorate the kennel as a creative activity.
  2 Make the roof more durable. To keep the kennel extremely dry, you can cover it with bitumen or tar paper. Once you've covered the roof, you can lay it out with pebbles for a more sophisticated look.
  3 Arrange the interior space. For your dog's comfort, add a blanket, dog bedding, or a piece of carpet inside. To place the carpet inside, simply cut a piece a couple of cm less than the inside dimensions of the floor and attach it to the floor inside. Use wood glue if you want to permanently fix the rug, or double-sided tape so you can replace the rug later.
  4 Add entertainment accessories to make the dog kennel his home.
- Hang a sign of any weather-resistant material with the name of the pet above the entrance to the kennel, attaching it to a nail. Such plates can be made of metal, wood, written on them with paint, or you can attach a spare token with the dog's data. Make sure that the nail of the sign does not go all the way into the booth.
- Attach small hooks to the outside of the booth to store your leash and toys.
Tips
- Use untreated wood and non-toxic paints.
- If you want to decorate the booth inside, do it before fixing the roof.
- Make a pitched roof so that snow and rain do not linger on it.
- Make sure the wood you are using is properly treated for your weather conditions with non-toxic sealants.
- You can make a lit kennel for your dog by attaching a plexiglass roof to it. And on top of it, fix the usual roof on the hinges. To be able to open the roof on warm sunny days and close it at night or in the heat.
- Use a sheet of plywood on all sides of the booth except for the base.
What do you need
- 4 pieces of bursa, section 5 x 10 cm, cut into 57 (2 pcs.) And 58 cm (2 pcs.)
- 1 large sheet of thick plywood
- 4 pieces of timber with a section of 5 x 5 cm made of spruce or pine: 4 x 38 cm and 4 x 33 cm.
- Drill or screwdriver
- 3 cm galvanized wood screws
- 8 7.5 cm galvanized wood screws
- Hooks for leashes, etc. (not necessary)
- Paint (optional)
- Plaque with the dog's name and a small carnation (optional)
- Dog litter (optional)
- Bowls for water and food (optional)
- Toys (optional)
Sources
- http://www.diynetwork.com/how-to/how-to-build-a-doghouse/index.html
- http://img.diynetwork.com/DIY/2010/05/28/10MAG12_doghouse_draft_3.pdf


