Author:
Florence Bailey
Date Of Creation:
24 March 2021
Update Date:
1 July 2024

Content
1 Cut out a rectangle of colored paper. For best results, postcard paper should be twice the height of the envelope you are using. And the detail that creates the 3D effect should be half the size. Too large 3D parts are cumbersome and difficult to handle.- Folder cardboard is great for creating postcards. Plain cardstock is also good for this, just try to keep the folds straight and strong.
 2 Fold the sheet in half. Make the fold even (for this, you can first draw a depressed line along the fold line with your fingernail or the corner of the ruler). 3 Make two slits close to each other. The incisions must be made on the side of the card fold, perpendicular to it. The depth of the slots should be about 2.5 cm. If necessary, you can make the slots deeper or further apart. When making cuts, take into account the size of your postcard volumetric element: if it is larger, then the "loop" created from the cuts should also be larger.
 - If you are worried about a visible hole in a postcard, close it up! Take another sheet of the same paper, fold it in half, put it on top and you're done! Now that you have the one-piece top of the card, the problem is solved.
4 Straighten the loop inward. Fold the section of paper between the slots first forward and then backward. Open the postcard and push it in, wash the folds. 5 Decide what you want to see on the part that pops up when you open the card. It can be a picture of a gift, a name, a heart, a cut-out photo, or something else that your imagination tells you. Cut out this element and glue it on the part of the “loop” that will be vertical to the bottom of the card when you open it. Let the glue dry completely. - It is best to use a glue stick for this part. Do not soak the elements of the card with liquid glue.
 6 Finish the postcard. Write your message and place the postcard in an envelope to convey to the addressee. She will definitely like it!
 - If you have ribbon, glitter, stickers, stamps, or other materials, use them to decorate your postcard!
Method 2 of 2: 3D postcard without loop
- 1 Take a piece of decorative paper and fold it in half (short sides together). For the base of the postcard, you can use whatever you want: cardboard, paper for printers, etc. Just make sure it can hold your postcard up!
- 2 Pick up the paper for the riser and fold it in half. You can pick up something from old books or magazines for this. The rising part should be half the size of the card itself. If the picked paper is too large, cut it to the correct size. When you find one that works for you, fold the sheet in half, joining the short sides (just like in the main body of the card).
- 3 Draw half of your image with a symmetry line along the fold. For example, half a heart. Cut along the line, open the heart and flip it over to the other side. The heart must be flexible, as it will be the expandable 3D element!
- 4 Form a V-shaped fold at the bottom of the heart. From the bottom point of the middle line, step up 6 mm and draw two lines from one point at an angle of 45 degrees to both sides up. If you have a paper folding tool or knitting needle, bend the paper along the lines with them (after drawing them along the fold line). If you don't have any knitting needles or sticks, just rinse the folds along the lines.
- Fold the heart in a V-shaped fold, the bottom edges of the heart will be tucked in your direction, and behind them the heart will be glued to the main body of the card.
- 5 Unfold the heart completely and use double-sided tape to attach the folded bottom edges to the main body of the card, aligning the midlines. The bottom edges should be visible and facing forward, they are part of the heart.
- After attaching the heart, help it fold forward when closing the card. This will hide it inside the postcard.
- It is possible to attach the heart with glue, but this does not give such a clean and reliable result.
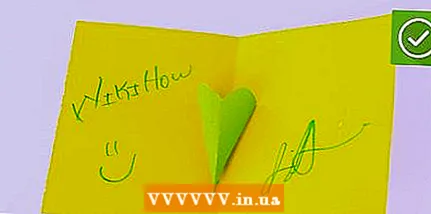 6 Decorate the postcard. The volumetric part of the postcard is ready and you can write your message and complete the postcard to the end. You can write something on the heart itself or next to it. Apply some glitter, add ribbon to the card, or whatever you can find for the occasion. Ready!
Tips
- Decorate your card with glitter, stamps, stickers, beads, and more.
- Use curly scissors to create interesting borders for the card and the design itself within the card.
- If you do not want the recipient of the card to see the cut-out part, cover it with a second whole layer, gluing it on top, or threading and tying the ribbon along the fold line of the card.
- Make sure you cut from the correct side. If your cuts are on the side, you are wrong!
Warnings
- Be careful, you can cut yourself on the paper.
- If a child makes a card, supervise him as he works with the scissors.
What do you need
For both options
- Paper (copying, drawing, cardboard)
- Scissors
- Glue / double-sided tape
- Markers, colored pencils, colored pens, writing materials
- The envelope
- Decorations (optional)
- Ruler (optional)
- Paper folding tool / knitting needle (optional)


