Content
- Steps
- Method 1 of 3: Check if the capacitor is charged
- Method 2 of 3: Discharge the capacitor with a screwdriver
- Method 3 of 3: Make and Use a Discharge Device
- Tips
- Warnings
- What do you need
Capacitors are widely used in household electrical appliances and electronic equipment. When connected to an energy source, they store an electrical charge, after which they can be used to power various devices and devices, or simply as a charge source. Before disassembling or repairing a household appliance or electronic device, it is necessary to discharge its capacitor. This can often be done safely with a conventional insulating screwdriver. However, in the case of larger capacitors, which are usually used not in electronic devices, but in household appliances, it is better to assemble a special discharge device and use it. First check if the capacitor is charged and choose an appropriate way to discharge it if necessary.
Attention:the information in this article is for informational purposes only.
Steps
Method 1 of 3: Check if the capacitor is charged
 1 Disconnect the capacitor from the power source. If the capacitor is still connected to the circuit, disconnect it from all power supplies. Usually, it is enough to unplug the household appliance or disconnect the battery contacts in the car.
 - If you are in a car, locate the battery in the hood and use a wrench or socket wrench to loosen the nut that holds the cable to the negative (-) terminal. Then remove the cable from the terminal to disconnect the battery.
- At home, it is usually enough to unplug the appliance from the outlet, but if you cannot do this, find a distribution board and turn off those fuses or circuit breakers that control the supply of electricity to the room you want.
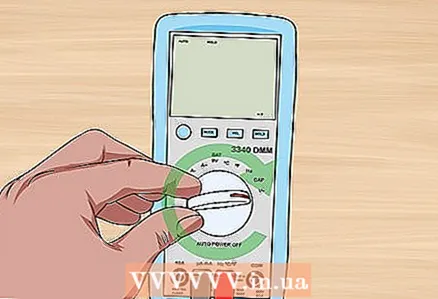 2 Select the maximum DC voltage range on the multimeter. The maximum voltage depends on the brand of the multimeter. Turn the knob in the center of the multimeter so that it points to the maximum voltage possible.
 - The maximum voltage value should be selected in order to obtain correct readings regardless of the amount of charge on the capacitor.
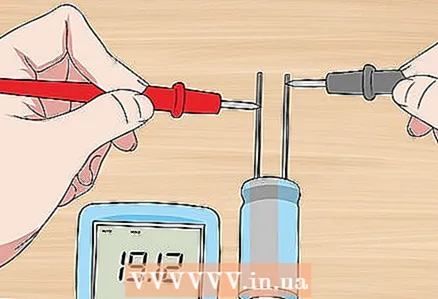
 3 Connect the test leads of the multimeter to the terminals of the capacitor. Two rods should protrude from the condenser cover. Just touch the red probe of the multimeter to one, and black to the second terminal of the capacitor. Press the test leads against the terminals until a reading appears on the multimeter display.
 - You may need to open the device or remove some parts from it to get to the condenser. If you cannot find or access the capacitor, check the instruction manual.
- Do not touch both test leads of the multimeter to the same terminal, as this will give you an incorrect reading.
- It does not matter which probe is pressed to which terminal, since in any case the current value will be the same.
 4 Pay attention to readings that exceed 10 volts. Depending on what you are dealing with, a multimeter can show voltages ranging from a few to hundreds of volts. Generally speaking, voltages above 10 volts are considered dangerous enough as they can cause electric shock.
 - If the meter reads less than 10 volts, there is no need to discharge the capacitor.
- If the multimeter reads between 10 and 99 volts, discharge the capacitor with a screwdriver.
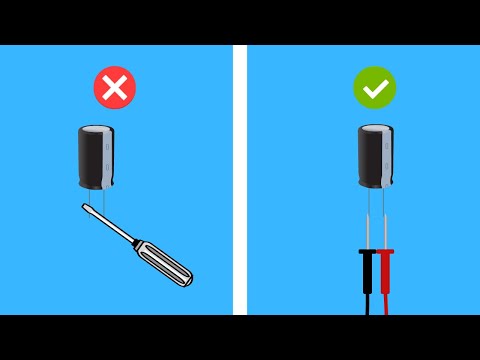
- If the voltage on the capacitor is higher than 100 volts, it is safer to use a discharge device rather than a screwdriver.
Method 2 of 3: Discharge the capacitor with a screwdriver
 1 Keep your hands away from the terminals. A charged capacitor is very dangerous and its terminals should never be touched. Only take the condenser by the sides.
 - If you touch the two terminals or accidentally short-circuit them with a tool, you may get a painful electric shock or burn.
 2 Select an insulating screwdriver. Typically, these screwdrivers have a rubber or plastic handle that creates an insulating barrier between your hands and the metal part of the screwdriver. If you do not have an insulating screwdriver, purchase a screwdriver that clearly states on the packaging that it is non-conductive. Many screwdrivers even indicate what voltages they are rated for.
 - If you are not sure if you have an insulating screwdriver, it is best to get a new screwdriver.
- An insulating screwdriver can be purchased at a hardware store or auto supply store.
- You can use either a flat head or a Phillips screwdriver.
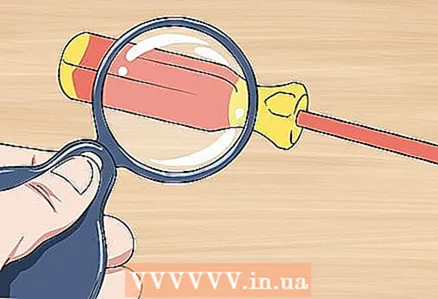 3 Check for any signs of damage on the screwdriver handle. Do not use a screwdriver with a rubber or plastic handle if it is broken, chipped, or cracked. Through such damage, current can reach your hands when you discharge the capacitor.
 - If your screwdriver handle is damaged, get a new insulating screwdriver.
- It is not necessary to throw away a screwdriver with a damaged handle, just do not use it to discharge a capacitor or other work on electrical parts and devices.
 4 Take the condenser with one hand at the base. Hold the capacitor firmly when discharging, so grasp the cylindrical sides near the base with your non-primary hand. Bend your fingers with the letter “C” and wrap them around the capacitor. Keep your fingers away from the top of the capacitor where the terminals are located.
 - Hold the capacitor the way you like it. There is no need to squeeze it too hard.
- Hold the capacitor close to the base to prevent sparks from getting on your fingers, which could be generated when it is discharged.
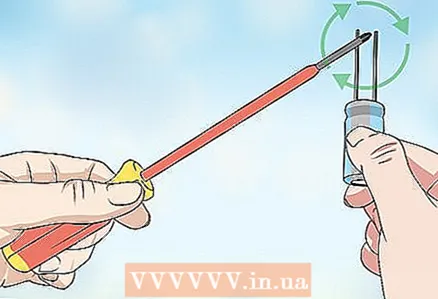
 5 Place a screwdriver on both terminals. Take the capacitor vertically so that the terminals point towards the ceiling, and with your other hand, bring a screwdriver and press it simultaneously against both terminals.
 - In this case, you will hear the sound of an electric discharge and see a spark.
- Make sure that the screwdriver touches both terminals, otherwise the capacitor will not discharge.
 6 Touch the capacitor again to check that it is discharged. Before handling the capacitor freely, remove the screwdriver and then touch both terminals with it again and check for a spark. In this case, no discharge will occur if you have completely discharged the capacitor.
 - This step is a precautionary measure.
- Once you are convinced that the capacitor is discharged, you can safely continue working with it.
- If desired, you can also check if the capacitor is discharged using a multimeter.
Method 3 of 3: Make and Use a Discharge Device
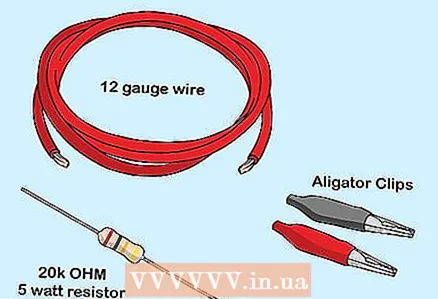 1 Purchase a copper wire with a diameter of 2 millimeters, a resistor with a nominal resistance of 20 kΩ and a dissipation voltage of 5 W and 2 crocodile clips. The discharge device is just a resistor and some wire to connect to the capacitor. All of these can be purchased at a hardware or electrical store.
 - With the clamps, you can easily connect the wire to the capacitor terminals.
- You will also need electrical tape or tape and a soldering iron.
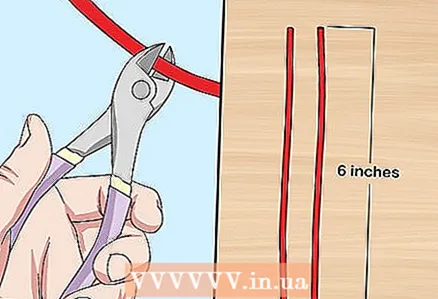 2 Cut two pieces of wire about 15 centimeters long from the wire. The exact length is not important as long as you can connect the resistor to the capacitor. In most cases, 15 centimeters should be sufficient, although sometimes more may be required.
 - The pieces of wire must be long enough to connect the resistor and capacitor terminals.
- Cut off some of the wire to make your job easier.
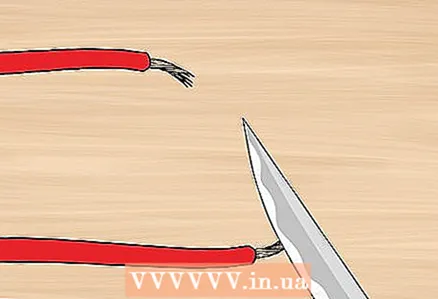 3 Peel off the insulation covering from both ends of each piece of wire about 0.5 centimeters. Take a wire stripper and peel the insulation off the wire so as not to damage the middle of the wire. If you do not have such pliers, cut the cover with a knife or razor, and then pull out the wire with your fingers.
 - Clean metal should remain at both ends of the wire.
- Remove enough insulation covering so that the cleaned ends can be soldered to the terminals and clamps.
 4 Solder one end of each piece of wire to the terminal of the resistor. One wire sticks out of both ends of the resistor. Wrap the end of one piece of wire around the first terminal of the resistor and solder it. Then wrap one end of the second piece of wire around the second terminal of the resistor and also solder.
 - The result is a resistor with long wires at each end.
- Leave the other ends of the wires free for now.
 5 Wrap the soldered joints with insulating tape or shrink wrap. Simply cover the soldered joints with tape. This way you will fix them more tightly and isolate them from external contacts. If you intend to reuse this unit, put a plastic sleeve over the end of the wire and slide it over the soldering area.
 - If you are using shrink wrap, you can hold it over the flame of a lighter or match so that it sticks tightly in place.
- Do not hold insulating tape over the flame.
 6 Solder clamps to the free end of each wire. Take the end of the wire and solder a crocodile clip to it, and then wrap the soldering area with shrink wrap or electrical tape. Do the same with the free end of the second wire.
 - If you are using an electrical conduit, be sure to slide it over the wire before soldering, otherwise you will not be able to slide it over the wide clamp afterwards.
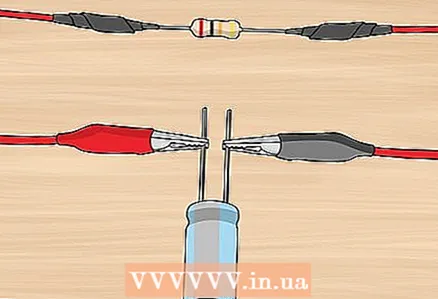 7 Connect one clamp to each terminal of the capacitor to discharge it. Attach the clamps to the different terminals of the capacitor. As a result, the capacitor will quickly discharge, although you will not hear a click or see a spark, as is the case with a screwdriver.
 - Make sure each clamp has good contact with the terminal metal.
- Be careful not to touch the terminals of the capacitor when connecting the terminals to them.
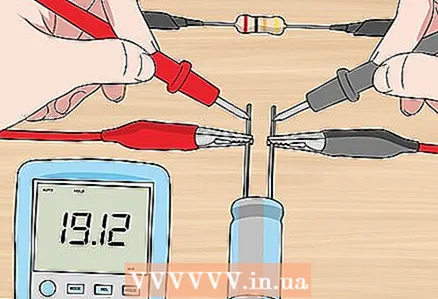 8 Check with a multimeter that the capacitor is discharged. Once again set the maximum voltage on the multimeter and touch the probes to the terminals of the capacitor. If the multimeter shows non-zero voltage, check the contacts on the discharge device and try to discharge the capacitor again. In this case, you do not need to disconnect the multimeter from the capacitor in order to observe the discharge process in real time.
 - If the voltage does not drop, something is wrong with the contacts on the discharge device. Check to see if they are torn at weak points.
- After you make sure that all the contacts are in order, try again to discharge the capacitor - this time it should work.
Tips
- After you discharge the capacitor, do not remove the resistor from it or connect its terminals with foil so that it remains discharged.
- Do not hold the resistor in your hands, use a probe or wire for this.
- Capacitors discharge on their own over time, and the capacitor will most likely discharge in a few days if it is not connected to external power sources or an internal battery - however, it is best to assume that the capacitor is charged until you are convinced otherwise.
Warnings
- Large capacitors are extremely dangerous and there may be others near one capacitor. Working with such capacitors often requires professional skills.
- Always be careful when working with electrical devices.
What do you need
Check if the capacitor is charged
- Multimeter
Discharge the capacitor with a screwdriver
- Insulating screwdriver
Make and use a discharge device
- Wire coil
- 2 crocodile clips
- Soldering iron
- Resistor 20 kOhm 5 W


