Author:
Joan Hall
Date Of Creation:
5 July 2021
Update Date:
1 July 2024

Content
- Method 2 of 4: Part Two: Getting Started with Quilting
- Method 3 of 4: Part Three: Quilting
- Method 4 of 4: Part Four: Build
- Tips
- Warnings
- Roller fabric knives come in a variety of sizes, but it is best to start with a medium sized knife.
- If you decide to use regular scissors, you need to make sure they are sharp enough not to chew on the fabric.
 2 Take out the cutting mat. Cutting fabric on a regular table may seem like the easiest way, but there is a high chance of ruining the furniture and you will not be able to maintain straight lines. Get a self-healing cutting mat to avoid problems. They come with rulers printed on them, making it much easier to get perfectly straight scraps of fabric.
  3 Use a ruler. Not a simple ruler, but a very long and wide one that works best for quilting. Try to find a clear plastic ruler about 10x60 cm. This ruler will allow you to securely press the fabric against the cutting mat and make perfect cuts in the fabric. If you are working on a small project, this line will also work for you.
 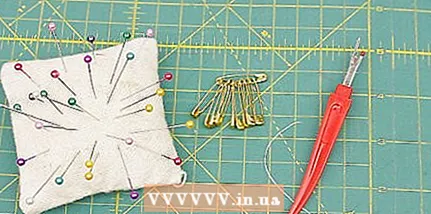 4 Collect the entire assortment of sewing supplies. These are the things that are required for any sewing, including needles, pins, a ripper. If you don't already have them, you can find them at any fabric and craft store. You will need a lot of pins, so stock up on them well.
  5 Pick up the threads. Threads seem like a versatile material, but they come in a variety of compositions and colors. Avoid using cheap threads, as they are more likely to break when sewing and also come loose when washing. High quality cotton thread is best for quilting. If you want to use the same thread for different projects, get a large bobbin in a neutral color (white, beige, or gray).
  6 Choose a fabric. The most important step in preparing for quilting is fabric selection. With thousands of fabrics sold, this can seem like a daunting task.Typical quilting can be done in 100% cotton, but polyester or cotton with added polyester is acceptable. Choose a few different fabrics for the front of the quilting, its borders, and 1-2 main fabrics for the back.
 - Consider colors and their use. How many colors will be used in the project? What will the patterns be? Try to create a good combination of large and small patterns in the same color scheme.
- Get creative with your fabric. Look for old tablecloths or sheets, rather than relying solely on store-bought fabrics.
- There is more fabric for the back of the quilting than for the front and batting for the inner layer, so you need to make sure you have enough.
 7 Take out the batting. Batting, also called filler or padding, is a fluffy material that makes your quilting warm. It is laid between the front and back sides of the quilting. Batting is made from various materials: cotton, polyester, mixed fiber, bamboo, and there is also fusible batting. In addition, it comes in a variety of thicknesses.
 - Polyester batting tends to start creeping through quilting seams over time, and fusible batting has a high chance of wrinkling afterwards. Therefore, for beginners, it is better to start with cotton batting, mixed fiber batting or bamboo batting.
- If you are starting a large quilting project, such as a bedspread, thicker batting is preferable. Small projects don't need a thick layer of batting, unless you want to make a particularly warm blanket.
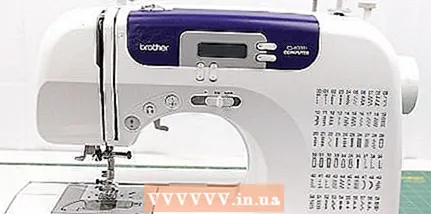 8 Use a sewing machine. Despite the fact that sewing using the quilting technique can also be done by hand, it is much more difficult for beginners and takes more time. To make quilting easier, use a sewing machine, any sewing machine that can sew a straight stitch will do. Make sure you have enough spare needles for the machine to sew the entire project without difficulty.
  9 Get out your iron. At a number of times when making quilting, you will need it (it is preferable that it has a steaming function). You do not need a fancy expensive iron at all, a simple cheap option is quite enough.
  10 Think over the pattern. Although a specific pattern is not required for quilting, sometimes having a simple pattern makes the job easier. You can find free quilting patterns online or purchase a pattern book. If you decide to come up with a pattern yourself, you need graph paper and a pencil.
 - If you have not purchased and prepared a pattern, it is highly recommended that you at least sketch it on paper before starting work.
- The easiest project for beginners is a quilt of even rows of squares. It is easier to use larger squares than a large number of small squares.
Method 2 of 4: Part Two: Getting Started with Quilting
 1 Wash the fabric. While not everyone does this, washing the fabric before using it will plant it and wash away excess paint - something that can ruin your finished project if not taken care of beforehand. Higher quality fabrics do not fade and do not shrink much during washing, however, it is recommended to wash the fabric before use, regardless of its quality. Also, this procedure will remove grime from the fabric.
 - 2 Iron the fabric. Iron the fabric to remove wrinkles and make cutting easier. Use the steaming function if your iron has one. You don't need to iron the batting, only the fabric for the front and back of the project.
- 3 Take measurements. Once you know what your finished project should be like, you need to determine the size of each individual piece of fabric. The most important thing to remember is the seam allowance. You need to allow for a 6mm allowance for each seam.That is, if you will sew 10-centimeter squares, the workpiece for them must be at least 11.2x11.2 mm in size. All unnecessary will go into the seams.
- The size of the finished project and the pieces of fabric used for it are usually arbitrary, unless you follow a specific pattern. Therefore, you can make the shreds as large or small as you like, depending on your skill level.
- If this helps, you can mark the fabric with a washable marker before cutting the fabric.
- 4 Cut out scraps of fabric. Start by concentrating on the front side. Cut out all the pieces to be stitched. Lay the fabric on the cutting mat by pressing down with a ruler and cut with the roller fabric knife. In order not to be mistaken, remember the saying: "Measure seven times, cut once."
- 5 Lay out the pattern. This stage is the most enjoyable. Now you need to lay out your quilting design! Arrange the cut pieces in any pattern you like. The easiest way to do these is on the floor, where there will be plenty of room. Make sure you lay out the pattern correctly, even if you have changed it several times already.
- You may decide to add additional pieces of fabric in a different color or change the pattern at this stage. Just replace some of the cut pieces with others.
- Mark the order of the scraps with sticky notes or chalk marks on each scrap.
- 6 Fold the shreds in order. It is somewhat inconvenient if your shreds remain spread out on the floor, so they should be folded in order. Collect shreds in rows from left to right, placing each next on top of the previous one. You can then mark each row so you know in which order to sew them.
Method 3 of 4: Part Three: Quilting
- 1 Sew the rows. Begin quilting by stitching each individual row. First sew two pieces of fabric from one end of the row. Place them right sides in, and sew a straight seam with a 6mm seam allowance. Then add another square and repeat the procedure. Continue working until you have sewn long, narrow strips of each row.
- Chip off the squares to be sewn to keep them evenly spaced when sewing.
- A consistent allowance for each seam will give you a perfectly smooth finished job. Try to keep all seams with a 6 mm allowance.
- 2 Iron the stripes. On the wrong side of each strip, there will be a large accumulation of seam allowances, so that the finished work is smooth, you need to iron out all the allowances. Smooth out the allowances of each row in the opposite direction (for example, in the first row to the right, in the second to the left, etc.).
- 3 Sew the rows together. The process is the same as for sewing together individual pieces of a row. Take two adjacent rows, fold them right over and sew with a 6mm seam allowance. Repeat this for each subsequent row until you have finished sewing the face of the quilting.
- Even if your rows were not exactly aligned, don't worry, your work will still look good despite mistakes!
- 4 Iron the finished part. Lay the quilter with the wrong side up. In the same way as for smoothing the seams of each individual row, smooth all the seams on the wrong side. Smooth them in opposite directions: 1st row - to the left, 2nd - to the right, 3rd - to the left, etc. High-quality ironing will greatly facilitate further work.
Method 4 of 4: Part Four: Build
- 1 Cut the fabric for the back of the quilting. When the front of the quilting is ready, you will need to cut out the batting and fabric for the back of the work. These parts should be slightly larger than the front to allow for possible puckering of the fabric when sewing. Measure the batting and fabric on the wrong side so that its size is 5-7 cm larger than the front part.
- 2 Sweep up the quilting details. Basting is the process of joining quilling pieces together and chipping them before sewing.There are two ways to sweep parts: with pins and spray glue for fabric. Align the parts in quilting in the correct order so that the back of the project is at the bottom, batting is in the center, and the front is on top. Align all sides, straighten the folds. Move the fabric from the center to the outside as you unfold the fabric.
- If you will be using spray adhesive, lightly dampen each layer before applying the next. Smooth out the fabric after the glue has held all the layers together.
- If you are pinning the design with pins, place them in the center of each square. Work from the center outward.
- If you want to take special precautions, you can use both glue and pins right away. This will definitely secure the layers together before sewing.
- 3 Sew the layers together. Work from the center and sew towards the edges so that excess fabric moves in the same direction and not towards the center. The easiest way to sew quilting layers is to sew stitch-by-stitch. directly along the existing connecting seams or very close to them. You can also sew the stitches diagonally to the squares. You can also sew free direction stitches on your sewing machine.
- If you want to make sure you are stitching in the right place, first draw lines in the right place with a washable fabric marker.
- The more seams you make throughout the project, the better the final result will look. More seams prevent batting from shifting or knocking inside the quilting.
- You can also sew a seam around the perimeter of the quilting when all other seams are ready.
- 4 Cut out the piping. Piping is a strip of fabric that is used to process the edges of the fabric to prevent it from shedding and to give the garment a finished look. You can cut the fabric for piping both along the side, and across it, as well as diagonally, which is more elastic. Cut strips of piping fabric about 7 cm wide and long enough to cover the entire perimeter of the quilting. Sew 4 separate stripes to match the length of each side of the quilting.
- 5 Iron the piping strips. If you have to trim the piping out of a large number of individual strips, smooth the seams first, then fold the piping in half lengthwise with the wrong side inward and iron.
- 6 Pin the piping in place. Apply a piping, closing the project cuts edge to edge from the front of the quilting (the part of the piping that will then be on the back of the quilting should be looking at you at the moment). Use a large number of pins to secure the fabric as shown.
- 7 Stitch the piping with a seam allowance of about 1 cm. As a result of stitching, you should secure the front half of the piping to the front of the quilting. You must do this for two opposite sides of the perimeter. Then fold the piping up and away from the center, exposing the right side of the front of the piping.
 8 Sew on the rest of the piping. Fold in the other two strips of piping. Use the same process to sew them with a 1 cm seam allowance. Fold the fabric up and out of the center, exposing the right side of the front of the piping.
 - 9 Fold the piping over the back of the quilting. Flip the quilting over to the other side. The edges of the edging will stick out up the entire perimeter. Begin tucking the piping inward on one side of the quilting so that the edges of the piping and quilting are aligned. Then place the rolled hem over the back of the quilting. You can iron the piping in such a position that it locks in this position, and then pin it off with pins. Do this around the entire perimeter of the project.
- 10 Finish the edging. Securing the piping on the wrong side is a somewhat difficult process, since the machine stitches will be visible from the face. Those.Two options can be used to minimize the visibility of the stitches: use invisible thread for sewing, or secure the piping on the back side by hand (with regular or blind stitch), avoiding piercing all layers of the fabric. Work all sides of the quilting, making sure the corners are straight and the stitching is straight.
 11 Finish the job. The sewing process ends when the piping is secured! You just have to wash your work if you want to give it a light vintage touch. Otherwise, your quilting is ready. Enjoy the achieved result!
Tips
- When washing quilting jobs, you can use a special anti-shedding agent that absorbs excess dye released by fabrics during washing. This will prevent the color of one fabric from creeping into areas with another fabric.
- If you will be using knitted fabrics (for example, old T-shirts) there are special products with which to iron them to prevent them from stretching. Do not try to use jersey for quilting.
- You can practice quilting on a small project before embarking on a large one.
- When sewing quilting by hand, the main task is to hide the knots inside the batting. When the thread or quilting section runs out, use a needle to tie the knot close to the fabric. Then push the needle back into the fabric. When you feel that you have encountered resistance from the knot, pull the thread sharply so that the knot will slide inside the fabric. Then you can simply cut the thread sticking out of the fabric without worrying about it coming loose.
- Muslin is great for the seamy side of quilting. It comes in wide widths so you don't have to trim multiple pieces of fabric. Plus, it's made from cotton that can be dyed any color you want to suit your project.
- When quilting, special quilting hoops are very helpful. Essentially, these are large embroidery hoops. They stretch the fabric so that it won't wrinkle when stitching. They will also hold the fabric somewhere at the level of your knees. After several hours of work on quilting, the weight of the project increases significantly.
Warnings
- Quilting from start to finish, especially when sewing by hand, takes a long time. You can use the services of a seamstress to assemble the front part of the quilting from the pieces you have prepared.
- Man-made fabrics like rayon and polyester can be used to create wrinkle-resistant quilting, but a person sleeping under such a thing will sweat and feel hot because these fabrics do not "breathe". It is better to use natural cotton fabrics for functional quilting items, and artificial ones for decorative ones.
- When using tailor's chalk to mark the quilting lines on the front side, test on a separate piece of fabric first. Some fabrics may stain from it.
- Take breaks while sewing, especially when sewing by hand. You don't want to hurt your hands or your back.


