Author:
William Ramirez
Date Of Creation:
23 September 2021
Update Date:
1 July 2024

Content
- Steps
- Method 1 of 3: Cardboard pyramid
- Method 2 of 3: Clay pyramid
- Method 3 of 3: Sugar Cubes Pyramid
- Tips
Have you been asked to make a model of an Egyptian pyramid? This is a fun school project that can be done in a variety of ways. The pyramid is easy to make from cardboard, clay, or sugar cubes, among other methods.
Steps
Method 1 of 3: Cardboard pyramid
 1 Stock up on everything you need. The cardboard pyramid has smooth edges and looks like a real pyramid, but it weighs little and does not retain its shape for long. It is likely that most of the materials and tools you need are already at your fingertips. You will need the following:
 - a large box or sheet of smooth cardboard;
- ruler;
- pencil;
- scissors;
- hot glue gun and sticks to it;
- brown or black waterproof marker;
- stationery glue;
- paint brush;
- sand.
 2 Cut a square out of the cardboard. Cut out a 35 by 35 centimeters square. This will be the base of the pyramid.
 - The base can be made of any size, but keep in mind that the size of the other components of the pyramid will also depend on its size.
 3 Cut four triangles out of the cardboard. Using a ruler and pencil, draw four isosceles triangles with a base of 20 centimeters and a height of 30 centimeters on the cardboard.
 - To get an isosceles triangle, place a point in the middle of the base (that is, at a distance of 10 centimeters from its end).
- If your cardboard is thick and difficult to cut, you can use a sharp knife instead of scissors.
 4 Hot glue the triangles together. Place the triangles in the shape of a pyramid so that their vertices touch. You can temporarily tape the triangles together, or have a friend or family member hold them together. Then apply hot glue along the joints of the triangles.
 - Be careful when using hot glue as it can burn you. Keep your hands away from the gun nozzle and glue. When not using the hot glue gun, place it on a safe surface.
 5 Glue the resulting pyramid to the base. Align the undersides of the pyramid with the square base. Apply hot glue along the joints and press the pyramid to the base.
  6 Wait for the glue to dry completely. The glue must dry properly before the next step. Wait a few hours to prevent the pyramid from falling apart.
  7 Draw "blocks" on the pyramid. Take a brown or black marker and draw horizontal and vertical lines that resemble bricks onto the cardboard. This will give the pyramid a more believable look.
  8 Paint the pyramid with office glue. Squeeze some glue into a plate and use a brush to apply it evenly onto the pyramid. Do not forget about the joints so that you can then cover them with sand.
 - You can also grease the cardboard with a glue stick before applying sand.
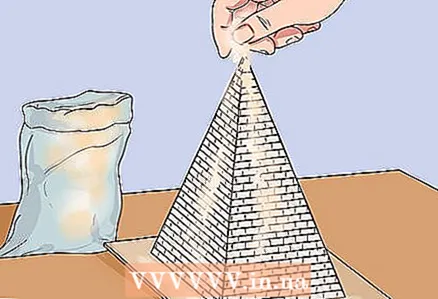 9 Sprinkle sand on the pyramid. Cover the pyramid with sand before the glue dries. Try to sprinkle an even layer of sand on the cardboard so that it evenly covers the pyramid.
 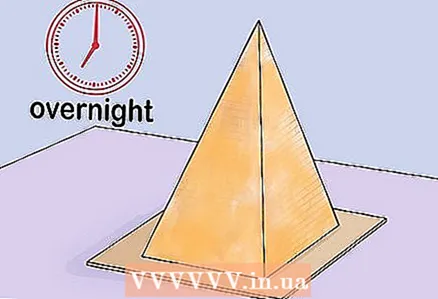 10 Wait for the pyramid to dry. Better to leave it to dry overnight. In this case, the sand will firmly adhere to the glue, and the pyramid will take on a complete look.
Method 2 of 3: Clay pyramid
 1 Stock up on everything you need. In a clay pyramid, you can make characteristic recesses and depressions, which will give it a similarity to the Egyptian pyramids. You will need the following:
 - a large ball of sculpting clay (one that dries in air);
- a sheet of cardboard;
- rolling pin;
- knife;
- ruler;
- pencil;
- scissors;
- paint (sandy brown);
- paint brush.
 2 Cut out the cardboard base. Using a ruler and pencil, draw a square on the cardboard. A 20 x 20 centimeter square will do. You can make a larger base, but in this case you will need more clay. Cut out the drawn square.
  3 Roll out the clay. Make a ball out of the clay and place it on a clean, dry surface. Use a rolling pin to roll out the clay to a thickness of 2.5 centimeters.
 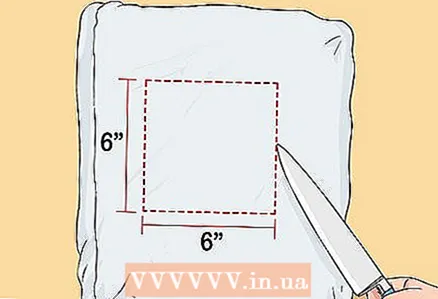 4 Cut a square out of the clay. Cut a 15 x 15 centimeter square out of the clay. Place it in the middle of the cardboard base.
 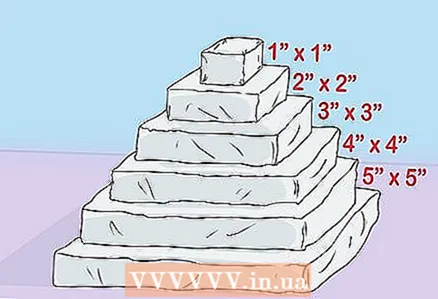 5 Cut the following squares out of the clay. The next layer will be a 12.5 x 12.5 centimeter square. After that, cut out squares of 10 x 10 centimeters, 7.7 x 7.5 centimeters, 5 x 5 centimeters, and finally 2.5 x 2.5 centimeters. Place them one at a time in the middle of the bottom square.
 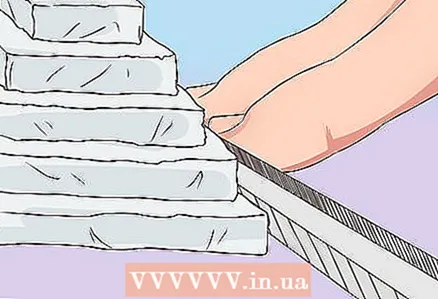 6 Align the edges and make cuts. Press the ruler against the sides of the squares to make them more vertical. You can also make cuts on the sides of the pyramid with a knife, which would resemble grooves from stone blocks.
 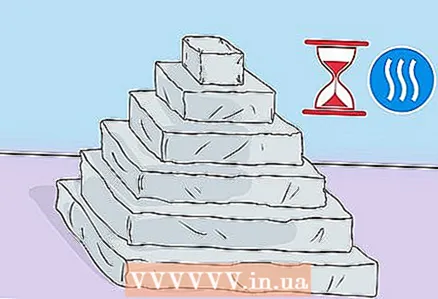 7 Wait for the clay to dry. Leave the pyramid for a few hours or even overnight for the clay to dry and harden. If you are not sure how long the clay takes to dry, check the directions on the package.
  8 Paint the pyramid. Pour paint into a plate and use a brush to apply it evenly onto the pyramid. Alternatively, cover the pyramid with a thin layer of office glue and sprinkle with sand until the glue is dry.
  9 Wait for the pyramid to dry. Leave the pyramid to dry overnight. Then take it to school and show it to the teacher and classmates.
Method 3 of 3: Sugar Cubes Pyramid
 1 Stock up on everything you need. This simple stepped pyramid has no flat sides and is made up of separate "blocks". You will need the following simple materials and tools:
 - a large box of sugar cubes (approximately 400 cubes);
- a sheet of cardboard;
- ruler;
- pencil;
- scissors;
- white stationery glue;
- sandy brown paint;
- paint brush.
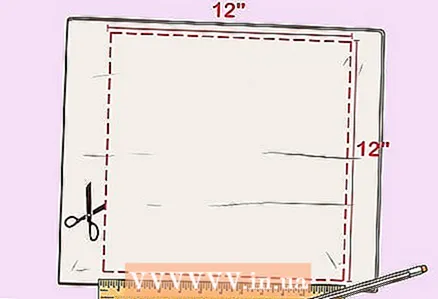 2 Cut a square out of the cardboard. Using a ruler and pencil, draw a 30 x 30 centimeters square on the cardboard and cut it out to form the base of the pyramid.
  3 Make a square of sugar cubes. Place a 10 x 10 square of sugar cubes in the center of the cardboard base (you will need 100 cubes for this). Use stationery glue to glue each cube to the cardboard.
  4 Add a second layer to the pyramid. Place a 9 x 9 cube square (81 sugar cubes in total) in the center of the first layer. Glue each cube.
  5 Continue adding more layers. The side of each next layer will be 1 cube shorter than the previous one: add layers 8 x 8 (64 dice), 7 x 7 (49 dice), 6 x 6 (36 dice), 5 x 5 (25 dice), 4 x 4 (16 dice), 3 x 3 (9 dice), 2 x 2 (4 dice) and finally place one dice on top.
  6 Wait for the glue to dry completely. Leave the pyramid for a few hours to allow the glue to dry properly and to hold the sugar cubes securely in place.
 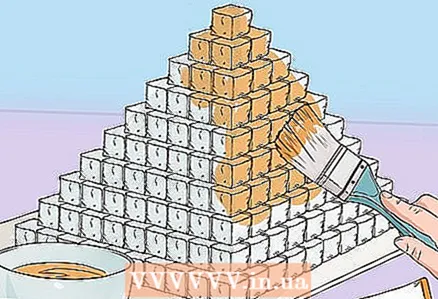 7 Paint the pyramid. Use the brush to paint the entire pyramid sandy brown. Use a small amount of paint when doing this and be careful not to damage the pyramid.
  8 Wait for the pyramid to dry. Leave the pyramid overnight to dry completely. After that, she can be taken to school.
Tips
- Glue can stain everything around, so cover your work surface with old newspapers before starting.
- Decorate the base around the pyramid: add sand, draw the Nile River and other attributes of Egypt.


