Author:
Marcus Baldwin
Date Of Creation:
15 June 2021
Update Date:
1 July 2024
![Windows 8.1 - Beginners Guide Tutorial - Part 1 [Tutorial]](https://i.ytimg.com/vi/qVEvbKg6JNI/hqdefault.jpg)
Content
- Steps
- Part 1 of 7: Home Screen
- Part 2 of 7: Desktop
- Part 3 of 7: General Navigation
- Part 4 of 7: Basic Programs
- Part 5 of 7: Change programs, settings, and appearance
- Part 6 of 7: Better Controls
- Part 7 of 7: Configuring Security
- Tips
- Warnings
Windows 8 belongs to the new generation of Microsoft Windows operating systems. Many features of the system have remained unchanged from Windows 7, and the redesigned design has become more convenient for use on mobile devices.
Steps
Part 1 of 7: Home Screen
- 1 Use of tiles. When you start your computer, after the lock screen and login screen, you will see the start screen. It is intended to replace the Start button from previous versions of Windows. The Start screen contains several rectangles of different colors and sizes. These are the tiles. They are designed to perform the same action that icons performed in previous versions of the OS: when pressed, the program associated with them is launched.

- Some tiles display basic information for the associated program. For example, the Store tile shows the number of apps for which updates are available.
- You can move tiles by holding and dragging. With the release of the Windows 8.1 update, group movement (and editing) of tiles became available.
- 2 The benefits of living tiles. Live tiles change their appearance every few seconds to display different information. Tiles like these are very handy and add dynamism to your home screen, but they are not available for all applications. Live Tiles are especially useful for apps such as News — stay in the loop with updated titles.
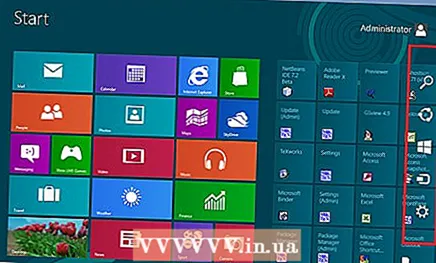
 3 Click the Desktop tile to switch to desktop mode. The start screen should have a tile that enables the traditional desktop mode. For most tasks, this look is not required, but thanks to the classic desktop look, you can quickly get used to the new Windows 8.
Part 2 of 7: Desktop
 1 Use the new Start button. When you switch to desktop mode, you will notice that the traditional Start button has changed slightly. The original version of Windows 8 did not have such a button at all, but with the 8.1 update, it was decided to return "Start". The menu that this button calls is presented in the Metro style (modern Start menu) and does not look like the original version. Selecting the Start button from the Express Buttons menu also brings up the Start menu.
 - The Home screen is actually an expanded and more functional Start menu.
- If you are uncomfortable with switching between the desktop and the Start screen, in Windows 8.1 you can set the Start screen to appear on top of the desktop, making it look more like Windows 7.
- 2 Organize and use your files as in previous versions. When you are on your familiar desktop, you will find that everything remains the same.You can combine files into folders, run programs, open and create files in the same way as in previous versions of Windows.
- 3 Use your desktop as a standalone program. Please understand that Windows 8 treats the desktop as a separate program. This is very important when viewing the taskbar and switching between programs.
- 4 Configure your computer to load the desktop on startup. If desired, you can change the settings and when you start the computer will load directly to the desktop (available starting with Windows 8.1). This option is available under the Navigation tab in the taskbar properties menu.
Part 3 of 7: General Navigation
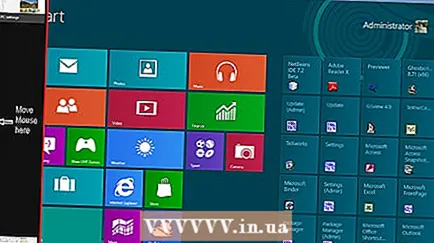
 1 Express buttons panel. To open the Fast Button Menu, move the pointer to the upper-right corner and drag downward. This will bring up the system time and control menus for some of the computer's functions. Be sure to familiarize yourself with the extensive capabilities of this menu.
 - Search is very similar to the All Programs button in the original Start menu. But when you press the search express button for some programs, search in the program itself is now available, and not search on the computer. Be careful.
- The Share button is used when performing tasks such as viewing images. Share items by attaching them to emails, posting to SkyDrive, or using other features depending on the files you choose.
- The Start button will return you to the corresponding menu.
- The Devices button allows you to switch to a second screen or configure and use printers. The available devices depend on the software and hardware available.
- The Options button can open the options for the current program, but it usually launches the PC options. Here you can turn off your computer or put it to sleep, connect to the Internet, control sound, personalization, open the control panel, and much more.
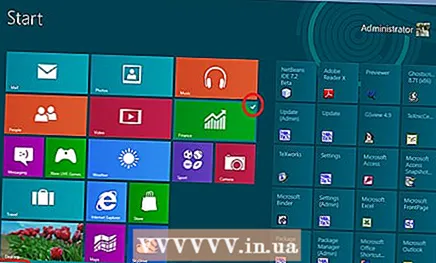
 2 Switch between windows. To switch between windows, programs and applications, hold the pointer in the upper left corner of the screen and press the left mouse button. This will allow you to view the running programs. To quickly jump to a specific program, hold the pointer in this corner and drag down to get to an analogue of the taskbar, where you will see all open programs.
 - Remember, the desktop is a separate program, and you may need to launch the desktop to navigate directly to the desired program.
- 3 Launching programs. To launch programs, click the tiles on the Start menu or the program icons in desktop mode. Creating separate tiles for frequently used programs will be discussed below. As before, programs can be pinned to the desktop taskbar.
- To pin a program to the taskbar for which you cannot quickly find the application icon in desktop mode, find the program using the search express button and select “Pin to taskbar”. This feature is not available for all programs, but pinning to the Start menu is always available.
- 4 Closing programs. Close programs using the familiar "x" button in the upper right corner of the program window. If this button is not available, open the side taskbar (hold the pointer in the upper left corner of the screen and drag down) and right-click the program you want to close.
- You can also use the Alt + F4 combination to close the program, but this way you can close only the program you are currently viewing.
- 5 Using several programs at the same time. As you will notice, for example, when you switch from the Internet access window, where you have a video on YouTube, playback will stop. If you want to use two programs in Windows 8 at the same time, then you need to switch your computer to windowed mode.
- Both programs must be running to switch to windowed mode. Hold the mouse pointer in the upper left corner to bring up the other program you wish to view. Capture an image and then hold it at the edge of the screen until the outline of the program appears. Release the image, after which both programs will be launched and active.
- In Windows 8.1, you can run up to 8 applications at the same time, but this number also depends on the size of your screen. For example, tablets cannot run more than two programs.
Part 4 of 7: Basic Programs
- 1 Office software package. If you have the latest version of the suite of office software installed in the same style as Windows 8, you will notice that the interface has become more elegant. Compared to Office 7, the functionality has remained largely unchanged. If you are familiar with this version of office tools, you can easily upgrade to the new version of the program. In order to improve, some programs have received new functions. Now using office programs has become even easier and more convenient.
- 2 Mail application. This is a very useful application capable of working with all your email accounts in one program. The program can be synchronized with Hotmail, Yahoo, AOL, Gmail or Google, Outlook and many others. You can view, send and organize all your correspondence with one program.
- To add email accounts, click Options on the Fast Key menu, then select Accounts and Add Accounts.
- 3 SkyDrive app. The SkyDrive app lets you store files online and access them from any computer. Files can be stored as private or public, in addition, you can share files with specific people. You can also create folders, upload files, and perform other actions such as refreshing the screen and viewing details by right-clicking on the background of the window.
- SkyDrive usually requires a subscription, but some features may be available for free.
- 4 Application "Store". The Store service allows you to find and download new programs for your device. Some of the programs are free. You will have access to games, productivity apps, social, entertainment and sports programs, reading apps, and more.
- 5 Standard programs. You may need programs like Notepad and Calculator, which were previously found in the Accessories menu. Such programs and utilities are also present in Windows 8. To find them, press the search button on the shortcut menu and scroll all the way to the right.
- Such programs usually run in desktop mode and are perceived as a single program.
- 6 New means of printing. Make sure your printer is configured using the Devices Fast Button. In programs that run on the desktop or have a familiar interface, printing is done in the same way as before. For applications with the new "modern" Windows 8 interface, you will need to find a special print button or call the print dialog using the Ctrl + P hotkey combination.
- 7 Setting up custom tiles. You can create new tiles from the Start menu by right-clicking on the application icon in the search menu. In the same way, you can change the appearance of the tiles by choosing the appropriate size (if available). With third-party software, you can create fully personalized tiles with your own image and text.
Part 5 of 7: Change programs, settings, and appearance
- 1 Installing programs. Programs can be installed the old fashioned way from disks or from the "Store" (discussed above). You can also download and install programs from the Internet, just like in previous versions of Windows.You will have access to a huge variety of programs, but do not forget that not all of them will work (or work correctly) under Windows 8.
- Check the compatibility of the software you are purchasing or download with Windows 8. If you have not yet upgraded to a new system, you can use the Update Assistant or Microsoft Compatibility Checker to check the compatibility of the programs.
- You can also run programs in compatibility mode or look for new drivers that can improve the performance of programs.
- 2 Removing programs. To uninstall some programs, just right-click on the corresponding tile or program icon in the search menu. You can also use the familiar Add / Remove Programs tool. For a quick jump, press the search express button and type Add or Remove Programs in the search bar. The program will be under the Options tab on the right.
- You should understand the difference between uninstalling a program and simply removing a tile. Removing tiles is described in the next paragraph.
 3 Removing tiles. To remove a tile, right-click on it and select Uninstall from Start Menu. This action is different from uninstalling programs because the program will remain installed on the computer and will be available. It just stops showing up in the Start menu.
 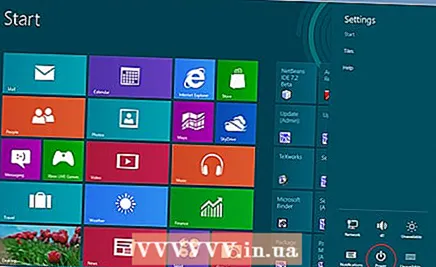 4 Changing six basic parameters. There are six main options available in the Express Key Menu: Network Settings, Volume, Screen Brightness, Notifications, Power, and Keyboard. The purpose of these parameters is self-explanatory and allows for general control of the system.
 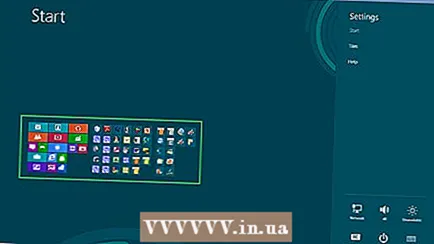 5 Extra options. To change advanced settings, select "Change computer settings" below the six basic settings. This menu allows you to personalize the screen, change user settings, personalize, sync, and more.
 - In desktop mode, there is a more familiar way to change settings.
- 6 Control Panel. For quick access to the control panel, you can find it using the quick search button or by clicking "Control Panel" under the "Options" quick button. To access the control panel and other options, you can position the pointer in the lower left corner and right-click.
- 7 Personalization of the appearance of the device. There are several different ways to change the look of your device. They allow you to personalize your device. If desired, these parameters can be synchronized between different devices, so that every time you will see the same screen in front of you, regardless of the device used.
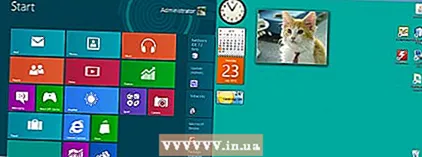
- Personalize your home screen. To change the background and color scheme of the Start screen, select Options from the Fast Key menu, then click Personalize. This action can only be performed from the start screen. In this menu, you can set the Start screen to overlay on top of the desktop instead of a strikingly different screen. Thanks to this, you can also set your own image as the background of the start screen.
- Personalization of the desktop. Right-click on the background in desktop mode and select Personalize. Set the desired background image from those available on your computer or select one of the preset images.
- Personalize your lock screen. To personalize your lock screen background, select Change Computer Settings below the six basic options. Click Personalization and Lock Screen. Click Browse to select your own background images.
- Change the picture of the account. To change your account picture, select Change Computer Settings below the six basic options. Next, click "Personalize" and "Account Picture". You can upload an existing photo or take a new photo using your webcam.
 8 Advanced mode. You can enable the use of a second screen (if available) simply by selecting Devices from the Express Key menu. Click on Second Screen and follow the instructions to select options.
 - To change how the dual-screen taskbar behaves, right-click the taskbar in desktop mode and select Properties.
Part 6 of 7: Better Controls
- 1 Configuring other users. To add new users to your device, select Change Computer Settings below the six basic options in the Settings section of the Fast Key Menu. Click on "Users" and "Add User".
- 2 Create shutdown and restart tiles. You can create separate tiles for easy shutdown or restart of your computer. Start your computer in desktop mode, right-click and select New and then Shortcut, type shutdown / p in the Location field, then click Next. After that, right-click on the new shortcut and select "Pin to Start". Similarly, you can create a reboot tile by typing "shutdown / r / t 0" instead of "shutdown / p".
- 3 Using the task manager. To access Task Manager, which has received badly needed changes, right-click in the lower left corner of the screen, or navigate all the way to the right in the search menu.
- 4 Parental control. Windows 8 has Parental Controls, now renamed to Family Safety. It's easier than ever to use it. Other features include receiving activity reports (reports are sent directly to your mail!), Setting filters, limiting application launch, and creating time limits.
- Family Safety must be enabled when creating a user account.
- Open Control Panel, select User Accounts & Family Safety, Family Safety, and then select the user for whom you want to change security settings.
- 5 Synchronization between devices. To sync the settings of all your devices on Windows 8, simply connect the device to your Microsoft account (sometimes called a Live account) and allow your settings to sync. To change the settings, select Change Computer Settings below the six main options in the Settings section of the Fast Key Menu. Then click "Synchronize settings" and turn on.
- 6 Remember hotkeys. Hotkeys are shortcuts that, when pressed together, perform a specific action. This can be starting and closing programs, starting and shutting down the system, as well as a number of other functions. In addition to the preserved hotkeys from previous versions of Windows, new shortcuts have also been added. There are many hotkeys, among which the most useful are:
- Win or the Windows key brings up the Start menu.
- Win + entering the name will allow you to start searching for applications, programs and files.
- Esc will allow you to undo many actions.
- Win + X will give access to various user commands.
- Win + L will allow you to switch between users.
- Win + C opens the Express Button Menu.
- Alt + Tab will allow you to switch between applications.
- Win + E opens the Windows folder or File Explorer.
Part 7 of 7: Configuring Security
- 1 Built-in protection functions. Built-in protection against viruses and malware is provided by Windows Defender. This is an effective way to protect your computer. If your computer has a preinstalled third-party antivirus, then Defender can be disabled. Use the search menu to launch the defender and test its functionality.
- 2 Setting up a picture password. You can set up a picture password that combines an image with a hand gesture that allows you to log in instead of typing your password. Perhaps this is not the best solution for touch devices, because you can guess your "password" by the footprints on the screen, but the choice is yours.
- In the user settings, click "Login Options" and "Create Picture Password".
- 3 Using the BitLocker tool. BitLocker is a built-in encryption tool in Windows 8 that is used to protect drives. To configure, go to Control Panel, System and Security, then BitLocker Drive Encryption.
- Please keep your recovery key in a safe place, as losing the key can mean the loss of data.
- 4 Security threats when synchronizing devices. Together with convenience, device syncing is a big security risk. By gaining access to your credentials, an outsider can access your files from any Windows 8 device. Weigh the pros and cons to make the best decision.
- 5 Be careful with third party apps. Some applications ask for security permissions that you shouldn't grant, or automatically save more data than necessary. Watch out for app permissions and don't download suspicious programs. Whenever possible, always download apps directly from the store. It's not safe to download apps from third-party sites.
- 6 Use common sense. Using a new system does not mean giving up common sense. Try to avoid suspicious sites and programs. Don't open email messages from unknown people, don't download email attachments from people you don't trust, avoid pages with lots of pop-up messages and download links (such as videos).
Tips
- Set up a Microsoft account to take full advantage of Windows 8.
- One of the new features in Windows 8 is the universal "Spell Checker" in the background. This feature comes in handy when writing a comment on a blog, creating or editing an article on wikiHow or similar sites, prompting you to make corrections. For the convenience of online users, many words from modern computer jargon have been added to the dictionary.
- It is possible to securely install the Windows 8 Preview version in parallel with the existing Windows version. During the installation, pay special attention to the partition where you are installing Windows 8. This installation requires an empty partition.
Warnings
- Be sure to check the software compatibility. Many programs may not work correctly in Windows 8.
- When installing Windows 8 Preview alongside an existing version of Windows, do not leave your computer idle while in Windows 8.
- If Windows 8 automatically goes into standby mode, the subsequent boot of an earlier version of Windows may be accompanied by a report about the violation of the integrity of hard drives. Nothing bad will happen, but it can take some of your time. When Windows wakes up, it cannot choose which partition to return to, which may require manually shutting down the computer and then restarting it.
- The reason lies in the Windows 8 dual boot menu, which is activated by the mouse and has a solid background fill.
- Customize the msconfig.exe file on an earlier OS version. You won't be able to use the menus from Windows 8, but you will get a stable boot.
- When dual-booting or even a clean install of the same system, make sure that the Windows system partition is on the correct partition.
- If you are not sure about the advisability of upgrading to a new version, you can use a boot from a removable device, which allows you to familiarize yourself with the capabilities of the system.A downloadable version for such devices is available for download.
- Don't dual boot if you have little hands-on experience. Numerous articles on wikiHow comprehensively address many issues and provide the necessary knowledge.


