Author:
Carl Weaver
Date Of Creation:
28 February 2021
Update Date:
1 July 2024

Content
- Steps
- Method 1 of 5: Setting up
- Method 2 of 5: Body Position
- Method 3 of 5: Hand Position
- Method 4 of 5: Seated Position
- Method 5 of 5: Exercise
- Tips
- Warnings
Spin the bike, not to be confused with regular exercise bikes, these are block exercise bikes that completely reproduce cycling. Spin bikes are very easy to use and can be used for many types of exercises, regardless of your fitness level. Once you've got your spin bike in a comfortable position, move your lead foot (or pedal) slightly forward and start training!
Steps
Method 1 of 5: Setting up
 1 Adjust the bike seat to hip height. Stand next to the machine to check the seat height. For a smooth and comfortable ride, the seat on the back of the bike should be flush with your hips. It's okay if the initial height of the bike's backs is not at the level you need. Use the lever on the back of the bike to set the seat higher or lower.
  2 Sit on the machine with your legs slightly bent. Place your feet on the pedals. If your legs are perfectly straight, then lower the seat one level to make it more comfortable.
 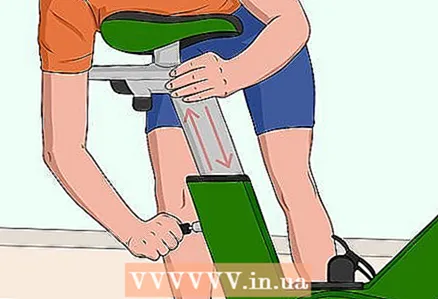 3 Raise the seat if your knees are too bent. Pedal once, pay attention to your knees. If your legs are too bent during rotation, raise the seat one or two levels higher.
 - It may take you a few minutes to find the perfect position on the bike. It's quite normal!
 4 Adjust the seat so that your knees are over your toes. Sit on the machine seat and pay attention to your lower leg. If your knee sticks out in front of your toes, move the seat back to keep your leg straight.
 - Ideally, the distance between the seat and the handlebars should be equal to the distance of your arm from your shoulder to your elbow.
- Use the lever under the seat of the machine to reposition the seat.
 5 Adjust the height of the handlebars so your back is level. Sit on the machine without changing the handlebar position. Can you straighten your back in this position, or do you slouch? Raise or lower the handlebars so that your back is straight and free of stress.
 - You can adjust the steering wheel with a lever.
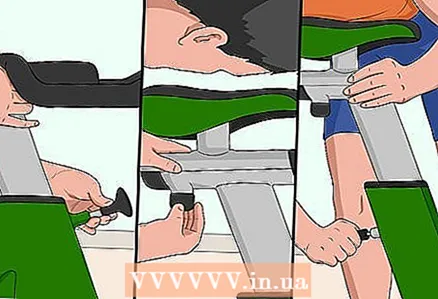 6 Check the machine settings again. Check all bolts and levers on the treadmill and make sure they are secure. After all, you don't need the seat or steering wheel to move during your workout!
 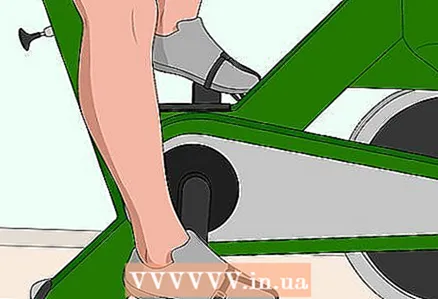 7 Secure your feet with straps. Secure your feet to the pedals to keep them from slipping. On many machines, you can clip or tie your shoes to the pedals to keep your feet still.
  8 Increase the resistance of the pedals for a more intense load. Take a look at the area under the steering wheel, there is a small lever. It controls the resistance of the pedals. To increase resistance, move the lever to the right, making your workout more intense. Reduce the resistance of the pedals by moving the lever to the left.
Method 2 of 5: Body Position
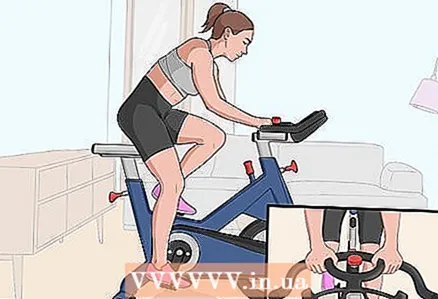
 1 Bend your arms slightly and grab the steering wheel. Do not strain too much while riding the treadmill. Instead, try to keep your elbows slightly bent and your shoulders relaxed. Try to relax so that your workout is as comfortable as possible.
 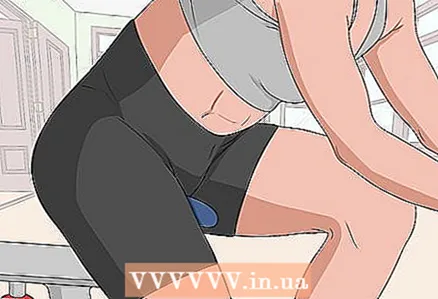 2 Sit on the widest part of the seat. This part of the seat is cushioned for comfort and support during your workout. During your workout, move back if you move slightly off the wider part of the seat.
  3 Grab the steering wheel, your back should be flat with a 25-degree angle off a straight line. Relax your shoulders and keep your hands on the handlebars. Check if you are sitting on the wider part of the seat, if you move forward, you will slouch, which is bad for your health.
  4 Tighten your abs to maintain balance. Like a bicycle, bike backs do not have a seat back to support your posture during exercise. To do this, you need to tighten your abs and maintain balance during your workout.
 - Imagine being slightly pushed, can you keep your balance on the back of the bike, or will you fall?
 5 Pedal smoothly, do not press on them. It's tempting to just pedal all over your feet, but it's not very effective. The pedal straps will help you! Pull the pedals up with each rotation instead of pressing down on them, so that not only the quadriceps will be engaged, but also the hamstrings.
Method 3 of 5: Hand Position
 1 For position 1, place your hands in the center of the U-shaped handlebars. In position 1, place your hands on the lower center of the U-shaped handlebars.
 - This hand position is great for simple endurance and strength training.
 2 For position 2, place your hands around the edges of the handles. Place your hands opposite each other on the tops of the handles. In this position, you should not touch the vertical parts of the handles.
 - This hand position is more versatile and suitable for different positions and techniques.
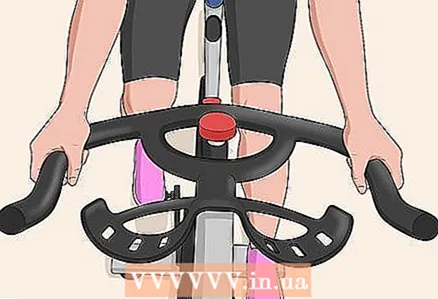 3 Create a 2.5 arm position by placing the arms at the bottom of the vertical bars. Move your hands down to the vertical parts of the handlebars.
 - This is a popular position for strenuous exercises like jumping and uphill exercises.
 4 For position 3, grasp the ends of the handles. Place your hands at the ends of the vertical pieces. This hand position is only used if you plan on standing up.
Method 4 of 5: Seated Position
 1 Get into a normal sitting position and arm position 1, 2, or 2.5. Place your hands on the bottom of the handle; do not use arm position 3 as you are in a seated position. Sit on a wide, soft part of the seat and relax your body. Don't squeeze the handles too hard, just use them as support during your workout. While sitting, try to do 80-110 rpm.
 - When training on the back of the bike, select a pedal resistance level where you can feel the load without overexerting yourself.
 2 Take hand position 2 or 2.5 for seated uphill workout. Seated uphill mode is very similar to regular seated mode - the main difference is that the pedaling resistance gradually increases during your workout, making it feel like you are cycling uphill. Take a comfortable position on the wider part of the seat and relax your body. This exercise requires a higher pedal resistance, so aim at 60-80 RPM.
 - An indoor cycling instructor can help you adjust the resistance of the pedals.
 3 Take a hand position 2 or 2.5 for a normal standing workout. Lift up from the seat and bend your knees slightly while standing on the machine.When changing position, change the resistance level so that you don't slip off the pedals or lose your balance. During this exercise, aim at 80-100 rpm.
  4 Get into hand position 3, rise from the seat for uphill workout while standing. Grasp the ends of the handles while taking the hand position 3. Then, rise up and take a standing position. Move your torso forward slightly, contracting your glutes and core muscles. Hold on to the handles lightly, do not squeeze them hard, push your hips a little back. When standing uphill, aim for 60-80 RPM with the highest pedal resistance.
  5 To perform jumps, move from a sitting position to a standing position with arms in positions 2 or 2.5. Don't worry, you don't really have to “jump” on the machine. Just start in a normal sitting position and move to a standing position. In general, aim for 80-110 RPM during this type of exercise.
 - Jumps are usually performed at regular intervals. For example, do 4 intervals while sitting, then “jump” to a standing position, and again 4 intervals.
Method 5 of 5: Exercise
 1 Burn a lot of calories in a 30 minute speed workout. Start in a standing position with hands in third position, move for 3 minutes at a comfortable speed to warm up. Tune into a 30 second sprint, then 30 seconds at a comfortable pace. Repeat this pattern for 6 minutes, then move to medium pace in third position for 3 minutes. Alternate a 30-second sprint with a 3-minute ride on the back of the bike for 3 sets. Then, cool down for 3 minutes at your own pace.
 - If you are a beginner, try to reach 20 minutes, if you cannot all 30.
 2 45 minutes endurance workout to squeeze out to the max. After reaching an average level, start long training sessions. Move slowly, at a pace convenient for you for 5 minutes, then make a jerk for 1 minute with a resistance of 80-100 rpm. Recover in 30 seconds, and pedal for 90 seconds at 90 RPM. Rest again, then 2 minutes at 80 rpm. Recover breathing in 5 minutes, and repeat 60, 90, and 120 second sets 3 times.
 - At the end of your workout, spin for at least another 5 minutes at any pace to cool down.
- As you gain experience, try to increase your workout time to 1 hour.
 3 Push to the max with 23-minute Tabata workouts. Exercise for 5 minutes at an easy, comfortable pace. Then, do 8 Tabata reps: 20 seconds sprint and 10 seconds recovery at an easy pace. Ride for 5 minutes at a steady pace. Do 8 Tabata reps again: 20 seconds of hard riding and 10 seconds of recovery. Twist for another 5 minutes to cool down after training.
  4 Promote Fat Burning with 20 Minute Back Bike Workouts. Give yourself 5 minutes to warm up. Spin for 5 minutes at a low resistance level, and 5 minutes at a higher resistance. Repeat this cycle 8 times for a great workout for fat burning. When finished, allow yourself to cool by setting the machine to a low resistance level.
 - For a really quick workout, just do sprint and recovery sets.
Tips
- Drink plenty of fluids before starting your workout. Exercise on the back of the bike is intense!
- If you are not motivated to train, start with 10 minutes of back riding and see if you want to continue.
Warnings
- Increase resistance as you move into a standing position. This way you will not slip and lose your balance during the transition.


